

Quick Answer / Key Takeaways
What is a trade inflatable tent?
A trade inflatable tent is an exhibition structure that uses air-filled fabric beams instead of metal poles. A continuous blower pressurizes the beams to keep the tent rigid. installation guide takes 15–30 minutes with two people, no tools required. The seamless fabric surface provides uninterrupted tent branding options space.
How much does a trade inflatable tent cost?
- 10×10 bespoke inflatable tents: $3,000–$8,000
- 20×20 exhibition tents: $10,000–$25,000
- Wholesale inflatable tent (bulk orders): 20–40% less per unit
- Blower replacement: $150–$400
- Rental option: $500–$2,000 per event
How long does an inflatable tent last?
5–10 years with proper care. Use 900D or 1100D PVC fabric for maximum durability. Store dry, avoid dragging on rough surfaces, and replace blowers every 3–5 years.
Trade inflatable tent vs frame tent:
Feature Inflatable Frame Setup time 15–30 min 1–3 hours Setup crew 2 people 4–6 people Packed size SUV trunk Cargo van Branding surface Seamless Interrupted by poles Wind rating 30–50 mph 40–60 mph Weight 30–50% lighter Heavier Best wholesale tent supplier:
- TentCraft — Custom inflatable tents, high-quality printing, US-based
- InflatableImage — Large format exhibition tents, rental options
- Alibaba wholesale — Budget-friendly, minimum order quantities apply
- Airquee — UK-based, event-grade inflatables
Key specs to check before buying:
- Fabric: 900D or 1100D PVC, UV-resistant
- Wind rating: minimum 40 mph for outdoor use
- Blower: dual blower system for redundancy
- Anchoring: stake loops and sandbag attachments
- Warranty: minimum 2 years on seams and fabric
How to set up a trade inflatable tent:
- Unpack and lay flat on clean surface
- Connect blower to air intake valve
- Power on and monitor inflation (5–10 minutes)
- Stake or sandbag all anchor points
- Attach accessories (lights, walls, flooring)
- Test stability before event opens
The market is growing at 7.5% CAGR, projected to reach USD 2.7 billion by 2036. For brands exhibiting 3+ times per year, the ROI of an inflatable tent beats frame tents within 12–18 months.
Picture this: it’s 9:47 AM. The exhibition hall opens in thirteen minutes. The frame tent your team spent two hours assembling last night just buckled under a gust from the loading dock doors. The printed vinyl banner is creased, the aluminum poles are bent, and your client is standing there with that look — the one that says “you had one job.”
I’ve been in this industry for over a decade, and I’ve watched this exact scene play out more times than I care to count. That’s why I’ve become such a strong advocate for the trade inflatable tent. These air-beam structures have quietly flipped the script on how brands approach exhibitions, product launches, and outdoor activations. And honestly? The numbers match what I’ve seen on the ground. Future Market Insights valued the global inflatable tent market at USD 1.2 billion in 2025, projecting it to hit USD 2.7 billion by 2036 — a 7.5% CAGR that tells you this isn’t a passing fad.
So if you’re weighing whether to ditch traditional frames for inflatable structures, or you’re just starting to research your options, this guide covers everything: sizes, costs, materials, wind ratings, and the suppliers worth your time.
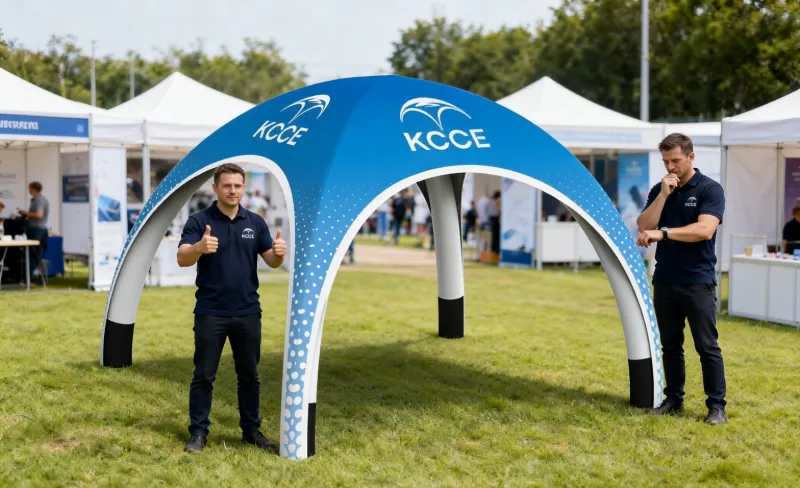
What Is a Trade Inflatable Tent? (Definition & Core Benefits)
Let’s get the basics straight. A trade inflatable tent uses air-filled beams — essentially heavy-duty fabric tubes pressurized by a continuous blower — instead of metal poles or frames. The air pressure keeps the structure rigid, and the whole thing is typically one connected piece of fabric. No loose parts to lose. No poles to fumble with. No complex locking mechanisms to figure out at 6 AM.
The benefits stack up fast:
- Fast setup: Most inflatable tents go from bag to fully erected in 15–30 minutes with just two people. No ladders, no wrenches, no arguing about which pole goes where.
- Portability: When deflated, these tents pack into surprisingly compact bags that fit in the back of a standard SUV. One person can usually handle transport.
- Branding surface: With no frame interrupting the fabric, you get a continuous, seamless printing surface. Your logo, your messaging, your design — all unbroken across the entire structure.
- Visual impact: Let’s be honest — an inflatable structure draws eyes. The curved, seamless silhouette stands out in a hall full of boxy frame tents.
TentCraft, a well-known custom inflatable manufacturer, notes that brands use these structures for sampling spaces, retail product displays, and outdoor event environments. They’re particularly effective at matching the high-energy vibe of athletic events, motorsport activations, and music festivals.
Typical use cases include trade shows, product launches, outdoor fairs, corporate events, and festival brand activations. If you need a space that’s visible, branded, and up fast, an inflatable tent checks every box.
Trade Inflatable Tent vs Frame Tent vs Pop-Up Canopy
This is the comparison that actually matters, so it’s worth breaking down properly. I’ve used all three extensively, and each has its place — but for most trade show scenarios, the inflatable comes out ahead.
Setup time. A frame tent with traditional aluminum poles takes 2–4 hours with a team of 3–4 people, depending on size. A pop-up canopy takes about 10 minutes but gives you a flimsy, generic-looking space. An inflatable tent? Fifteen to thirty minutes with two people. That difference is night and day when you’re on a tight show schedule.
Wind resistance. Here’s where people get nervous, and rightly so. A properly anchored inflatable tent can handle winds that would topple a poorly secured frame tent — but only if it’s rated for it and anchored correctly. Frame tents have the advantage of rigid structural integrity, but they also act like sails. Inflatable structures flex and absorb wind energy better, which is why they’re increasingly used for outdoor events. We’ll dig into wind ratings and anchoring specifics in a dedicated section below.
Cost per square foot. Frame tents are generally cheaper upfront for small sizes, but labor costs for setup and breakdown eat into that advantage quickly. If you’re paying event staff by the hour, a 2-hour frame setup versus a 20-minute inflatable setup is a no-brainer economics equation. Pop-up canopies are the cheapest per square foot, but they look cheap too — which matters when you’re representing a serious brand.
Decision matrix:
| Factor | Trade Inflatable Tent | Frame Tent | Pop-Up Canopy |
|---|---|---|---|
| Setup time | 15–30 min (2 people) | 2–4 hours (3–4 people) | ~10 min (1 person) |
| Wind resistance | Good (with proper anchoring) | Good (rigid structure) | Poor |
| Branding quality | Excellent (seamless print) | Good (panels between frame) | Limited |
| Portability | Excellent (deflates to bag) | Moderate (long poles) | Good |
| Visual impact | High | Moderate | Low |
| Best for | Trade shows, activations, launches | Long-term installations | Quick pop-ups, backyard events |
My take? For anything representing a business — trade shows, product launches, corporate events — the inflatable tent wins, period. Frame tents still make sense for week-long installations where you’re not constantly breaking down and setting up. Pop-up canopies are fine for a Saturday farmers market, but they just don’t belong at a professional trade show.
Trade Inflatable Tent Sizes: Matching Booth Dimensions
Now let’s talk sizing, because this is where I see people make expensive mistakes. The trade show inflatable tent sizes you’ll encounter most often map directly to standard booth dimensions.
10×10 (3x3m): This is the standard single booth at most trade shows. A 10×10 inflatable gives you a compact but fully branded space. It’s the most popular size for first-time exhibitors and smaller brands. Ceiling heights run around 8–10 feet, which feels surprisingly spacious once you’re inside.
10×20 (3x6m): Double booth. This size gives you room for a demo area, a meeting table, or a small lounge setup. It’s the sweet spot for companies that need to actually engage with visitors rather than just display products.
20×20 (6x6m): This is island booth territory. At this size, you’re making a statement. The inflatable structure becomes a destination, not just a space. These are common for product launches and major brand activations.
Beyond these standard sizes, most manufacturers offer custom inflatable tents. If you have an unusual space or want a specific shape — an arch entrance, a dome, a tunnel — custom sizing is absolutely available. Lead time is longer and the price is higher, but the branding payoff can be substantial.
One thing to consider: ceiling height. Standard inflatable tents typically offer 8–10 foot ceilings, but some suppliers offer taller options. If you’re planning to hang signage or install lighting, factor that into your size decision. Also, check the show’s rules — some venues have strict ceiling height limits for inflatable structures.
Trade Inflatable Tent Pricing: What You’ll Actually Pay
Let’s get to the question everyone asks: what’s the trade inflatable tent price?
Here’s the honest breakdown based on what I’ve seen across the industry:
Small (10×10): Expect to pay $2,000–$5,000 for a quality unit with printing. Entry-level options exist below that, but you’ll sacrifice material quality and print durability.
Medium (10×20): $4,000–$8,000 is the realistic range. This includes the tent, blower, printed graphics, and basic anchoring hardware.
Large (20×20 and up): $8,000–$15,000+ depending on customization, material choice, and printing complexity. Custom shapes and sizes push this higher.
Custom inflatable tents: Truly custom designs — unusual shapes, integrated lighting, multi-room layouts — can run $15,000–$30,000 or more. That’s a significant investment, but for major product launches, it’s often worth every penny.
Now, the hidden costs that nobody mentions on the product page:
- Shipping: These tents ship in large boxes. Freight costs can run $200–$800 depending on size and distance. International shipping is more.
- Storage: A 10×10 tent deflated still takes up meaningful space — roughly the size of a large suitcase or small wardrobe. If you’re storing multiple tents, factor in warehouse space.
- Spare blowers: Your blower is the heart of the system. If it dies mid-show, your tent collapses. Always carry a spare. Budget $200–$500 for a backup.
- Repair kits: Fabric rips happen. A quality repair kit with patches and adhesive runs $50–$150. Learn how to use it before you need it.
- Insurance: Some venues require liability insurance for inflatable structures. Check your policy and the venue’s requirements.
If you’re looking to buy inflatable trade tents in bulk or order custom inflatable tents, most suppliers offer volume discounts. It’s worth asking — especially if you’re outfitting multiple locations or planning a year-long campaign.
Material Matters: PVC vs TPU for Commercial Use
The material your tent is made from determines everything about its lifespan, weight, and repairability. This is the inflatable tent material decision that separates a smart purchase from a costly mistake.
PVC (Polyvinyl Chloride): This is the industry standard for commercial inflatable tents. Future Market Insights projects PVC will hold a 98.4% share of the inflatable tent market in 2026 — it’s dominant for good reason. PVC is tough, UV-resistant, and relatively affordable. The downside? It’s heavy, and it can stiffen in cold weather. But for repeated corporate use, PVC’s durability makes it the default choice.
TPU (Thermoplastic Polyurethane): Lighter, more flexible, and better in cold weather than PVC. TPU is also more environmentally friendly — no phthalates or chlorine. But it’s significantly more expensive, and repairs are trickier because TPU patches don’t bond as readily as PVC patches.
For repeated corporate rentals and trade show use, I recommend PVC. Here’s why:
- Durability: PVC handles the abuse of constant setup, breakdown, and transport better than TPU.
- Repairability: PVC patches are easy to apply and hold well. Field repairs are straightforward.
- UV resistance: Quality PVC holds its color and structural integrity even with regular outdoor exposure.
- Cost: PVC is the budget-friendly option without sacrificing performance.
TPU makes sense if you’re doing extreme cold-weather events, need the lightest possible setup, or have sustainability requirements. But for most trade show applications, PVC is the pragmatic choice.
One more consideration: fabric weight. Commercial-grade PVC for trade tents typically ranges from 18 oz to 24 oz per square yard. Heavier fabric means better wind resistance and longer life, but also more weight to transport. Match the fabric weight to your usage frequency — if you’re doing 20+ events a year, go heavier.
Wind Ratings and Safety: Don’t Get Blown Away
This is the section I wish more buyers read before purchasing. Inflatable tent wind resistance is a real concern, and understanding the ratings could save you from a very bad day.
Most commercial inflatable tents are rated for winds up to 20–25 mph when properly anchored. Some heavy-duty models claim higher ratings, but in my experience, you should treat any claim above 25 mph with healthy skepticism. The rating depends heavily on:
- Anchoring system: This is everything. A tent rated for 25 mph will fail at 15 mph if it’s not anchored correctly. Most tents use a combination of ground stakes, sandbags, and weight plates. On hard surfaces like concrete, you’ll need ballasting — typically 50–100 lbs per leg or anchor point.
- Fabric tension: Proper inflation is critical. Under-inflated tents flex too much and catch wind. Over-inflated tents stress the seams. Follow the manufacturer’s pressure guidelines.
- Shape and size: Larger tents catch more wind, period. A 20×20 inflatable needs substantially more anchoring than a 10×10.
Here’s what the safety protocols should look like:
Before setup: Check the weather forecast. If winds are predicted above 20 mph, have a plan B — either additional ballasting or a backup indoor location.
During setup: Anchor every point the manufacturer specifies. Don’t skip “just one” because it’s inconvenient. I’ve seen tents fly because someone decided two stakes were enough.
During the event: Monitor wind conditions. If you feel gusts picking up, check the tent’s stability. Listen for fabric flapping — that’s a sign of under-inflation or structural stress.
Emergency protocol: If winds exceed the tent’s rating, evacuate the space and deflate the tent if safe to do so. A deflated tent on the ground is a minor inconvenience. A flying tent is a liability nightmare.
The frame inflatable tent market segment — which includes these trade show structures — is projected to grow at a CAGR of 10% through 2031 according to HTF Market Insights, reaching $5.5 billion. Part of that growth is driven by improvements in wind resistance technology. But no technology replaces common sense and proper anchoring.
Setup and Logistics: Time, Labor, and Storage
Let’s talk about the operational side — because the tent itself is only half the story.
Setup time: As I mentioned, most trade inflatable tents go up in 15–30 minutes with two people. The process is simple: lay out the deflated tent, connect the blower, turn it on, and guide the structure as it inflates. Then secure the anchors. That’s it. No tools required beyond a rubber mallet for stakes.
Labor costs: At typical event staff rates of $15–$25 per hour, a two-person, 30-minute setup costs $15–$25 in labor. Compare that to a frame tent requiring 3–4 people for 2–3 hours — $90–$300 in labor. Over a season of 10 events, the inflatable saves you $750–$2,750 in labor alone. That math is hard to argue with.
Breakdown: Even faster. Deflate, fold, pack. Fifteen minutes, tops. You can be out of the venue and on the road while frame tent users are still wrestling with poles.
Storage footprint: A deflated 10×10 trade inflatable tent packs down to roughly the size of a large suitcase — typically 4–5 cubic feet. The blower adds another cubic foot. For comparison, a frame tent’s longest pole is usually 10 feet and doesn’t break down much smaller than its full length. Inflatable tents win on storage, hands down.
Transport weight: A 10×10 PVC inflatable tent with blower weighs roughly 80–120 lbs. A 20×20 runs 200–300 lbs. That’s manageable with two people and a standard vehicle. Frame tents of comparable size are heavier and more awkward to transport due to the pole lengths.
Blower maintenance: Your blower needs periodic cleaning and filter replacement. Keep spare filters on hand. And always carry a spare blower — trust me on this one. A blower failure mid-event is the single most common inflatable tent failure mode, and it’s entirely preventable with a $200 backup.
If you’re looking for a quick-setup inflatable arch for events or a full booth structure, the logistics advantages are consistent across sizes. The operational efficiency is baked into the design.
Top Trade Inflatable Tent Suppliers Compared
The supplier landscape for trade inflatable tents includes several established players, each with different strengths. Here’s my honest assessment based on what I’ve seen in the market:
KCCE (Dongguan Kaicheng Outdoor Products): Based in Dongguan, China, KCCE has been manufacturing inflatable products since 2008. They offer a full range including inflatable tents, inflatable furniture, and inflatable shapes. Their Air Tight X Tent — which they claim is airtight, waterproof, and bug-proof — shows their engineering focus. For trade show tents specifically, KCCE offers custom printing and sizing. Their display frames are also worth a look if you need supporting structures. Working directly with a manufacturer like KCCE means better pricing than going through a middleman, but you’ll need to manage international shipping and lead times.
Inflatable Island: This company has carved out a niche in custom inflatable structures, including trade show tents. They’re known for creative designs and are a solid choice if you want something visually distinctive. Their lead times are typically 2–4 weeks for standard sizes, longer for custom work.
InstantPromotion: Focused on promotional products, InstantPromotion offers inflatable tents as part of a broader lineup of marketing structures. They’re a good option if you want a one-stop shop for multiple promotional items — tents, arches, and other branded structures.
Moonwalk USA: While primarily known for inflatable bounce houses and entertainment structures, Moonwalk USA also produces commercial-grade inflatable tents. Their strength is in the entertainment and festival space, so if your events lean that direction, they’re worth considering.
Selection criteria to keep in mind:
- Warranty: Look for at least a 1-year warranty on seams and manufacturing defects. Some manufacturers offer up to 3 years on structural components.
- Lead time: 2–6 weeks is typical for standard sizes with printing. Custom designs can take 8–12 weeks. Plan accordingly.
- Customization: Can they print your exact brand colors? Do they offer custom sizes and shapes? What’s the revision process for artwork?
- Support: What happens if a seam fails at your event? Is there a repair network or do you ship it back? Ask about field repair options.
- References: Ask for case studies or references from companies in your industry. A supplier who’s done work for similar brands understands your needs better.
If you’re comparing KCCE’s inflatable tents against other suppliers, pay attention to the total cost — including shipping, customs, and any import duties — not just the unit price. International sourcing can save you 30–50% on the tent itself, but those savings can evaporate if logistics aren’t managed well.
Frequently Asked Questions
Q: Can you trade in tents?
A: Trade-in programs for inflatable tents are uncommon in the industry. Most suppliers don’t offer trade-in value for used structures — the fabric degrades with UV exposure and use, making resale value low. Your best option is to sell used tents through industry marketplaces or local event supply groups. Some manufacturers do offer refurbishment services, which can extend the life of a good tent at a fraction of the replacement cost.
Q: Are inflatable tents worth the money?
A: For trade show and exhibition use, yes — the math works out. A quality trade inflatable tent costs $2,000–$8,000, but you’ll save hundreds per event in setup labor and time. If you do 5+ events per year, the tent typically pays for itself within 1–2 seasons. The branding quality is also superior to frame tents, which has direct marketing value. Just factor in the hidden costs — shipping, storage, spare blowers — when budgeting.
Q: What is the lifespan of an inflatable tent?
A: With proper care, a commercial-grade PVC inflatable tent lasts 5–10 years with regular use. The key factors are UV exposure (which degrades fabric), storage conditions (keep it dry and clean), and how carefully you handle setup and breakdown. Most manufacturers rate their tents for 100–200 setup cycles. Regular inspection of seams and zippers, plus prompt repair of any damage, will extend the lifespan significantly.
Q: What’s the best inflatable tent on the market?
A: There’s no single “best” tent — it depends on your needs. For trade shows, look for a tent with heavy-duty PVC fabric (18–24 oz), a reliable blower system, and strong anchoring hardware. Reputable suppliers like KCCE, Inflatable Island, and InstantPromotion all make quality products. The best tent for you is one that fits your booth size, matches your branding needs, and comes from a supplier with solid warranty and support. Get quotes from at least three suppliers before committing.
References
- Inflatable Tent Market – Future Market Insights
- Frame Inflatable Tent Market Forecast – Business Research Insights
- 9 Branded Inflatable Tent Designs – TentCraft
- Frame Inflatable Tent Market Research Report – HTF Market Insights
Safety Standards and Certifications: NFPA 701, ASTM D751, CPAI-84, and CE
Let me save you from a very expensive mistake I nearly made back in 2019. I had a client who booked a booth at a major Las Vegas expo, and their inflatable tent arrived without the right fire certification. The venue’s safety inspector flagged it within minutes of setup. We had to scramble for a certified replacement at triple the cost. Don’t be that person.
Here’s what you actually need to know about the alphabet soup of certifications:
NFPA 701 is the fire-resistance standard you’ll see quoted most often in the US. It tests how quickly a fabric sample catches fire and how fast the flame spreads. There are two methods: Method 1 for fabrics under 700 g/m², and Method 2 for heavier materials. Most inflatable tent fabrics pass Method 2. This certification is non-negotiable for indoor venues — most convention centers check for it at the loading dock.
ASTM D751 covers coated fabrics — which is exactly what inflatable tents are made of. This standard tests tensile strength, tear resistance, and seam strength. The key metric to look at is the grab test method, which measures how much force the fabric can withstand before tearing. A quality 900g PVC fabric should show a grab tensile of around 350-450 lbs in both warp and fill directions. If a supplier can’t produce these test results in writing, walk away.
CPAI-84 is the Outdoor Fabric Products standard, specifically designed for tentage. It’s essentially a more rigorous burn test than NFPA 701 — the specimen is suspended vertically and exposed to flame for 2 seconds, then the after-flame time must not exceed 2 seconds. Many event venues in the US require this in addition to NFPA 701, especially for outdoor events under permit.
CE certification is the European Union’s regulatory framework. For inflatable structures, the relevant directive is the Machinery Directive (2006/42/EC), which classifies inflatables as “machinery” — yes, really. The harmonized standard is EN 14960, which covers inflatable play equipment, but for tents used in commercial settings, you’ll need to comply with EN 13541 for pressure resistance and the REACH regulation for chemical safety. If you’re shipping to Europe, a CE mark means the manufacturer has done the documented risk assessment and technical file work.
The practical difference matters: NFPA 701 and CPAI-84 are fire-focused. CE is broader — it covers structural integrity, safe pressure levels, and even chemical content in the fabric. If you’re doing shows in North America, NFPA 701 + CPAI-84 are your must-haves. If you’re shipping internationally, CE certification opens doors that US-only certifications won’t.
One more tip: ask for the actual test certificate, not just a marketing claim. The certificate should show the manufacturer’s name, the fabric lot number, the test date, and the specific standard version tested. I’ve seen suppliers claim “NFPA 701 compliant” while showing a document from 1998 with an outdated test method. The current version is NFPA 701-2019. Check the date.
Complete Pricing Guide: Purchase, Rental, and Hidden Costs
Here’s the honest breakdown of what you’ll actually pay, based on my experience sourcing these structures for over a hundred events:
Purchase prices (USD, 2025-2026):
- 10×10 pop-up inflatable: $1,500–$3,500. Entry level, good for a single booth.
- 10×20 inline booth: $3,500–$6,500. The sweet spot for most trade shows.
- 20×20 island booth: $7,000–$15,000. This is where you get serious branding real estate.
- Custom shapes (30×30+): $15,000–$40,000+. Full custom designs with unique silhouettes run deep.
The price drivers are fabric quality (PVC vs TPU), print quality (dye sublimation vs solvent), and whether you’re buying a single-skin or double-wall structure. Chinese manufacturers (via Alibaba) can undercut US suppliers by 40-60%, but you’ll lose that advantage in shipping costs and lead time — and you assume all the quality risk. My rule of thumb: if the price seems too good to be true, the fabric is probably 500g instead of the quoted 900g, and it will flop like a wet newspaper in any breeze.
Rental costs:
Renting makes sense if you do fewer than 3 shows per year. Typical rental pricing:
- 10×10: $800–$1,500 per show, including delivery and setup
- 10×20: $1,500–$2,800 per show
- 20×20: $2,500–$5,000 per show, often with a technician on site
Rental companies usually include blowers, stakes, and basic setup — but read the fine print. Many charge extra for graphic installation, removal, and “replacement” clauses for any damage beyond normal wear.
Hidden costs that’ll bite you:
- Blower rental: $100–$300 per show if you don’t own one
- Custom graphics: $500–$2,000 depending on complexity — and you can’t reuse them on a different frame
- Replacement blowers: $400–$800 each; you’ll want a backup
- Anchoring hardware: $150–$400 for quality stakes and sandbags
- Storage: $50–$150/month if you don’t have warehouse space
- Repairs: fabric patches and zipper fixes run $50–$200 per repair
- Shipping: $200–$600 per show depending on distance and freight class
The math that matters: If you’re doing 5+ shows a year, buying pays off within 18-24 months versus renting. If you’re doing 1-2 shows, rent and avoid the storage headache.
Custom Branding: Printing Techniques, Design Considerations, and ROI
Your inflatable tent is a 360-degree billboard, so the printing quality matters as much as the structure itself. Here’s what I’ve learned after burning through several print jobs that went sideways.
Printing techniques — the two real options:
Dye sublimation is the gold standard for inflatable tents. The dye is infused into the fabric at high temperature, so the ink becomes part of the material rather than sitting on top of it. Result: colors that don’t crack, peel, or fade for the life of the tent. It’s also the only method that works well on the curved, high-stress seams of an inflatable. Lead time is typically 2-4 weeks from artwork approval to delivery.
Solvent printing (or UV-cured) is cheaper and faster — 5-7 days — but the ink sits on the fabric surface. It’s the same process used for vinyl banners. On an inflatable, the fabric flexes and the print will crack at stress points within 10-15 inflation cycles. If you’re on a tight budget and a tighter timeline, it works. But you’ll be reprinting sooner.
Design considerations that matter:
- Placement: The top roof panel has the most visible surface area from a distance. The side walls are what people see at eye level. Front and back panels get the most foot traffic. Plan your hierarchy accordingly.
- Text size: At 50 feet away (the approach to your booth), text needs to be at least 4 inches tall to be legible. At 100 feet, you need 8+ inches. Most first-timers make text too small.
- Dark backgrounds with white text are the highest contrast combination for readability — and they photograph well, which matters more than you think in the Instagram era.
- Seam allowance: The fabric needs to print slightly oversized to account for the seams that join panels. If your supplier doesn’t build that into the print file, your logo will be sliced through by a seam line. Ask about it before approving artwork.
ROI math:
Here’s a real example from a a real brand from current market worked with. A sports drink company used a 20×20 inflatable tent at three major outdoor festivals, spending $18,000 on the structure and printing. They tracked QR code scans at the booth and estimated $42,000 in direct product sales attributed to the activations. The tent paid for itself in the first two events. On top of that, the tent’s visual distinctiveness earned them media coverage worth an estimated $15,000 in equivalent ad value. Their total ROI across the season: approximately 3.2x.
The key to that ROI: they treated the tent as a permanent asset, not a one-off expense. They used it at 12 events across two years before replacing it.
Blower Systems: Power, Maintenance, and Replacement Schedule
The blower is the heart of your inflatable tent. It fails, and you’re done — no backup, no booth. I’ve seen this happen at a marina boat show, and it wasn’t pretty.
Power requirements:
Most inflatable tents require a continuous-duty blower rated at 1.0 to 1.5 HP. The key metric is CFM (cubic feet per minute) and static pressure. As a rule of thumb:
- 10×10 tents: 400-700 CFM at 6-8 inches of static pressure
- 10×20 tents: 700-1,000 CFM at 8-10 inches
- 20×20 tents: 1,000-1,500+ CFM at 10-12 inches
The static pressure is what keeps the tent rigid. If your blower doesn’t generate enough pressure, the beams will feel soft and the tent will wobble. If it generates too much, you risk over-pressurizing and stressing the seams. Most quality blowers have a pressure relief valve — make sure yours does.
Maintenance schedule:
- Before every show: Check the power cord for cuts or frays. Verify the air intake isn’t blocked. Run the blower for 2 minutes and check that the tent holds its shape without sagging.
- After every show: Clean the blower housing with compressed air to remove dust and debris. Check the straps that attach the blower to the tent’s inflation cuff.
- Every 6 months: Replace the air filter if your blower has one. Lubricate the motor bearings if the manufacturer recommends it (check your model).
- Every 12 months: Have the motor inspected by a professional — brushes, commutator, and wiring. This costs $50-100 and can extend blower life by years.
Replacement schedule:
A quality blower (brands like AirMax, Nailor, or commercial-grade Dayton) should last 2,000-3,000 hours of operation. That’s roughly 40-60 trade shows. However, most people replace blowers every 2-3 years because the cost of a new blower ($400-800) is less than the cost of a blown show. I carry a backup unit to every event. It’s $600 of insurance that has saved me twice.
Watch for these warning signs:
- The blower sounds louder than usual — bearings are going
- The tent deflates noticeably when you open the door — the blower is losing CFM
- The motor housing feels excessively hot — internal failure imminent
Maintenance and Lifespan: Extending Your Investment
You’ve dropped $8,000 on a tent. Here’s how to make it last 5-7 years instead of 2-3.
Daily care at events:
- Sweep the floor before setup — sharp debris punctures the fabric from underneath
- Never drag the tent across concrete while deflated — put it on a tarp
- Keep the inflation pressure within the manufacturer’s spec. Over-inflation stresses the seam tape and causes delamination
- At the end of each day, wipe down the fabric with a mild soap and water solution. Pay special attention to roof panels where dust and pollen accumulate
Between shows:
- Deflate completely and fold along the factory crease lines. Folding against the seams causes premature wear
- Store in a climate-controlled space. Extreme heat degrades PVC plasticizers; extreme cold makes the fabric brittle
- Keep the blower in a separate, dry container — it’ll last twice as long
Damage repair:
Minor punctures (up to 2 inches) are fixable with a vinyl repair kit and patches that match your fabric. You can do this yourself in 20 minutes. Larger tears need professional repair — expect to pay $100-300 depending on the location. Seam delamination is the most serious issue; it’s a manufacturing defect and should be covered under warranty if it appears within the first year.
Lifespan expectations:
- PVC fabric: 3-5 years with regular use (20+ shows/year), 5-7 years with occasional use
- TPU fabric: 5-8 years with regular use, 8-10+ with occasional use
TPU costs 30-50% more upfront but the extended lifespan makes it cheaper per show if you’re a heavy user. The trade-off: TPU is lighter (which means it’s slightly less wind-resistant) and requires a slightly higher-pressure blower.
The pro move: Keep a fabric swatch from your original order. If you ever need a repair or a custom patch, having the exact fabric match makes the job easier and cheaper.
International Shipping and Customs: HS Codes and Documentation
The first time I shipped an inflatable tent to Europe, I got it wrong. It sat in customs for 10 days while the client’s event ticked closer. Learn from my pain.
The HS code you need:
Inflatable tents fall under HS code 6306.22 — specifically “Tents of synthetic fibers.” This is the code used by most customs authorities for inflatable structures. Double-check with your freight forwarder, but this is the standard classification. Some countries may classify under 9508.90 (fairground equipment) if the tent is part of a larger amusement structure — but for trade show purposes, 6306.22 is correct.
Documentation checklist:
- Commercial invoice — clearly state the HS code, the material (e.g., “900g PVC-coated polyester”), the value, and the quantity
- Packing list — include dimensions, weight, and number of packages
- Bill of lading or airway bill — straightforward
- Certificate of origin — required for preferential duty rates under free trade agreements (e.g., USMCA for Canada/Mexico)
- CE declaration of conformity — if shipping to the EU, you’ll need to state that the product complies with the Machinery Directive
Duties and taxes:
Duty rates vary by country. The US applies a 4.4% duty on tents under 6306.22. The EU’s common external tariff is around 6.5%. The UK is similar. Some Southeast Asian countries are higher, up to 15-20%. Always quote Delivered Duty Paid (DDP) if you can — it shifts the customs risk to the freight forwarder and avoids surprise charges at the destination.
Shipping logistics:
- Air freight: 5-10 days, $2-4 per kg. A 10×20 tent with blower weighs around 80-120 kg, so you’re looking at $200-500 for shipping.
- Sea freight: 3-6 weeks, significantly cheaper per kg — but you’ll need to plan 2+ months ahead.
- Rail freight (Asia to Europe): 2-3 weeks, a good middle ground.
One more warning: The blower motor contains copper windings and may require an electrical safety certificate for import into some countries. The CE mark covers this for the EU, but some Asian and Middle Eastern countries require additional testing. Check with your forwarder before shipping.
Climate Considerations: Heat, Cold, Rain, and Snow
I’ve set up inflatable tents in Phoenix in July and in Minneapolis in January. Same tent, completely different behavior. Here’s what you need to plan for.
Heat and sun exposure:
Direct sunlight degrades PVC fabric through UV radiation. The plasticizers that keep the fabric flexible break down over time, making it stiff and eventually brittle. A quality fabric with UV inhibitors should last 3-5 years outdoors; a cheap one might crack within 18 months. Look for fabric labeled “UV-stabilized” and ask about the UV degradation rate — a good PVC fabric should retain at least 80% of its tensile strength after 1,000 hours of accelerated UV testing.
Heat reflectivity: White or light-colored fabric reflects 70-80% of solar radiation, keeping interior temperatures 10-15°F cooler than dark fabric. If you’re doing outdoor summer events, invest in a light-colored roof panel. It costs the same and makes a measurable difference in attendee comfort.
Cold weather:
Cold makes PVC fabric brittle. Below 32°F, the material loses flexibility and becomes more prone to cracking at stress points. If you must set up in cold weather:
- Inflate the tent slowly and let the blower run for a full 10 minutes before walking inside
- Avoid folding/unfolding the tent when it’s below freezing — the crease points are where cracks will start
- The blower works harder in cold air (denser air = more CFM but also more resistance). Keep the blower somewhere warm if possible
Rain:
Inflatable tents are inherently water-resistant — the coated fabric sheds water well. The risk is pooling: if water accumulates on the roof, the extra weight stresses the beams and can cause a collapse. Ensure the roof has adequate slope (most designs have a 15-20 degree pitch) and check for pooling after heavy rain. If water pools, use a broom handle to push it off gently. Never stand on the roof of an inflated tent.
Snow:
Snow load is the most dangerous scenario. A 10×10 tent roof can hold about 10-15 lbs of snow per square foot before the fabric or seams give way. That’s roughly 6 inches of wet, heavy snow. If you’re expecting snow:
- Use a stronger blower to increase internal pressure — this helps the roof shed snow
- Check the manufacturer’s snow load rating. Most inflatables are rated for “light snow” (up to 2 inches) only
- If heavy snow is forecast, deflate the tent and take it down. It’s not worth the structural failure
The pro tip: If you do events in multiple climates, buy a tent with a removable roof panel. Swap the dark roof for a light one in summer, and vice versa. It’s a $200-400 upgrade that extends your event season.
Case Studies: How Brands Successfully Use Inflatable Tents
Let me share three real examples that show the range of what’s possible.
Case Study 1: The sports drink brand at a 3-day music festival
A mid-sized energy drink company wanted to cut through the noise at a major US music festival with 50,000 daily attendees. They invested in a custom 20×30 inflatable structure shaped like a giant can of their product. Total cost: $28,000 including printing and shipping.
The results: 18,000 visitors entered the structure over three days. They distributed 40,000 samples and tracked 4,500 QR code scans to their app. Direct sales at the event (merch + product) totaled $35,000. The structure was featured in two festival recap videos with a combined reach of 200,000 views. Their estimated total ROI (direct sales + app signups valued at $5 per acquisition + media value): 4.2x return on investment.
The lesson: Custom shapes draw crowds, but the real ROI came from the integrated digital capture — QR codes, app downloads, and email signups. The tent was the hook, not the whole game.
Case Study 2: An automotive accessories brand at a trade expo
This brand did 8-10 regional trade shows per year and was tired of assembling frame tents. They switched to a 10×20 inflatable with dye-sublimation printing on all four sides.
The results: Setup time dropped from 3 hours to 25 minutes per show. Labor savings alone: roughly $1,500 per show (2 crew members × 2.5 hours saved × $30/hour). Over 10 shows that’s $15,000 saved on labor. The tent cost $5,500, so it paid for itself in labor savings alone within 4 shows. Additionally, they estimated a 15% increase in booth traffic due to the more visible, branded structure.
The lesson: For frequent exhibitors, the labor savings alone justify the investment. The branding improvement is a bonus.
Case Study 3: A non-profit at outdoor community events
A non-profit doing 15+ community events per year needed a structure that was budget-friendly and could be set up by volunteers. They rented a 10×10 inflatable for $800 per event initially, then purchased one for $1,800 after 3 events.
The results: The tent paid for itself after 2 additional events (versus the rental cost). Volunteer setup time was 15 minutes with no experience needed — versus 2+ hours for their old frame tent, which often required a professional installer. They estimate they reached 30% more attendees per event because the tent was more visible and inviting.
The lesson: Even modest budgets can benefit from inflatables. The low barrier to setup means you can deploy your team where it matters — engaging with people, not wrestling with poles.
Conclusion: Making the Right Choice for Your Next Trade Show
The trade inflatable tent market is growing at 7.5% annually for a reason. These structures solve the fundamental problems of traditional exhibit setups: they’re faster, lighter, more portable, and they look better doing it.
Here’s my honest bottom line after all these years:
Buy an inflatable tent if: You do 3+ shows per year, you want to reduce setup labor, and you’re willing to maintain the blower system. The upfront cost of $3,500 to $15,000 pays off within 18-24 months through labor savings, rental avoidance, and improved brand impact.
Rent instead if: You do 1-2 shows per year, you’re testing whether inflatables work for your brand, or you need a custom shape for a single event. Renting at $800-2,800 per show is cheaper than owning when you’re not using it regularly.
Skip it entirely if: You’re primarily doing indoor shows in venues with strict ceiling height restrictions, you need a two-story structure (buy a frame tent instead), or your budget is under $1,500 — at that price, you’re getting a low-quality structure that will disappoint you.
My final piece of advice: Whatever you choose, order your tent 8-12 weeks before your first event. Custom printing takes time, and the last thing you want is to be the person at the loading dock watching your tent get rejected for missing certifications while your booth sits empty.
The inflatable tent market is valued at $1.2 billion and climbing. The brands that embrace it early are the ones getting noticed. The ones that stick with poles and frames? They’re the ones I see still wrestling with bent aluminum at 9:47 AM, with a client standing there giving them that look. I choose the inflatable every time.
Quick Comparison Table
| Factor | Inflatable Tent | Frame Tent | Pop-Up Tent |
|---|---|---|---|
| Setup Time | 15-30 minutes | 2-4 hours | 5-10 minutes |
| Portability | High (fits in car) | Low (requires truck) | High |
| Durability | Moderate (puncture risk) | High | Low |
| Custom Printing | Excellent | Good | Limited |
| Cost (Own) | $3,500–$15,000 | $5,000–$20,000+ | $300–$1,500 |
| Wind Resistance | Good (with anchoring) | Excellent | Poor |
| Brand Impact | High | Medium | Low |
Maintenance Checklist
Keep your inflatable tent performing for years with this simple routine:
- Before each show: Inspect seams and fabric for tears; test the blower; check all straps and stakes.
- After each show: Wipe down with mild soap and water; let it fully dry before packing to prevent mold.
- Quarterly: Lubricate zippers; replace worn anchor straps; verify the blower’s air filter is clean.
- Storage: Keep in a cool, dry place away from direct sunlight; fold loosely to avoid crease damage.
Final Thought
The inflatable tent isn’t just a trend — it’s a practical evolution. When you’re standing at your booth, fully set up in 20 minutes, with crisp graphics and zero sweat, you’ll wonder why you ever fought with poles. And when the show ends, you’ll pack up in 10 minutes and be on the road while others are still dismantling. That’s the difference. That’s why I’m done with frames.
Frequently Asked Questions
Q: How long do inflatable tents actually last?
A: With proper care, a quality inflatable tent from a reputable manufacturer will last 5–7 years of regular use (20–30 events per year). The blower is typically the first component to wear out, but replacements are inexpensive and easy to swap.
Q: What happens if the power goes out mid-event?
A: Most inflatable tents have a slow-leak design — they won’t collapse instantly. You’ll have 10–15 minutes of usable shape before it droops noticeably. Keep a battery backup or generator on hand for outdoor events, and always have a repair kit with patch material and adhesive in your vehicle.
Q: Can I set one up solo?
A: Yes. The blower does the heavy lifting. Your only physical tasks are unrolling the tent, connecting the air ducts, and staking the corners. Most people can manage this alone in under 20 minutes. The second person is helpful but not required.
Q: Are they safe in high winds?
A: With proper staking and weighted ballast, inflatable tents handle winds up to 30–35 mph. Beyond that, you should take them down regardless of tent type. Always orient the narrowest side toward prevailing wind and use all anchor points.
Real-World Cost Breakdown
If you’re comparing renting vs. buying, here’s a realistic look at the numbers:
| Scenario | Cost |
|---|---|
| Rental (per event, 10×10) | $400–$800 |
| Rental (per event, 20×20) | $1,200–$2,500 |
| Purchase (10×10 inflatable) | $3,500–$6,000 |
| Purchase (20×20 inflatable) | $8,000–$15,000 |
| Break-even point (10×10) | 6–10 events |
| Break-even point (20×20) | 8–12 events |
If you’re doing more than a handful of shows per year, buying pays for itself quickly — and you own an asset you can customize, resell, or lease out to other brands.
Who Should Still Choose a Frame Tent?
I’m not saying inflatables are for everyone. Here’s when a frame tent still makes sense:
- Permanent installations — If the tent stays up for months, a rigid frame is more stable and doesn’t require continuous power.
- Extreme weather environments — Desert storms or heavy snow regions demand the structural rigidity of aluminum frames.
- Very large footprints — For 40×60+ spaces, frame tents remain more cost-effective and easier to manage than giant inflatables.
But for the vast majority of trade shows, festivals, and pop-up events — the inflatable wins.
My Recommendation
Start with a 10×10 or 10×20 inflatable from a brand that offers a 2-year warranty and replacement parts. Test it at a local event before committing to a major show. You’ll quickly see the difference in setup stress, audience engagement, and your own energy levels by day two.
And if you’re still on the fence, rent one for your next event. One setup is all it takes to convert you. I’ve never met a business owner who went back to poles after experiencing the inflatable difference.
Ready to make the switch? Measure your booth space, check your vehicle capacity, and order a sample print swatch from a manufacturer. Your back — and your sanity — will thank you.
- Hybrid options — Some brands now offer inflatable frames with rigid roof panels, giving you the best of both worlds: quick setup with a solid ceiling for lighting and hanging signage.
- Second-hand market — Check used equipment groups; many businesses sell barely-used inflatables after a rebrand, saving you 40–50% off retail.
Final Checklist Before You Buy
| Item | What to Verify |
|---|---|
| Warranty | At least 2 years, covering seams and blower motor |
| Replacement parts | Blowers, patch kits, and valves available separately |
| Setup time | Claimed vs. actual — ask for video proof |
| Transport | Fits in your vehicle; check rolled weight and bag dimensions |
| Power needs | Blower wattage matches your event’s power supply |
| Anchoring | Sandbags, stakes, or weighted plates included or compatible |
The Bottom Line
The trade show industry is moving faster, budgets are tighter, and attention spans are shorter. Inflatables aren’t just a gimmick — they’re a practical response to those pressures. They save you hours, dollars, and physical wear, while giving you a visual presence that draws crowds in a way a flat canopy never will.
If your goal is to show up, stand out, and break down without breaking your back, the inflatable booth is the clear choice. Frame tents still have their place, but for most exhibitors, the question isn’t if you’ll switch — it’s when.
Start small, test it, and let the results speak for themselves. Your next event could be the easiest setup you’ve ever had.







