

Quick Answer / Key Takeaways
What is a blow up backyard party tents?
A blow up party tent (also called an inflatable pop up canopy tents or air beam tent) is a portable shelter that uses pressurized air beams instead of metal or fiberglass poles for structural support. A continuous-duty electric blower forces air into sealed fabric tubes, making them rigid enough to support a canopy roof and sidewalls. operating manual takes 5–10 minutes with two people—no ladders, no pole assembly, no tools required.
How much does a blow up party tent cost?
Budget backyard models (10×10 to 10×20) run $300–$800. Commercial-grade units with 650gsm PVC tarpaulin specifications, dual blowers, and reinforced anchor points cost $1,500–$2,500. Rental rates for large inflatable structures—including inflatable nightclubs—range from $800 to $2,500 per day. The price gap reflects material quality: cheap tents use 200–300gsm fabric that tears at stake points, while commercial units use welded seams and double-stitched webbing.
How do you anchor a blow up party tent?
Wind is the #1 killer of inflatable tents. Follow this sequence:
1. Grass: Use 12″ spiral augers (rated 200+ lbs pull-out), screwed at a 45° angle away from the tent. Minimum 8 points for a 20×20.
2. Concrete/Asphalt: 40-lb sandbags on every leg, plus ratchet straps from the frame to fixed objects.
3. Wind rating: Budget tents handle 10–15 mph. Commercial units with proper anchoring withstand 25–30 mph. Always deflate if winds exceed the rated limit.
Are blow up tents better than pole tents?
For events under 48 hours, yes. Setup is 5–10 minutes versus 45–60 minutes for a pole tent. Air beams flex in gusts and return to shape, while aluminum poles bend permanently. Storage is also superior—a 20-foot inflatable folds into a bag that fits in an SUV. The downside: inflatable tents require electricity for the blower and lose structural integrity if the blower fails. Pole tents are still better for multi-day installations or remote sites without power.
What is the lifespan of an inflatable party tent?
A quality unit with 650gsm PVC and UV-resistant coating lasts 5–7 years with proper care. Budget tents (300gsm) typically fail within 1–2 seasons. Always store dry, patch small punctures immediately with a PVC repair kit, and never drag the tent across rough surfaces.
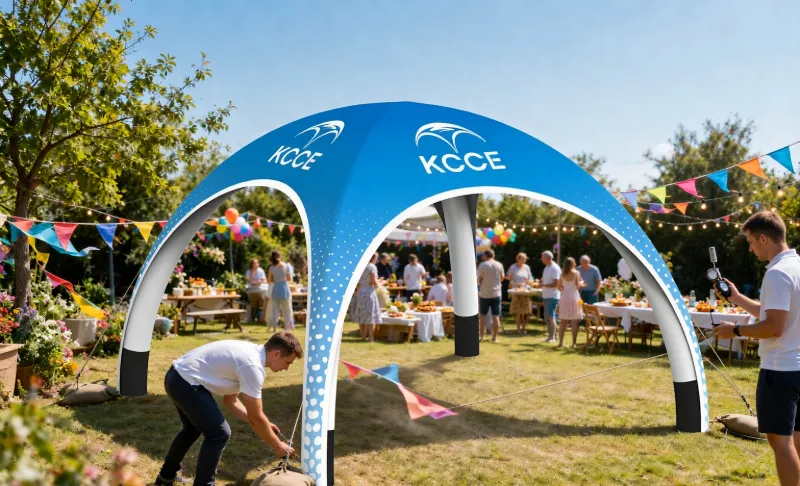
You’ve just dropped $400 on a blow-up party tent for your daughter’s graduation. First gust of wind hits, and one of those flimsy stakes pulls straight out of the grass, sending the whole thing careening into the fence. Sound familiar? If you’re shopping for a blow up party tent, you’re staring at a wall of look-alike options on Amazon and Home Depot—but trust me, they are not the same.
I have extensive experience in the event and outdoor equipment world., and I’ve watched this category blow up in ways nobody predicted. What used to be a niche rental product for exhibition inflatable tents has gone completely mainstream. Families grab them for backyard birthdays. Churches set them up for outdoor services. I’ve even seen startups ordering inflatable nightclubs for launch parties. The appeal makes total sense: no poles, no ladders, no four-hour setup marathons. But here’s the catch—there’s a massive gap between a $300 weekend special and a $2,500 commercial unit, and the marketing photos won’t tell you which one you’re actually getting.
This guide cuts through the noise, comparing the budget backyard model against the commercial-grade unit, and explaining exactly where your money goes—fabric, blowers, anchoring—so you don’t wind up with a liability instead of a tent.
Introduction: Why Choose a Blow Up Party Tent?
Let’s be real about why you’re here. You’ve probably wrestled with a traditional pole tent at some point—the tangled fiberglass poles, instructions that might as well be in another language, and that solid 45 minutes of frustration before you even hang the first decoration. A blow up party tent just kills that whole pain point. You unroll it, attach a blower, flip a switch, and watch it rise in minutes. It’s genuinely satisfying to watch, I won’t lie.
But the benefits go beyond convenience. Air beam technology has matured significantly in the last five years. The structural columns of a quality inflatable tent are made of high-strength fabric tubes that, when pressurized, become rigid enough to support thousands of pounds. Unlike aluminum poles that snap or bend under stress, air beams flex in the wind and then snap back to shape. That’s physics working in your favor, not against you.
Then there’s the portability angle. A 20-foot inflatable canopy folds down into a bag that fits in the back of an SUV. Try doing that with a traditional frame tent of the same size—you’d need a trailer. For anyone juggling multiple events or venues, that storage and transport advantage alone often justifies the switch. Is that enough to make you ditch your old setup? Maybe. But you’ll want to read the rest first.
Why Inflatable Party Tents Deserve a Second Look
Setup speed is the obvious selling point, but the real value of these things goes way deeper than what you see in the product photos. Let me walk you through what actually matters.
Setup Speed. Honestly, the numbers here are almost hard to believe. A two-person crew can have a large inflatable up and running in a relatively short time. The same size pole tent? You’re looking at a lengthy setup time wrestling with poles, ropes, and patience. Now think about what that means for someone running multiple events every weekend. That time isn’t just saved—it’s money, plain and simple.
Structural Resilience. I touched on this earlier, but it really deserves its own moment. Here’s the thing about air beams: they distribute stress across the entire structure instead of dumping it all on the joints like a frame tent does. So when the wind picks up, the inflatable sways and flexes. It bends instead of breaking. You might be wondering if that actually matters in practice—trust me, it does. It’s exactly why a ton of rental companies have quietly switched their inventory to inflatables for outdoor gigs. They’ve seen what happens to pole tents in a surprise gust.
Uneven Terrain Tolerance. Pole tents are picky. They demand relatively flat ground or they’ll pitch all wrong and drive you crazy. Inflatables? Far more forgiving. The air beams just conform to whatever surface they land on, and with no rigid frame members to worry about, you can set up on a gentle slope or bumpy grass that would make a traditional tent wobble like a drunk uncle. Is it perfect on every surface? No. But it’s dramatically better.
Aesthetic Appeal. Let’s be real for a second—inflatable tents just look cool. I mean, the seamless curves and clean lines give off this modern, premium vibe that your standard peaked tent can’t touch. Brands like OZIS and VEVOR have figured this out and run with it, building inflatable nightclubs and event spaces that genuinely make people stop and take photos. In my experience, that visual wow factor is worth more than any spec sheet.
Types of Blow Up Party Tents (Arch, Dome, Tunnel, etc.)
Not all blow up party tents are the same, and honestly, the shape you pick says a lot about what kind of event you’re running. Space matters, sure, but so does the vibe. Here’s a breakdown of the main styles you’ll run into.
Dome Tents. These are your classic half-sphere structures. If you’re throwing a small backyard gathering or a kid’s birthday party, this is probably what you’ll end up with. They’re also handy as a focal point if you’re setting up something bigger around them. What I like about domes is that they’re the easiest to set up and, per square foot of coverage, the most stable. You can’t really beat that combination.
Arch Tents. Picture an elongated tunnel—that’s basically what these are. They’re great for entryways, walkways, or draping over a long buffet table. The effect is pretty dramatic when guests walk through, and they photograph really well. You might be wondering if an arch is worth it just for the entrance. Speaking from experience, the “wow” factor alone makes it worth considering.
Tunnel Tents. These look similar to arches but give you a bit more breathing room inside. I’ve seen them used for wedding ceremonies where you want a covered aisle, and also for market vendors who need a long, narrow footprint without wasting space. They’re a solid middle ground.
Cube or Nightclub Tents. This is the category that’s exploded in popularity lately. Products like the OZIS Inflatable Nightclub, which comes in at 30x20x13 feet, or VEVOR’s 26.2 x 19.7 x 13.1 ft model are basically portable party venues. You get dance floors, LED lighting options, and enough headroom that adults aren’t crouching around. It’s not cheap, but if you’re throwing an event where people expect that nightclub feel, there’s really no substitute.
Custom Shapes. For the commercial folks out there, companies like Tentcraft can build fully branded inflatable structures in nearly any shape you can dream up—product replicas, giant animals, corporate logos. These are less about shelter and more about marketing. If you’re using them correctly, they’re as much a promotional tool as they are a tent.
Size Guide: How to Choose the Right Tent for Your Event
Here’s the thing most buyers get wrong: they fall in love with a product photo and completely forget about what’s going inside the tent. That 20×20 looks great in the listing, but throw in a dance floor, a stage, and round tables for eight, and suddenly you’re playing Tetris with your guests.
So let’s break it down with some real numbers.
10×10 feet (100 sq ft): This comfortably seats about 8–10 people at tables, or maybe 15–20 if everyone’s standing. Honestly, it’s best for a small backyard get-together or a single vendor booth at a market. Don’t try to do more with it—you’ll just end up with people bumping elbows all afternoon.
20×20 feet (400 sq ft): You’re looking at 30–40 seated guests, or up to 60 standing. From what I’ve seen, this is the sweet spot for graduation parties, small weddings, and family reunions. It’s also where people tend to overestimate—I’ve watched hosts try to squeeze a buffet line into one corner and regret it immediately.
30×20 feet (600 sq ft): This is what OZIS and VEVOR push as their nightclub size. Fits 60–80 seated, 100+ standing. The nice part? You can actually add a DJ booth, a modest dance floor, and a bar area without feeling like you’re inside a sardine can. I’d still recommend skipping the oversized couch decor, though.
40×60 feet (2,400 sq ft) and up: Now we’re talking commercial-grade. We’re talking 200+ guests, full catering setups, a real stage with lighting rigs. But here’s the catch—these aren’t weekend DIY projects. They typically require professional installation and multiple blowers to keep the structure stable. You’re not just buying a tent at this point; you’re hiring a crew.
So what’s my rule of thumb after dealing with this stuff for years? Take your expected guest count and multiply by 10–12 square feet per person for seated events. That’s your minimum tent size, no shortcuts. For standing cocktail-style events, you can tighten that to 6–8 square feet per person.
One more thing: always order one size up if you’re adding a dance floor or stage. Trust me—guests will not squeeze past a DJ booth without complaining. And you’ll be the one hearing about it all night.
Material and Durability: What to Look For
Let’s cut through the noise and talk about the specs that actually matter—denier and coating. Get these right, and you won’t end up with a tent that collapses mid-event.
Denier is just a fancy word for fabric thickness. Cheap tents? They’ll often use 300D Oxford polyester. That stuff is thin, almost translucent, and honestly, it might tear if you look at it wrong. I’ve seen it happen. Commercial-grade tents are a different beast entirely—they use 600D or higher, and usually throw in a PVC coating for waterproofing and UV resistance. Take the OZIS inflatable nightclub, for instance. It’s built with commercial-grade PVC tarpaulin that’s actually rated for repeated use, not just a one-off weekend gig.
Here’s a tip that’ll save you a headache and some cash: if a product listing doesn’t state the denier or material thickness, assume it’s too thin. Reputable manufacturers publish these specs, and they do it because they’re selling durability, not hype. You know what listings say “high-quality material” without any specifics? They’re hiding something. Why else would you leave out the details?
Now, let’s talk about the blower. It’s easy to overlook, but the CFM (cubic feet per minute) rating tells you how much air pressure the tent can hold. A weak blower means sagging—and sagging looks terrible, plus it messes with wind resistance. You ever seen a tent that looks like a half-deflated balloon? Yeah, that’s the blower’s fault. Commercial tents typically use blowers with substantial airflow., depending on the size, so if a listing doesn’t mention CFM, that’s another red flag. Honestly, it’s not that hard to include, so why would they skip it?
Setup and Portability: A Step-by-Step Guide
Here’s what a typical setup looks like for a large inflatable tent. I’ve done this a bunch of times, and honestly, the first time feels way more intimidating than it actually is.
Step 1: Site Preparation (5 minutes). Clear the area of debris, sharp objects, and excessive slopes. If you’re on grass, lay out a ground tarp to protect the tent floor. Seems obvious, but you’d be surprised how many people skip this and end up with a puncture.
Step 2: Unroll and Position (5 minutes). Take the tent out of its storage bag and unroll it where you want it to sit. Find the air intake valves—on large tents, there should be at least two. You’ll want to make sure they’re easily accessible before you start inflating.
Step 3: Attach Blowers (2 minutes). Connect your blower(s) to the intake valves. Most commercial tents run on 110V blowers, but larger units might need 220V. Check your power source before you’re standing in a dark field with a deflated tent. Trust me on that one.
Step 4: Inflate (3–10 minutes). Flip the blower on and watch the structure rise. It’s oddly satisfying. For reference, a large nightclub tent like the VEVOR 26.2×19.7 ft model takes about 5–8 minutes to fully inflate with a proper blower.
Step 5: Anchor (10 minutes). This is where you need to pay attention. Drive stakes through the anchor loops at every point—corners, midpoints, and any reinforced tie-downs. On hard surfaces, you’ll need weighted sandbags or water barrels. I’ll go into more detail on anchoring below, but never skip this step.
Step 6: Test and Adjust (2 minutes). Walk the perimeter. Look for sagging. Verify all anchor points are secure. Check the air pressure—Most tents hold a certain pressure in the beams., though exact specs vary by manufacturer.
All told, you’re looking at 25–35 minutes with a two-person team. Compare that to the 2+ hours for a pole tent of similar size, and the value proposition becomes pretty obvious. Is it perfect for every situation? No. But for speed and portability, it’s hard to beat.
Wind Resistance and Safety Standards (ANSI/UL, ASTM, etc.)
Nobody wants to bring this up at the party planning meeting, but it’s the line between a fun afternoon and a trip to the ER. Think of an inflatable tent as a sail with a zipper. It catches wind like crazy, and if the anchoring is weak, that thing will move—whether there’s a kid inside or not.
Safety Standards Actually Matter. The industry has a few rules worth knowing. ASTM F2374 is the big one for inflatable play devices, and it covers a lot of party tents. Then there’s NFPA 701, which deals with fire resistance for fabrics in public spaces—if you’re renting one out for events where someone might light a grill or a candle nearby, you want that certification. And for public gatherings, ANSI/UL 2021 handles how these things get installed and maintained.
Wind Ratings—Read Them or Regret It. Most decent inflatable tents are rated to handle moderate wind speeds., but that only applies when they’re anchored properly. Anything above that? Deflate it and call it a day. Some commercial brands will claim they can take more, but honestly, I’ve never seen any inflatable structure that’s truly happy past 30 mph. Here’s the thing: the product page should tell you the wind rating. If it doesn’t, that’s a red flag. Assume it’s not rated and treat even a mild breeze like a serious threat.
Anchoring Physics, or Why Your Tent Will Fly Away. An air tent behaves exactly like a sail, and that’s where cheap setups fail. The “stakes” that come with budget tents are usually these flimsy 8-inch nails—they pull right out of soft dirt with almost no effort. The industry standard for grass is long auger stakes., which screw into the ground and grab hold of the soil way better. On concrete or asphalt, stakes are useless. You’ll need weighted anchors instead: sandbags around 50–75 pounds each, or water barrels at every anchor point. Is it overkill? Maybe. But have you ever watched a 200-pound inflatable tumble across a parking lot? I have. It’s not pretty.
Maintenance and Repair: Extend Your Tent’s Life
You drop a serious chunk of change on a quality inflatable tent. Treat it right, and You can expect several years of solid, regular use from a commercial-grade unit.. Let’s get you there.
Cleaning. Here’s the drill: after every event, wipe down the fabric with a mild soap solution and give it a thorough rinse. Zippers and valve areas get dirty fast, so give them some extra attention. And please, steer clear of harsh chemicals or pressure washers—they’ll eat right through the PVC coating. I’ve seen it happen, and it’s not pretty.
Drying. This one isn’t up for debate. Never, ever store a damp tent. Mildew will destroy the fabric faster than you can say “warranty void,” because that’s exactly what happens. Just set it up partially inflated or drape it over some sawhorses until it’s bone dry. It takes time, but it’s worth it.
Storage. Fold it loosely—those tight bundles that crease the fabric are a slow death. Keep it in a cool, dry spot away from direct sunlight. UV radiation is the number one killer of inflatable tents, plain and simple. When your tent isn’t in use, it belongs in its storage bag. You might think a little sun won’t hurt, but trust me, it adds up.
Repairs. Small punctures? They’re going to happen. Just part of the game. Most manufacturers sell patch kits with PVC adhesive and matching fabric patches. Clean the area, apply the adhesive, press the patch down, and let it cure for a full 24 hours. For bigger tears or seam failures, don’t be a hero—contact the manufacturer or a professional repair service. Trying to sew PVC fabric without the right equipment? You’ll just make it worse. I’ve tried. It’s not worth it.
Blower Maintenance. Clean or replace the air filter on a regular basis, and check the power cord for any damage. Honestly, blowers are the most likely component to fail, so if you’re running frequent events, keep a spare on hand. It’s a small investment that saves you from a big headache mid-event.
Inflatable vs. Traditional Tents: A Real-World Comparison
So you’re trying to pick between an inflatable tent and a traditional pole tent. I’ve been around both, and honestly, it’s not as cut-and-dry as the marketing makes it seem. Let me break down the real differences.
| Factor | Inflatable Tent | Traditional Pole/Frame Tent |
|---|---|---|
| Setup Time | 10–15 minutes | 1.5–2 hours |
| Team Required | 2 people | 4–6 people |
| Wind Resistance | Flexes, up to ~30 mph | Rigid, can handle higher winds |
| Weight | Heavier (blower + fabric) | Lighter (aluminum poles) |
| Storage Size | Compact, bag storage | Bulky, requires trailer |
| Repair | Patch kit, DIY-friendly | Pole replacement, more complex |
| Cost (20×20) | Varies | Varies |
| Lifespan | Varies | Varies |
| Aesthetics | Modern, sleek | Traditional, classic |
The setup time difference alone is a game-changer. You can have an inflatable tent up and ready in the time it takes to argue about who’s bringing lunch. With a pole tent, you’re looking at a solid chunk of the morning gone, and you need at least four people wrangling heavy aluminum beams. I’ve seen crews of six still struggling with those things.
Here’s something people don’t always think about: the wind. Inflatable tents have that air-beam design that actually flexes with gusts—up to about 30 mph. That sounds limiting, but traditional tents, while stiffer and better in higher winds, can snap poles if you’re not careful. Which is worse, honestly? There’s no clean answer.
Now, the weight. Yeah, inflatable tents are heavier because you’re hauling a blower plus all that reinforced fabric. But here’s the thing: it also packs down way smaller than a pole tent. The storage is a simple bag you can toss in a van. A frame tent? You’re renting a trailer for that beast.
Repairs are another spot where they split. An inflatable tent usually just needs a patch kit, and honestly, most people can handle that themselves. Pole tents can require replacing bent or broken aluminum sections, which gets fiddly fast.
Cost-wise, inflatables run about $800 to $2,500 for a 20×20, while traditional tents start around $500 and top out near $1,500. But don’t just look at the sticker. A traditional tent lasts 5 to 10 years; inflatables fizzle out in 3 to 5. You might be wondering—does the cheaper upfront price really even out over time? That depends entirely on how often you’re using it.
My take: If you’re running weekend events—weddings, corporate parties, festivals—inflatable tents are the smarter buy. They’re quicker, they look sleeker (that modern profile is a crowd-pleaser), and the convenience factor is real. But if you’re leaving something up for months at a time, or you live somewhere that gets serious wind, save the money and go traditional. You’ll be happier in the long run.
Customization Options: Branding and Aesthetics
This is where inflatable tents really shine for commercial users. Companies like Tentcraft have built entire businesses around custom inflatable structures—which makes sense when you think about it. You can a real brand from current market tent with your logo, company colors, and even custom shapes that represent your products. A tent shaped like a soda can for a beverage launch? That’s not hypothetical; people do that.
Printing Methods. Here’s where quality matters: good manufacturers use dye-sublimation printing, which actually embeds the ink into the fabric rather than printing on the surface. That’s a huge difference. The graphics won’t crack, peel, or fade, even with regular use and constant sun exposure. I’ve seen cheap screen-printed tents look worn out after one season; dye-sub holds up for years.
Color Options. Most manufacturers offer the full spectrum, so you’re rarely limited. But for brand consistency, don’t guess—request a Pantone-matched color sample before production. You might be wondering if that’s overkill. It’s not. Colors on a screen and colors on vinyl are two different animals, and you don’t want your brand red showing up as orange on event day. Also, the “free mockup” services that many manufacturers offer are worth using. They show you exactly how the final product will look before you commit—and catching a design flaw on a screen beats catching it on a 20-foot tent at a trade show.
Accessories. Consider add-ons like branded sidewalls, printed flooring, LED lighting systems, and even air-conditioned versions for hot climates. These upgrades genuinely amp up the wow factor—but honestly, they also amp up the cost and setup complexity. Is it worth it? Depends on how much foot traffic you’re expecting and how often you’ll use the tent. For a one-off weekend event, maybe skip the AC. For a summer-long campaign, it might be the best money you spend.
Cost Analysis: Purchase vs. Rental
Let’s talk numbers. A commercial-grade inflatable nightclub like the OZIS 30×20×13 ft model will cost a significant amount, often in the thousands. depending on configuration and accessories. VEVOR’s comparable 26.2×19.7×13.1 ft unit is positioned as a more budget-friendly option, often landing in the $1,500–$2,500 range.
Rental costs for similar inflatable nightclubs typically run $800–$1,500 per event, depending on your location and the rental company’s pricing structure. Delivery, setup, and pickup are usually extra.
Here’s the math that matters: if you’re hosting more than 3–4 events per year, purchasing starts to make financial sense. At 4 events per year with average rental costs, you’re spending a significant amount annually on rentals. A tent can pay for itself in a relatively short time. Plus, you have the flexibility to use it whenever you want, without coordinating with a rental company’s schedule.
For one-time events, renting is obviously the smarter choice. But for churches, schools, event planners, and families who host regularly, ownership wins.
Regulatory Compliance and Permits for Public Events
This part trips up a lot of first-time buyers. If you’re putting up an inflatable tent for a public event—meaning the public is actually invited—you’re almost certainly looking at permit requirements and local regulations.
Fire Codes. Here’s where it gets real. Many municipalities enforce fire resistance standards for tents above a certain size, typically for larger structures. And if your tent sits within 20 feet of a building, you might have to deal with extra separation rules. It’s not just paperwork—these rules exist because tents burn fast when they burn.
Occupancy Limits. Your local fire marshal is the one who decides how many people can fit inside, based on the tent’s size and where the exits are. You really can’t guess at this one. Overshoot the limit and you’re looking at fines, sure, but the bigger problem is what happens when people need to get out in a hurry. That’s the part nobody wants to think about until it’s too late.
Permits. Do yourself a favor and call your local building department or parks department before you commit to anything. Some places want a permit for any tent beyond a certain footprint. Others only care if you’re doing something commercial. The rules vary so much that you can’t assume what your city will do.
Insurance. If you’re renting tents to other people or running a paid event, liability insurance is non-negotiable. I’ve seen this become a sticking point more than once. Most policies want proof that the tent meets safety standards and that whoever installed it actually knew what they were doing.
International Considerations. If you’re bringing tents in from overseas, customs is a whole other beast. Inflatable tents usually fall under a specific HS code for textile tents.—the category for tarpaulins, awnings, and sunshades—but it’s not always that clean. Honestly, just get a customs broker involved. It’s worth the money to avoid the headache of misclassification and unexpected duty payments.
One last thought: the rules feel like a lot when you’re just trying to host a fun event. But every one of these requirements came from something going wrong somewhere. Better to deal with the paperwork than to be the cautionary tale.
Seasonal Usage Tips and Climate-Specific Recommendations
Inflatable tents aren’t a universal solution for every kind of weather—far from it. After years of watching folks drag these things into conditions they weren’t built for, I’ve got some thoughts. Take it from someone who’s seen a tent turn into a sail.
Hot Weather. Here’s the thing about PVC: it’s basically a heat magnet. Leave a dark-colored tent sitting in direct sun and The inside can become very hot.. That’s not just uncomfortable—it’s dangerous. If you’re planning a summer event, go with light-colored fabric, and don’t skimp on ventilation panels or portable AC units. Your guests will thank you. And the sun doesn’t just make it hot; it breaks down the material over time. UV-protective coatings help, but honestly, the simplest fix is just limiting how long the tent sits exposed.
Cold Weather. You might be wondering why the tent feels like cardboard in winter. Cold makes PVC stiff, and stiff means brittle—crack city. From what I’ve seen, the trick is to inflate before the temperature plunges, and for heaven’s sake, don’t fold or move the tent once it’s cold and rigid. Some manufacturers flat-out say don’t use these things below 32°F. That’s probably good advice.
Rain. A quality inflatable tent will keep you dry, sure, but standing water is where things get dicey. Make sure the ground slopes away from the tent and drainage is clear. And if heavy rain’s coming, check those anchor points before you head inside—saturated ground loses its grip fast, and a loose tent in a downpour is nobody’s idea of fun.
Wind. I’ll say this again because people keep ignoring it: if winds are pushing past the manufacturer’s rating—usually 25 to 30 mph—deflate the tent. Period. Is it really worth risking your gear or someone getting hurt? A deflated tent is a pain, but a flying one is a disaster.
Case Studies: Event Planners Using Inflatable Tents
I’ve talked to a bunch of event planners who’ve made the jump to inflatable tents, and honestly, the stories all sound the same—in a good way. Take one wedding planner I know in the Midwest. She swapped her entire inventory to inflatables last year. Her reasoning wasn’t complicated: Setup time was significantly reduced.. That means her crew can pull off two events in a day instead of one. The revenue bump hit her bottom line almost instantly.
Then there’s a church in Texas that uses a big inflatable canopy for summer outdoor services. They didn’t pick it for the novelty factor. They picked it because their volunteers are mostly older folks, and setting up pole tents required ladders, heavy lifting, and a whole lot of sore backs afterward. With the inflatable, they can put it up and take it down every week without breaking a sweat. No strain, no hassle.
The rental side of things is changing too. Good Housekeeping ran a piece on Amazon’s inflatable nightclub trend, and it made a solid point: backyard parties are basically the new social currency. Rental companies are scrambling to add inflatable nightclubs to their offerings because people keep asking for them and there aren’t enough to go around. And let’s be real—the profit margins on those things are pretty darn good.
You might be wondering if inflatables are just a gimmick. But from what I’ve seen, the people using them aren’t going back. The math works, the physical toll drops, and the demand keeps climbing. That’s not a trend. That’s just good business.
Frequently Asked Questions
Q: Are blow up tents worth it?
Honestly? For most parties and events, yeah — they kind of are. The setup speed alone is a game changer. You’re not wrestling with poles and clips, you’re just letting air do the work. Plus they look sharp and pack down small.
But here’s the thing: they’re not perfect. Wind resistance is weaker than a traditional frame tent, and they won’t last as long if you’re using them constantly. That said, if you’re hosting more than three events a year, the math works out in your favor pretty fast. The investment basically pays for itself.
Q: How much does a blow up tent cost?
You can find budget inflatable party tents on Amazon starting at a few hundred dollars., but I’d steer clear of those for anything serious. They’re flimsy and you’ll likely end up replacing them. Quality backyard models run in the hundreds to over a thousand dollars., which is where most people should be looking. On the commercial side, units like the OZIS inflatable nightclub go for $2,500 to $4,000. VEVOR sits in the middle with options around $1,500 to $2,500.
You might be wondering why the price range is so wide. It comes down to fabric quality, air pump reliability, and how many people the tent can actually hold. That’s where the money goes.
Q: How much to rent a blow up club?
Expect to pay a significant amount per event., and keep in mind that delivery, setup, and pickup are usually billed separately. That stings a bit. The final cost depends on where you’re located, how big a tent you need, and which rental company you go with. My advice: if you’re throwing events regularly, buying beats renting every time — rental fees add up way faster than people realize.
Q: What are blow up tents called?
This one’s a bit of a mess, honestly. You’ll hear inflatable party tents, air tents, inflatable canopies, and blow up tents all used interchangeably. The bigger versions get marketed as inflatable nightclubs or inflatable event tents, which sounds fancier but it’s the same basic technology. If you want to sound technical, the construction method is called air beam or air frame — that’s the term industry folks use.
References
- Large White Inflatable Nightclub 30x20x13Ft Disco Cube – Amazon
- VEVOR Inflatable Nightclub, 26.2 x 19.7 x 13.1 Ft, Blow up Party Tent – VEVOR
- 9 Branded Inflatable Tent Designs That Will Inspire Your Next Event – Tentcraft
- Amazon Is Selling an Inflatable Nightclub for Your Backyard – Good Housekeeping







