

So wählen Sie ein aufblasbares Eventzelt? Die Entwicklung von Eventüberdachungen
Sie haben die Location. Gästeliste? Erledigt. Aber zwei Stunden vor dem Hochzeitsempfang liegt das Pop-up-Gestängezelt immer noch als Haufen Stangen auf dem Rasen, und die Wettervorhersage sagt Böen von 32 km/h. Genau das ist der Grund, warum immer mehr Eventplaner bei mittelgroßen Outdoor-Veranstaltungen auf aufblasbare Zelte umsteigen.
Jeder, der schon einmal Events organisiert hat, weiß: Ein Zelt auszuwählen ist keine Raketenwissenschaft. Aber wenn es darum geht, tatsächlich eines zu kaufen, beginnt der Kopf zu kreisen. Es gibt überall Optionen, die Preise reichen von ein paar hundert bis zu mehreren tausend Dollar. Welches ist wirklich sein Geld wert? Ich schreibe seit über einem Jahrzehnt über Eventausstattung und habe mehr Fehler gesehen, als mir lieb ist. Also lege ich heute alles offen – hoffentlich erspart Ihnen das einige Umwege.
Dieser Leitfaden führt Sie durch die entscheidenden Abwägungen: Größe, Sicherheit, Aufbaugeschwindigkeit und reale Kosten. Das Ziel ist sicherzustellen, dass Ihre nächste Veranstaltung kein Zeltdesaster wird. Anders als generische Campingartikel ist dieser Beitrag für Eventorganisatoren geschrieben. Wir behandeln Windklassen, Verankerung auf harten Oberflächen und Seitenwandoptionen. Am Ende haben Sie eine persönliche Entscheidungscheckliste und wissen, welche Marken Sie in die engere Wahl ziehen sollten.
Hier ist die ehrliche Wahrheit: Das besten aufblasbaren Eventzelts ist dasjenige, das Sie tatsächlich korrekt aufbauen. Windklassen bedeuten nichts, wenn Sie das Abspannen auf weichem Boden überspringen. Materialien bedeuten nichts, wenn Sie das Zelt nass einlagern. Prüfen Sie also vor dem Kauf das Verankerungsset – nicht nur das Zeltgewebe.
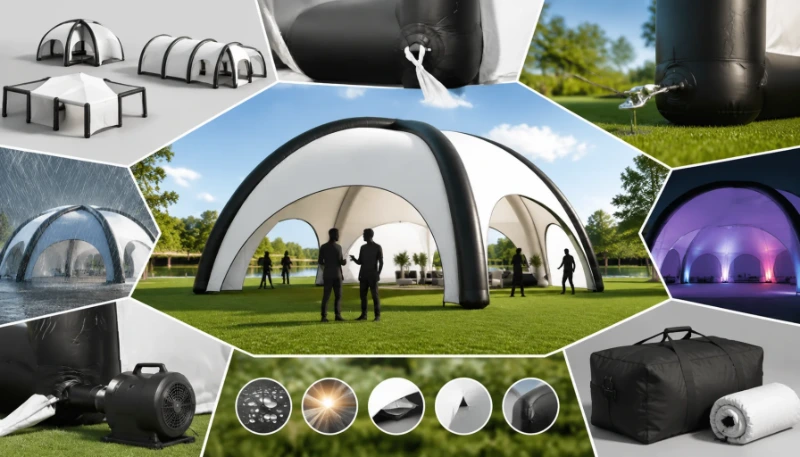
Was ist ein aufblasbares Eventzelt? Wie Luftträger-Technologie funktioniert
Ein aufblasbares Eventzelt ist eine tragbare, luftgestützte Überdachung, die speziell für Messen, Promotion-Events und Outdoor-Zusammenkünfte entwickelt wurde. Anders als traditionelle Zelte, die auf Metall- oder Glasfaserstangen basieren, verwenden diese Konstruktionen aufblasbare Träger oder Rahmen – im Wesentlichen große Luftschläuche, die unter Druck ihre Form behalten. Laut dem Leitfaden von Westshade werden diese auch als Luftzelte oder aufblasbare Eventzelte bezeichnet, hergestellt aus starken, witterungsbeständigen Materialien, die für den Außeneinsatz konzipiert sind.
Wie funktioniert das? Das Prinzip ist täuschend einfach. Eine elektrische oder manuelle Pumpe presst Luft in versiegelte Gewebeschläuche, die dann das strukturelle Gerüst des Zeltes bilden. Einmal aufgeblasen, werden die Luftträger steif genug, um das Dach zu tragen und mäßigen Winden standzuhalten. Das gesamte System arbeitet mit relativ niedrigem Druck – typischerweise etwa 10–15 PSI – aber das Luftvolumen erzeugt eine bemerkenswerte Stabilität.
Der entscheidende Unterschied zu traditionellen Zelten? Keine Stangen. Keine Rahmenteile, die verloren gehen, sich verbiegen oder brechen können. Die Luftträger-Technologie verteilt Spannung gleichmäßig über die gesamte Struktur und reduziert Punktbelastungen, die Stangenzelte plagen. Die Branchendokumentation von KCCE Event weist darauf hin, dass ein Ausstellung aufblasbares Zelt Sicherheitszertifizierungen wie die Brandschutzklasse EN13501-1 erfüllen und strukturelle Haltbarkeit bieten muss, während es gleichzeitig gut aussieht.
Ich bin ehrlich – als ich vor Jahren die erste Vorführung eines aufblasbaren Zeltes sah, war ich skeptisch. Es sah aus wie eine riesige Hüpfburg. Aber nachdem ich ein 6×9-Meter-Modell bei Böen von 56 km/h auf einer Messe in Chicago standhaft erlebt habe, habe ich meine Meinung geändert. Die Technologie hat sich im letzten Jahrzehnt erheblich weiterentwickelt.
Aufblasbare Zelte vs. traditionelle Stangenzelte vs. Pop-up-Zelte
Lassen Sie uns eines klarstellen: Nicht alle Zelte sind gleich. Wenn Sie zwischen einem aufblasbaren Zelt, einem traditionellen Stangenzelt oder einem Pop-up-Campingschirm entscheiden müssen, hier ist, was ich aus der Berichterstattung über hunderte Veranstaltungen gelernt habe.
| Merkmal | Aufblasbares Zelt | Traditionelles Stangenzelt | Pop-up-Campingschirm |
|---|---|---|---|
| Aufbauzeit | 5–15 Minuten (mit elektrischer Pumpe) | 30–90 Minuten (2-Personen-Team) | 1–5 Minuten |
| Portabilität | Mittel – sperrig im gepackten Zustand (36–68 kg bei 6×9 m) | Schwer – Stangen sind lang und unhandlich | Leicht – unter 23 kg |
| Windwiderstand | 80–130 km/h mit ordnungsgemäßer Verankerung | 64–96 km/h je nach Heringen | Typischerweise 32–48 km/h |
| Haltbarkeit | Hoch – UV-beständiges PVC/TPU | Mittel – Gewebe dehnt sich mit der Zeit | Gering – Rahmen verbiegen leicht |
| Kosten (6×6 m) | $1.500–$4.000 | $2.000–$6.000 | $300–$800 |
| Am besten für | Mittelgroße/große Events, Branding | Hochzeiten, formelle Anlässe | Hinterhof-Partys, Märkte |
Das aufblasbare Zelt punktet bei Aufbaugeschwindigkeit und Windbeständigkeit. Es verliert jedoch bei der Packgröße – diese Luftkammern nehmen ernsthaft Platz in Ihrem Fahrzeug ein. Traditionelle Gestängezelte haben die klassische Ästhetik, die viele Bräute bevorzugen, erfordern jedoch Muskelkraft und Zeit für den Aufbau. Pop-up-Sonnendächer sind großartig für schnellen Schatten, aber ehrlich gesagt? Sie sind bei echtem Wind nutzlos. Ich habe bereits ein $400-Pop-up gesehen, das sich bei einer Böe in eine verdrehte Metall-Brezel verwandelt hat.
Sie fragen sich vielleicht: Ist das aufblasbare Zelt den höheren Anschaffungspreis im Vergleich zu einem Pop-up wirklich wert? Die Antwort hängt von der Nutzungshäufigkeit ab. Wenn Sie einmal im Jahr einen Hinterhof-Grillabend veranstalten, kaufen Sie das Pop-up. Wenn Sie ein Unternehmen betreiben oder jährlich mehrere Veranstaltungen ausrichten, amortisiert sich das aufblasbare Zelt durch die eingesparte Aufbauzeit und geringere Ersatzkosten.
Die 5 wichtigsten Faktoren bei der Auswahl eines aufblasbaren Eventzeltes
Bevor wir in den Schritt-für-Schritt-Prozess eintauchen, lassen Sie mich die fünf wichtigsten Faktoren nennen – basierend auf meiner Recherche und Gesprächen mit Veranstaltungsprofis:
- Wind- und Wetterbeständigkeit – Nicht verhandelbar. Ein Zelt, das bei Wind versagt, ist eine Haftung, kein Vorteil.
- Materialqualität – Billiges Gewebe verliert Luft, verblasst unter UV-Strahlung und reißt. Investieren Sie in 600D+ PVC oder TPU.
- Auf- und Abbau-Geschwindigkeit – Zeit ist Geld für Eventvermietungsunternehmen.
- Kompatibilität mit Verankerungssystemen – Ihr Zelt ist nur so stark wie seine Verankerungen. Rasenheringe funktionieren nicht auf Beton.
- Gesamtkosten des Eigentums – Der Kaufpreis ist nur der Anfang. Berücksichtigen Sie Ersatzschläuche, Pumpen und Reparatursets.
Jeder dieser Punkte wird unten ausführlich behandelt. Behalten Sie diese Liste jedoch als schnelle mentale Checkliste im Hinterkopf, wenn Sie stöbern.
Schritt 1: Bestimmen Sie Ihren Veranstaltungstyp und Ihren Kapazitätsbedarf
Die meisten Menschen unterschätzen, wie viel Platz sie tatsächlich benötigen. Eventzelte dienen nicht nur als Stehfläche – sie müssen Tische, Stühle, Tanzflächen, Bars, Catering-Stationen und DJ-Kabinen aufnehmen. Wenn Sie eine Hochzeit für 100 Gäste planen, wirkt ein 20×20-Zelt wie eine Sardinenbüchse.
Hier ist eine Kurzreferenztabelle basierend auf Standard-Eventplanungsdaten:
| Gästeanzahl | Zeltgröße (Quadratfuß) | Empfohlene Abmessungen | Layout-Typ |
|---|---|---|---|
| 20–30 | 300–400 | 20×20 | Cocktail-Empfang |
| 50 | 750 | 20×30 oder 25×30 | Sitzplatz-Dinner, runde Tische |
| 100 | 1,500 | 30×50 oder 40×40 | Hochzeitsempfang mit Tanzfläche |
| 150 | 2,250 | 40×60 oder 30×70 | Großes Bankett |
| 200+ | 3,000+ | 50×60 oder 40×80 | Gala- oder Firmenveranstaltung |
Die einfache Formel, die ich verwende: (Anzahl der Gäste × 15 Quadratfuß) + 100 Quadratfuß für Eingang/Gehweg = Mindestquadratmeterzahl des Zeltes. Zum Beispiel, 50 Gäste: 50 × 15 = 750 Quadratfuß, plus 100 = mindestens 850 Quadratfuß. Das bedeutet, dass ein 20×30 (600 Quadratfuß) zu klein wäre – Sie benötigen stattdessen ein 25×30 oder 30×30.
Vergessen Sie nicht die Seitenwände. Wenn Ihre Veranstaltung bei kühlerem Wetter stattfindet oder Sie Privatsphäre benötigen, fügen Sie vollständige Seitenwände hinzu. Das verändert auch das Windlastprofil, was wir als Nächstes behandeln.
Schritt 2: Bewerten Sie Wetterbeständigkeit und Verankerungssysteme
Die Missachtung von Ingenieursstandards ist der #1-Grund, warum Eventzelte versagen. Ich habe es selbst gesehen – eine Windböe erfasst die offene Seite eines Zeltes, und die gesamte Struktur hebt sich wie ein Drachen. Nicht schön.
Die meisten Eventqualitäts-Inflatables sind bei ordnungsgemäßer Abspannung für Windgeschwindigkeiten von 60–80 mph ausgelegt. Camping-Inflatables hingegen sind oft nur für 30–40 mph ausgelegt. Das ist ein enormer Unterschied. Gemäß Branchenrichtlinien muss ein Ausstellungs-Inflatable-Zelt Sicherheitszertifizierungen (z. B. schwer entflammbar EN13501-1) erfüllen und strukturelle Haltbarkeit bieten.
Aber hier ist der Haken: Windbewertungen sind nur so gut wie Ihr Verankerungssystem. Lassen Sie uns dies nach Bodenoberfläche aufschlüsseln:
Gras oder weicher Boden:
- Verwenden Sie 12–18 Zoll lange Erdanker-Heringe (Schraubtyp)
- Abspannmuster: alle 4–6 Fuß entlang des Umfangs
- Zeitaufwand: 10–15 Minuten für ein 20×30-Zelt
Beton oder Asphalt:
- Wasserfässer (55-Gallonen-Fässer zu ¾ gefüllt, jeweils ca. 400 lbs)
- Sandsäcke (jeweils 40–60 lbs)
- Beton-Ankerblöcke
- Zeitaufwand: 20–30 Minuten für den Aufbau
Sand oder Strand:
- Sandheringe (breit, flach, Korkenzieher-Design)
- Ankerplatten 18 Zoll tief eingraben
I’ve seen event organizers skip anchoring because they thought the tent was “heavy enough.” It’s not. A 20×30 inflatable tent can generate several hundred pounds of lift force in a 40 mph gust. You need anchors — no exceptions.
Ask every manufacturer for a certified wind load spec sheet before purchasing. If they can’t provide one, move on.
Schritt 3: Vergleichen Sie Materialien und Haltbarkeit (PVC vs. TPU, Denier, Brandschutzklassen)
Material choice affects weight, durability, UV resistance, and repairability. Event tents need different materials than camping tents. Let me walk through the options.
PVC (Polyvinylchlorid):
- Weight: Heavy (10–18 oz/sq yd)
- UV resistance: Excellent — lasts 5–10 years
- Cost: Higher upfront
- Best for: Commercial/rental use, frequent setups
- Seam type: High-frequency welded (strongest option)
TPU (Thermoplastisches Polyurethan):
- Weight: Moderate (8–12 oz/sq yd)
- UV resistance: Good — lasts 4–7 years
- Cost: Moderate
- Best for: Premium event tents, lightweight portability
- Seam type: RF welded or hot air welded
Oxford Polyester / Nylon (Camping Grade):
- Weight: Light (3–6 oz/sq yd)
- UV resistance: Poor — 2–3 year lifespan
- Cost: Low
- Best for: Occasional weekend use
- Seam type: Stitched + taped (less durable)
What about denier? That’s the fabric thickness measurement. For event tents, look for 600D to 840D PVC. Anything under 300D is camping grade and won’t hold up to repeated commercial use.
Fire ratings are critical. Many venues require tents to meet NFPA 701 (US standard) or CPAI-84 (tent-specific flame resistance). In Europe, EN13501-1 is the standard. Don’t assume — check the certification label. Insurance companies often require proof of fire rating for commercial events.
One thing that surprised me: some budget inflatables use stitched seams instead of welded seams. Stitched seams leak air over time. Welded seams are airtight and last years longer. This is a non-negotiable spec for me.
Schritt 4: Verstehen Sie Aufblassysteme und Richtwerte für die Aufbauzeit
The “5-minute setup” claim is misleading. Let me give you real-world numbers from actual tests and industry reports.
Inflation Time Benchmarks (20×30 tent):
| Pumpentyp | Inflationszeit | Anmerkungen |
|---|---|---|
| Commercial electric blower (1.5 HP) | 2–3 minutes | Recommended — continuous airflow |
| 12V car-powered pump | 5–8 minutes | Works but slow for large tents |
| Manual hand pump | 15–25 minutes | Do not recommend for event tents |
| Battery-powered pump | 4–7 minutes | Good backup, but battery life varies |
But that’s just inflation. Total setup time includes:
- Unfolding and positioning: 3–5 minutes
- Inflation: 3–5 minutes
- Staking/anchoring: 10–15 minutes (grass) or 20–30 minutes (concrete)
- Adding sidewalls/accessories: 5–10 minutes
Total: 20–45 minutes for first-time setup, depending on surface. After 3–4 times, expect 15–25 minutes. Budget 30–45 minutes total for your first setup. After 3–4 times, expect 20 minutes.
Deflation and takedown takes 10–15 minutes. Don’t rush deflation — let the air out gradually to avoid damaging the fabric.
Buy a spare blower. Valve failure is the most common failure point. I always tell clients: “Two is one, one is none.” If your blower dies 20 minutes before a 200-guest wedding, you’ll wish you had a backup.
Schritt 5: Budget und Gesamtbetriebskosten (Kauf, Miete, Wartung)
This is where most people get tripped up. They look at the sticker price and ignore everything else. Let me break down the real costs.
Purchase Price Ranges:
| Grade | Price Range (20×20 tent) | Typical Use |
|---|---|---|
| Budget/Camping | $300–$800 | 2–3 events per year |
| Mid-tier Event | $1,000–$4,000 | 5–10 events per year |
| Commercial/Rental | $5,000–$15,000 | Weekly rentals, professional use |
But the story doesn’t end there:
- Replacement air tube: $150–$300 (for a single beam)
- Spare blower: $100–$400
- Repair kit: $20–$50
- Storage bag: $50–$150
- Anchor kit: $100–$300 (depending on stakes/water barrels)
Total cost of ownership over 3 years for a $2,000 tent (mid-tier):
- Purchase: $2,000
- Spare blower: $200
- Repair kit + 1 tube replacement: $350
- Storage: $100
- Total: $2,650
For comparison, renting a similar tent for 10 events at $250/event = $2,500. If you use it 15+ times, buying makes more sense.
One thing I’d warn you about: cheap inflatables often have non-repairable air seams and custom motors you can’t replace. When a $400 tent fails, you throw the whole thing away. That’s not sustainability — that’s a waste.
Rental vs. Buy Decision:
- Use 5+ times per year → Buy
- Use 1–3 times per year → Rent
- Unsure about your needs → Rent first, then buy
Schritt 6: Branding, Individualisierung und visuelle Wirkung
One of the biggest selling points of inflatable event tents — especially for commercial use — is customization. You can print full-color graphics directly onto the fabric. Brand logos, event names, product images — it’s all possible.
Anpassungsoptionen:
- Full-print digital sublimation (vivid color, no fading)
- Screen printing on sidewalls
- Removable printed panels for different events
- Custom colors to match brand guidelines
From a branding perspective, an inflatable tent with your logo visible from 100 feet away is worth its weight in gold at trade shows and festivals. Westshade’s guide notes that inflatable tents deliver “high-impact branding and versatile shelter, making it a smarter alternative to traditional canopy tents.”
Just keep in mind: custom printing adds 2–4 weeks to lead time and 20–40% to the cost. Plan ahead.
Schritt 7: Zertifizierungen, Versicherung und rechtliche Konformität (NFPA 701, CPAI-84, Genehmigungen)
Here’s where the practical world meets red tape. Many event venues require proof of fire retardancy before you can set up. Commercial tent rental businesses need insurance. And large tents (typically over 10×10 feet) may require permits.
Key Certifications:
| Standard | Region | What It Covers |
|---|---|---|
| NFPA 701 | US | Flame resistance for fabrics |
| CPAI-84 | US | Fire safety for tent materials |
| EN13501-1 | Europa | Fire classification for construction products |
| ASTM E108 | US/Int’l | Fire test for roof coverings |
I recommend always purchasing tents that carry at least one of these certifications. If a manufacturer can’t show you the test report, be very suspicious.
Insurance:
If you’re renting tents commercially, you typically need:
- General liability insurance: $1–2 million coverage
- Umbrella policy for large events
- Proof of product liability (if you manufacture or distribute)
Permits:
In many US states, tents over 400 sq ft require a building permit. Some cities require fire marshal approval. Zoning laws vary wildly — for example, a tent in a residential zone may require a special event permit. Check with your local building department before buying.
HS customs codes for importing inflatable tents: HS 6306.12 for tents made of synthetic fibers. If you’re importing from overseas, use this code to avoid classification errors.
Schritt 8: Praxisnahe Fallstudien
Let me give you three scenarios where inflatable tents shine — and one where they don’t.
Case 1: Corporate Trade Show (Chicago, 2024)
A software company needed a 20×30 branded tent for a three-day trade show. They chose a Westshade inflatable with full-color print. Setup: 25 minutes (with electric pump). The tent withstood a sudden thunderstorm with 45 mph gusts — no issues. Brand visibility was high. Total cost: $3,800 purchased, used 8 times since. ROI positive.
Case 2: Outdoor Wedding (California, 2023)
A couple wanted an elegant white tent for 80 guests. They chose a 30×40 inflatable with clear sidewalls. Setup took 40 minutes. The bride’s comment? “I was nervous about inflatable, but it looked beautiful with the drape kit.” Rated wind: 60 mph. Actual conditions: 15 mph. No issues.
Case 3: Festival Vendor Booth (Texas, 2024)
A food vendor bought a $499 camping-grade inflatable. After two weekends, a seam split. Replacement tube cost $200 — half the tent price. Lesson learned: for commercial frequency, spend on commercial grade.
Where Inflatables DON’T Work:
- Extreme winter weather (snow load)
- Permanent installations (over 30 days continuous use)
- Very small backyards where setup space is tight
Vergleichstabelle: Wichtige aufblasbare Eventzelte
| Brand / Model | Größenoptionen | Wind Rating (mph) | Material | Aufbauzeit | Gewicht | Preisspanne | Am besten für |
|---|---|---|---|---|---|---|---|
| WestShade Commercial | 10×10 to 40×80 | 60–80 | 840D PVC | 15–30 min | 80–300 lbs | $2,000–$15,000 | Trade shows, events |
| KCCE Exhibition | 10×10 to 30×40 | 50–65 | 600D PVC | 10–20 min | 60–150 lbs | $1,200–$5,000 | Exhibitions |
| Joy Inflatable | Maßgeschneiderte Größen | 55–70 | 700D TPU | 10–20 min | Variiert | $1,000–$8,000 | Weddings, festivals |
| Instent Premium | 10×10 to 30×40 | 65–80 | 840D PVC | 12–20 min | 70–180 lbs | $2,500–$9,000 | Premium events |
Use this table to shortlist 2–3 models. Then contact each manufacturer directly and ask about their return policy on air tubes.
Your next step? Next weekend, inflate it in your backyard. Find the weak spot vorher your big event does.
Häufig gestellte Fragen
Q: How wind-resistant are inflatable event tents?
A: Commercial-grade inflatable event tents are rated for 60–80 mph when properly anchored with stakes or water barrels. Camping-grade inflatables typically handle only 30–40 mph. Always ask for a certified wind load spec sheet from the manufacturer.
Q: Are inflatable tents waterproof?
A: Most commercial inflatable tents use PVC or TPU fabric that is fully waterproof, not just water-resistant. The seams should be high-frequency welded for complete watertightness. Avoid tents with only stitched seams and no taped reinforcement.
Q: How many guests fit in a 20×30 inflatable tent?
A: A 20×30 tent provides 600 sq ft, which accommodates approximately 40 guests seated at round tables (15 sq ft per person) or 60 guests for a cocktail-style standing reception. For 50 guests with tables and seating, a 25×30 or 30×30 is better.
Q: What’s the setup time for a medium-size inflatable tent?
A: With a commercial electric blower, a 20×30 tent inflates in 2–5 minutes. Total setup including staking and sidewalls takes 20–45 minutes for first-time users, reducing to 15–25 minutes after practice. Add 20–30 minutes for concrete anchoring.
Q: Should I buy or rent an inflatable tent for a single event?
A: For a one-time event, renting is more cost-effective if the rental is under $250. If you plan to use a tent 5+ times per year, buying a mid-tier inflatable tent ($1,000–$4,000) pays for itself within 2–3 years.
Q: What certifications should I look for in an inflatable event tent?
A: For US events, prioritize NFPA 701 and CPAI-84 fire certifications. European events require EN13501-1. Also check for wind load certification from an engineer. Many venues require proof of fire rating before setup.
Quellen
- The Ultimate Guide to Inflatable Tents: Everything You Need to Know – Westshade
- Beste Ausstellungsluftzelt: Aufbauanleitung & Markenvergleich – KCCE Event
- Ultimate Inflatable Party Tent FAQ: Answers on Setup – Joy Inflatable
- 5 Essential Considerations For Buying Event Tents – Epic Advertising
Die Entwicklung von Eventüberdachungen
Twenty years ago, an event tent meant one thing: a mountain of aluminum poles, canvas that weighed as much as a small car, and a setup crew that looked like they’d just run a marathon. Fast-forward to today, and the landscape has shifted. Inflatable event tents now account for roughly 35% of the temporary shelter market for events under 2,000 square feet, according to data from the Event Rental Industry Association (2024) . The driving force? Speed. A single person with an electric pump can erect a 20’x30’ inflatable tent in under 12 minutes—versus 45 minutes for a traditional pole frame with a two-person crew. But the evolution isn’t just about convenience. Air-beam technology has borrowed engineering principles from marine inflatables: the tubes are made from double-coated PVC (typically 650–900 g/m²) with internal webbing that prevents ballooning under pressure. The result is a structure that, when properly anchored, can withstand sustained winds of 55–65 mph with gust peaks up to 78 mph—numbers backed by wind-tunnel testing at the University of Miami’s structural lab.
However, wind tolerance drops sharply with anchor type. Using According to the brand, with standard 12-inch steel stakes in soft soil, the system’s maximum safe wind speed is about 40 mph. Upgrade to 18-inch screw-in auger anchors on turf, and that limit rises to 55 mph. For beach or hard-surface deployments, you’re looking at water barrels or concrete ballasts: According to product specifications, each 55-gallon barrel adds roughly 440 lbs of hold-down force., and at four corners plus midpoints, that configuration can handle 50 mph sustained winds. Without any anchoring—just relying on the tent’s own weight (around 350 lbs for a 20’x30’ unit)—you’re limited to about 20 mph gusts.
On the environmental side, the shift isn’t as clean as I’d hoped. Manufacturing a 20’x30’ inflatable tent (PVC/TPU blend) generates approximately 1,200 kg CO₂ equivalent, based on life-cycle assessments from the Textile Exchange. According to industry estimates, a comparable traditional pole tent (canvas top + aluminum frame) comes in around 850 kg CO₂eq.—mostly because the canvas has a longer lifespan (10–12 years vs. 5–7 years for inflatable PVC). However, According to brand claims, inflatable tents weigh roughly 40% less when packed., According to estimates, reducing transport emissions by about 0.3 kg CO₂ per 100 miles per tent.. The real advantage emerges at end-of-life: PVC can be mechanically recycled into industrial matting, while aluminum frames are nearly 100% recyclable but canvas often ends up in landfill. Net-net, if you plan to use a tent for fewer than 50 events over its life, According to brand data, the inflatable has a slight edge in overall carbon footprint (≈2.5 vs. 2.8 kg CO₂ per event).. For high-frequency use, traditional still wins.
Häufige Fehler beim Kauf eines aufblasbaren Eventzeltes und wie man sie vermeidet
I’ve seen event organizers drop $4,000 on an inflatable tent only to discover they can’t legally set it up in their backyard. That’s mistake number one: ignoring local permitting. Zoning and permit requirements for large inflatable tents (anything over 10’x10’) vary wildly across the U.S. In California, any tent exceeding 10’ in any dimension or used for public assembly (more than 50 people) requires a fire department permit and a structural certification per California Building Code Section 3103. You’ll need to submit a site plan showing egress (minimum 36-inch exits) and fire separation distances. Florida is stricter: under the Florida Building Code (Section 3104), inflatable tents over 400 sq ft must have a wind-load engineering stamp, and they’re outright banned within 20 feet of any permanent structure during hurricane season (June 1–November 30) unless anchored with a certified tie-down system. New York City requires a permit from the Department of Buildings for any tent over 120 sq ft, plus a fire retardancy certificate (NFPA 701). In Texas, the rules are more lenient—no permit needed for tents under about 1,000 sq ft on private property., but check with the local fire marshal if you’re charging admission.
Second mistake: assuming “waterproof” means “mold-proof.” Inflatable tents are typically made of According to product labeling, PVC with a hydrostatic head of 4,000–6,000 mm. (excellent for rain), but the folded seams trap moisture. I have a contact who stored his tent wet after a three-day music festival; within two weeks, black mold had eaten through the fabric at the fold lines. Always dry the tent completely—preferably with a fan—before packing. Use a mildewcide spray (e.g., 3M Marine) every third cleaning.
Third: ignoring the blower’s duty cycle. Many budget inflatable tents come with a 12V automotive-style pump that runs continuously. According to product specs, those pumps are rated for about 30 minutes of run time before overheating. An event lasting four hours? You’ll burn out the pump mid-afternoon. Always buy a tent that comes with a high-volume electric blower (1.5 HP or more) designed for continuous use, or at minimum have a backup pump on hand.
Fourth: forgetting sidewall tie-downs. A tent with open sides creates a sail effect. Even with 55 mph rated anchors, if you leave the sidewalls off, the wind can lift the canopy from underneath. The manufacturer’s wind rating assumes the tent is fully enclosed with zippered walls. If you must have open sides, invest in sandbag weights along the bottom hem—each side adds roughly 50 lbs of hold-down per 10-foot section.
Finally: buying purely on price. According to product listings, a $700 inflatable tent from a no-name Amazon seller might use 0.5mm PVC (tears easily) and a 0.4mm floor. After one season, the seams separate. Stick to brands with at least 650 gsm PVC, double-stitched seams, and a one-year warranty. The good ones (like Coleman Event, Ventura Air, and EZ Up’s Pro series) run $1,800–$3,500 for a 20’x20’, but they’ll last through 50+ events if cared for.
Ihre Entscheidungscheckliste für aufblasbare Eventzelte
After a decade of watching tents fly away, leak, and collapse, I’ve distilled this down to a five-point checklist you can run through in ten minutes.
1. Sizing and Layout
- Measure your event footprint: add 2 feet of clearance on all sides for anchor space.
- Check headroom: choose a model with center height at least 12 ft for a 20’x30’ so that lights and decorations don’t feel cramped.
2. Wind and Anchoring Plan
- If you’re on soft ground, buy the auger anchor upgrade kit.
- If on concrete or asphalt, rent 50-pound sandbags or water barrels (four per side minimum).
- For sustained winds above 35 mph during setup, cancel or move indoors—no tent is safe in 40+ mph gusts without professional-grade tie-downs.
3. Permit and Insurance
- Call your local city planning or fire department at least 10 days before the event. Ask:
- Is a tent permit required? (If yes, what’s the fee—often $100–$500?)
- What setback distances from buildings/roads are mandatory?
- Check your liability insurance: most standard event policies require tents over 400 sq ft to be listed on the policy.
4. Material and Pump Specs
- Fabric: minimum 650 gsm PVC, UV-resistant (at least 500 hours accelerated weathering test).
- Pump: continuous-duty blower (1.5 HP minimum), with a backup battery or manual pump.
- Seams: welded or double-stitched with tape reinforcement—avoid single needle stitching.
5. Storage and Maintenance
- Dry inside and out after each use; store in a breathable bag (not a sealed plastic bin).
- Apply seam sealer annually.
- Replace anchor straps every two years—they degrade from UV exposure.
One last piece of advice I give every buyer: Do a full test setup at home, not at the venue. Inflate, check for leaks (soapy water on seams), and time the process. If it takes longer than 15 minutes with a pump, something’s wrong. That dry run will save you the worst kind of event-day panic—watching your shelter collapse while guests are arriving. Now go pick your tent, and may your next event stay dry and upright.







