

インフレータブルイベントテントの選び方とは? イベント用シェルターの進化
会場は確保済み。ゲストリストも準備完了。しかし結婚披露宴の2時間前、そのポップアップフレームテントはまだ芝生の上でポールの山のままで、天気予報は時速20マイルの突風を示しています。まさにこれが、ますます多くのイベントプランナーが中規模の屋外イベントでインフレータブルテントに切り替えている理由です。.
イベントを主催した経験のある人なら誰でも知っています——テント選びはロケット科学ではありません。しかし実際に購入する段階になると、頭が混乱し始めます。選択肢はどこにでもあり、価格は数百ドルから数千ドルまで様々です。実際に価値があるのはどれでしょうか?私は10年以上にわたってイベント機器について執筆しており、数え切れないほどの失敗を見てきました。そこで今日はすべてを詳しく説明します——これが皆さんの回り道を少しでも減らす助けになれば幸いです。.
このガイドでは、サイズ、安全性、設営速度、実際のコストといった重要なトレードオフについて詳しく説明します。目標は、次のイベントがテントの災害にならないようにすることです。一般的なキャンプ記事とは異なり、これはイベント主催者向けに書かれています。耐風等級、硬質地面でのアンカー固定、サイドウォールのオプションについても取り上げます。最後には、個人的な決定チェックリストと、候補に挙げるべきブランドがわかるようになります。.
正直な真実をお伝えします: 最良のインフレータブルイベントテント とは、実際に正しく設営できるテントのことです。柔らかい地面でペグ打ちを省略すれば、耐風等級は意味をなしません。濡れた状態でテントを保管すれば、素材も意味をなしません。したがって、購入前にアンカーキットを確認してください——テントの生地だけではなく。.
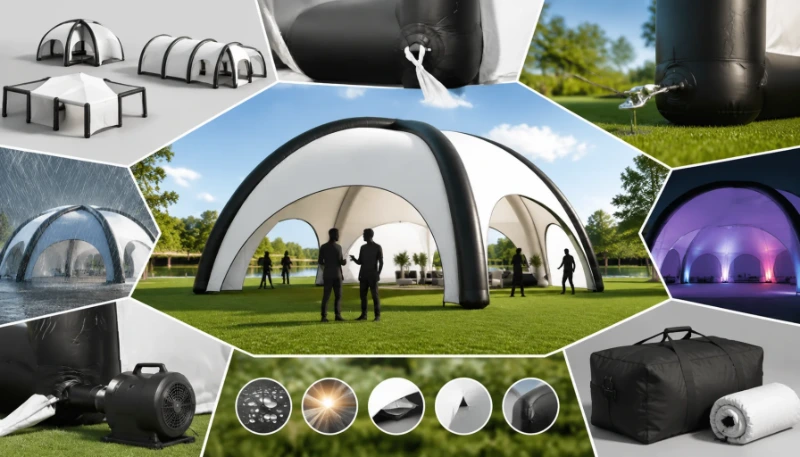
インフレータブルイベントテントとは?エアビーム技術の仕組み
インフレータブルイベントテントとは、トレードショー、プロモーションイベント、屋外集会のために特別に設計された、持ち運び可能な空気支持式シェルターです。金属やグラスファイバーのポールに依存する従来のテントとは異なり、これらの構造物は膨張したビームまたはフレーム——基本的には圧力下で形状を維持する大型のエアチューブ——を使用します。Westshadeのガイドによると、これらは エアテント またはインフレータブルイベントテントとも呼ばれ、屋外環境向けに作られた強靭で耐候性のある素材で製造されています。.
どのように機能するのでしょうか?原理は驚くほどシンプルです。電動または手動ポンプが密閉されたファブリックチューブに空気を送り込み、それがテントの構造的骨格を形成します。一度膨張すると、エアビームはキャノピーを支え、中程度の風に耐えるのに十分な剛性を持ちます。システム全体は比較的低圧力——通常約10〜15 PSI——で動作しますが、空気の量が驚くべき安定性を生み出します。.
従来のテントとの主な違いは?ポールがありません。紛失、曲がり、破損するフレーム部品もありません。エアビーム技術は構造全体に応力を均等に分散させ、ポールテントを悩ませる点状の故障を軽減します。KCCE Eventの業界文書によると、 展示用インフレータブルテント 防火規格EN13501-1などの安全認証を満たし、見た目も良好でありながら構造的耐久性を提供する必要があります。.
正直に言うと、何年も前に初めてインフレータブルテントのデモを見たとき、私は懐疑的でした。巨大なバウンスハウスのように見えました。しかしシカゴのトレードショーで20×30モデルが時速35マイルの突風の中でしっかりと立っているのを見て、私は考えを変えました。この技術は過去10年間で大幅に成熟しています。.
インフレータブルテント vs 従来のポールテント vs ポップアップテント
一つ明確にしておきましょう:すべてのテントが同じように作られているわけではありません。インフレータブル、従来のポールテント、ポップアップキャノピーの間で選択しようとしている場合、何百ものイベントを取材して私が学んだことは以下の通りです。.
| 特徴 | インフレータブル・テント | 伝統的なポールテント | ポップアップキャノピーテント |
|---|---|---|---|
| 設置時間 | 5〜15分(電動ポンプ使用) | 30〜90分(2人チーム) | 1〜5分 |
| 携帯性 | 中程度——収納時はかさばる(20×30で80〜150ポンド) | 重い——ポールが長く扱いにくい | 軽量——50ポンド未満 |
| 風への抵抗力 | 適切なアンカー固定で時速50〜80マイル | ペグ次第で時速40〜60マイル | 通常時速20〜30マイル |
| 耐久性 | 高——耐UV PVC/TPU | 中程度——時間の経過とともに生地が伸びる | 低——フレームが曲がりやすい |
| コスト(20×20) | $1,500〜$4,000 | $2,000〜$6,000 | $300〜$800 |
| 最適な用途 | 中/大規模イベント、ブランディング | 結婚式、正式な集まり | 裏庭でのパーティー、マーケット |
インフレータブルテントは、設営速度と耐風性に優れています。しかし、収納サイズでは劣ります——エアビームが車内でかなりのスペースを占めます。従来型のポールテントは、多くの花嫁が好むクラシックな美観を持っていますが、組み立てには力と時間が必要です。ポップアップキャノピーは手軽な日陰には最適ですが、正直なところ? 本格的な風の中では役に立ちません。私は$400のポップアップが突風でねじれた金属のプレッツェルのようになるのを見たことがあります。.
あなたはこう疑問に思うかもしれません: インフレータブルテントは、ポップアップと比較して高い初期費用に見合う価値が本当にあるのか? 答えは使用頻度によって異なります。年に一度の裏庭BBQを開催するだけなら、ポップアップを購入してください。ビジネスを運営している、または年間複数のイベントを開催しているなら、インフレータブルは設営時間の節約と交換コストの削減で元が取れます。.
インフレータブルイベントテントを選ぶ際の重要考慮事項トップ5
段階的なプロセスに入る前に、私の調査とイベント専門家との会話に基づいて、最も重要となる5つの要素を共有させてください:
- 耐風性と耐候性 — 譲れない条件です。風で倒れるテントは資産ではなく、負債です。.
- 素材の品質 — 安価な生地は空気漏れ、UVによる退色、破れが発生します。600D以上のPVCまたはTPUに投資してください。.
- 設営・撤収のスピード — イベントレンタル業界では、時間はお金です。.
- アンカーシステムとの互換性 — テントの強度はアンカーの強度次第です。芝生用のペグはコンクリートでは機能しません。.
- 総所有コスト — 購入価格は始まりに過ぎません。交換用チューブ、ポンプ、修理キットも考慮に入れてください。.
これらの各項目については、以下で詳しく解説します。ただし、閲覧中はこのリストを簡単なチェックリストとして頭に入れておいてください。.
ステップ1:イベントの種類と収容人数のニーズを決定する
ほとんどの人は、実際に必要なスペースを過小評価しています。イベントテントは立つためのスペースだけではありません——テーブル、椅子、ダンスフロア、バー、ケータリングステーション、DJブースを収容する必要があります。100人のゲストの結婚式を計画している場合、20×20のテントでは缶詰のように感じられるでしょう。.
以下は、標準的なイベント計画データに基づく早見表です:
| ゲスト数 | テントサイズ(平方フィート) | 推奨寸法 | レイアウトタイプ |
|---|---|---|---|
| 20–30 | 300–400 | 20×20 | カクテルレセプション |
| 50 | 750 | 20×30または25×30 | 着席ディナー、円卓 |
| 100 | 1,500 | 30×50または40×40 | ダンスフロア付き結婚披露宴 |
| 150 | 2,250 | 40×60または30×70 | 大規模宴会 |
| 200+ | 3,000+ | 50×60または40×80 | ガラまたは企業イベント |
私が使用する簡単な計算式: (ゲスト数 × 15平方フィート)+ 入場・通路用に100平方フィート = 最低必要テント面積. 例えば、50人のゲストの場合:50 × 15 = 750平方フィート、プラス100 = 最低850平方フィート。これは20×30(600平方フィート)では小さすぎることを意味し——25×30または30×30が必要になります。.
サイドウォールも忘れないでください。イベントが涼しい気候で行われる場合やプライバシーが必要な場合は、フルサイドウォールを追加してください。これにより耐風荷重プロファイルも変わります。これについては次に説明します。.
ステップ2:耐候性とアンカーシステムを評価する
工学基準を無視することが、イベントテントが失敗する#の理由です。私はそれを実際に見たことがあります——突風がテントの開放側を捉え、構造全体が凧のように持ち上がります。見苦しいものです。.
ほとんどのイベント用インフレータブルは、適切に固定された場合、時速60〜80マイルの風に耐える定格です。対照的に、キャンプ用インフレータブルは時速30〜40マイルの定格が一般的です。これは大きな違いです。業界ガイドラインによると、展示用インフレータブルテントは安全認証(例:難燃性EN13501-1)を満たし、構造的耐久性を提供する必要があります。.
しかし、ここに落とし穴があります:耐風定格はアンカーシステムと同じ程度の信頼性しかありません。地面の種類別に詳しく見ていきましょう:
芝生または柔らかい地面:
- 12〜18インチのオーガーステーク(スクリュー式)を使用
- 固定パターン:周囲に沿って4〜6フィート間隔
- 所要時間:20×30テントで10〜15分
コンクリートまたはアスファルト:
- ウォーターバレル(55ガロンドラム缶に¾満タン、各約400ポンド)
- サンドバッグ(各40〜60ポンド)
- コンクリートアンカーブロック
- 所要時間:設営に20〜30分
砂地またはビーチ:
- サンドステーク(幅広・平型・コルクスクリュー設計)
- Burying anchor plates 18 inches deep
I’ve seen event organizers skip anchoring because they thought the tent was “heavy enough.” It’s not. A 20×30 inflatable tent can generate several hundred pounds of lift force in a 40 mph gust. You need anchors — no exceptions.
Ask every manufacturer for a certified wind load spec sheet before purchasing. If they can’t provide one, move on.
ステップ3:素材と耐久性を比較する(PVC vs TPU、デニール、防火等級)
Material choice affects weight, durability, UV resistance, and repairability. Event tents need different materials than camping tents. Let me walk through the options.
PVC(ポリ塩化ビニル):
- Weight: Heavy (10–18 oz/sq yd)
- UV resistance: Excellent — lasts 5–10 years
- Cost: Higher upfront
- Best for: Commercial/rental use, frequent setups
- Seam type: High-frequency welded (strongest option)
TPU(熱可塑性ポリウレタン):
- Weight: Moderate (8–12 oz/sq yd)
- UV resistance: Good — lasts 4–7 years
- Cost: Moderate
- Best for: Premium event tents, lightweight portability
- Seam type: RF welded or hot air welded
Oxford Polyester / Nylon (Camping Grade):
- Weight: Light (3–6 oz/sq yd)
- UV resistance: Poor — 2–3 year lifespan
- Cost: Low
- Best for: Occasional weekend use
- Seam type: Stitched + taped (less durable)
What about denier? That’s the fabric thickness measurement. For event tents, look for 600D to 840D PVC. Anything under 300D is camping grade and won’t hold up to repeated commercial use.
Fire ratings are critical. Many venues require tents to meet NFPA 701 (US standard) or CPAI-84 (tent-specific flame resistance). In Europe, EN13501-1 is the standard. Don’t assume — check the certification label. Insurance companies often require proof of fire rating for commercial events.
One thing that surprised me: some budget inflatables use stitched seams instead of welded seams. Stitched seams leak air over time. Welded seams are airtight and last years longer. This is a non-negotiable spec for me.
ステップ4:空気注入システムと設営時間のベンチマークを理解する
The “5-minute setup” claim is misleading. Let me give you real-world numbers from actual tests and industry reports.
Inflation Time Benchmarks (20×30 tent):
| Pump Type | 膨張時間 | 備考 |
|---|---|---|
| Commercial electric blower (1.5 HP) | 2–3 minutes | Recommended — continuous airflow |
| 12V car-powered pump | 5–8 minutes | Works but slow for large tents |
| Manual hand pump | 15–25 minutes | Do not recommend for event tents |
| Battery-powered pump | 4–7 minutes | Good backup, but battery life varies |
But that’s just inflation. Total setup time includes:
- Unfolding and positioning: 3–5 minutes
- Inflation: 3–5 minutes
- Staking/anchoring: 10–15 minutes (grass) or 20–30 minutes (concrete)
- Adding sidewalls/accessories: 5–10 minutes
Total: 20–45 minutes for first-time setup, depending on surface. After 3–4 times, expect 15–25 minutes. Budget 30–45 minutes total for your first setup. After 3–4 times, expect 20 minutes.
Deflation and takedown takes 10–15 minutes. Don’t rush deflation — let the air out gradually to avoid damaging the fabric.
Buy a spare blower. Valve failure is the most common failure point. I always tell clients: “Two is one, one is none.” If your blower dies 20 minutes before a 200-guest wedding, you’ll wish you had a backup.
ステップ5:予算と総所有コスト(購入、レンタル、メンテナンス)
This is where most people get tripped up. They look at the sticker price and ignore everything else. Let me break down the real costs.
Purchase Price Ranges:
| Grade | Price Range (20×20 tent) | Typical Use |
|---|---|---|
| Budget/Camping | $300〜$800 | 2–3 events per year |
| Mid-tier Event | $1,000–$4,000 | 5–10 events per year |
| Commercial/Rental | $5,000–$15,000 | Weekly rentals, professional use |
But the story doesn’t end there:
- Replacement air tube: $150–$300 (for a single beam)
- Spare blower: $100–$400
- Repair kit: $20–$50
- Storage bag: $50–$150
- Anchor kit: $100–$300 (depending on stakes/water barrels)
Total cost of ownership over 3 years for a $2,000 tent (mid-tier):
- Purchase: $2,000
- Spare blower: $200
- Repair kit + 1 tube replacement: $350
- Storage: $100
- Total: $2,650
For comparison, renting a similar tent for 10 events at $250/event = $2,500. If you use it 15+ times, buying makes more sense.
One thing I’d warn you about: cheap inflatables often have non-repairable air seams and custom motors you can’t replace. When a $400 tent fails, you throw the whole thing away. That’s not sustainability — that’s a waste.
Rental vs. Buy Decision:
- Use 5+ times per year → Buy
- Use 1–3 times per year → Rent
- Unsure about your needs → Rent first, then buy
ステップ6:ブランディング、カスタマイズ、視覚的インパクト
One of the biggest selling points of inflatable event tents — especially for commercial use — is customization. You can print full-color graphics directly onto the fabric. Brand logos, event names, product images — it’s all possible.
カスタマイズオプション:
- Full-print digital sublimation (vivid color, no fading)
- Screen printing on sidewalls
- Removable printed panels for different events
- Custom colors to match brand guidelines
From a branding perspective, an inflatable tent with your logo visible from 100 feet away is worth its weight in gold at trade shows and festivals. Westshade’s guide notes that inflatable tents deliver “high-impact branding and versatile shelter, making it a smarter alternative to traditional canopy tents.”
Just keep in mind: custom printing adds 2–4 weeks to lead time and 20–40% to the cost. Plan ahead.
ステップ7:認証、保険、法的コンプライアンス(NFPA 701、CPAI-84、許可証)
Here’s where the practical world meets red tape. Many event venues require proof of fire retardancy before you can set up. Commercial tent rental businesses need insurance. And large tents (typically over 10×10 feet) may require permits.
Key Certifications:
| 標準 | 地域 | What It Covers |
|---|---|---|
| NFPA 701 | US | Flame resistance for fabrics |
| CPAI-84 | US | Fire safety for tent materials |
| EN13501-1 | ヨーロッパ | Fire classification for construction products |
| ASTM E108 | US/Int’l | Fire test for roof coverings |
I recommend always purchasing tents that carry at least one of these certifications. If a manufacturer can’t show you the test report, be very suspicious.
Insurance:
If you’re renting tents commercially, you typically need:
- General liability insurance: $1–2 million coverage
- Umbrella policy for large events
- Proof of product liability (if you manufacture or distribute)
Permits:
In many US states, tents over 400 sq ft require a building permit. Some cities require fire marshal approval. Zoning laws vary wildly — for example, a tent in a residential zone may require a special event permit. Check with your local building department before buying.
HS customs codes for importing inflatable tents: HS 6306.12 for tents made of synthetic fibers. If you’re importing from overseas, use this code to avoid classification errors.
ステップ8:実際のケーススタディ
Let me give you three scenarios where inflatable tents shine — and one where they don’t.
Case 1: Corporate Trade Show (Chicago, 2024)
A software company needed a 20×30 branded tent for a three-day trade show. They chose a Westshade inflatable with full-color print. Setup: 25 minutes (with electric pump). The tent withstood a sudden thunderstorm with 45 mph gusts — no issues. Brand visibility was high. Total cost: $3,800 purchased, used 8 times since. ROI positive.
Case 2: Outdoor Wedding (California, 2023)
A couple wanted an elegant white tent for 80 guests. They chose a 30×40 inflatable with clear sidewalls. Setup took 40 minutes. The bride’s comment? “I was nervous about inflatable, but it looked beautiful with the drape kit.” Rated wind: 60 mph. Actual conditions: 15 mph. No issues.
Case 3: Festival Vendor Booth (Texas, 2024)
A food vendor bought a $499 camping-grade inflatable. After two weekends, a seam split. Replacement tube cost $200 — half the tent price. Lesson learned: for commercial frequency, spend on commercial grade.
Where Inflatables DON’T Work:
- Extreme winter weather (snow load)
- Permanent installations (over 30 days continuous use)
- Very small backyards where setup space is tight
比較表:主要なインフレータブルイベントテント
| Brand / Model | サイズオプション | Wind Rating (mph) | 素材 | 設置時間 | 重量 | 価格帯 | 最適な用途 |
|---|---|---|---|---|---|---|---|
| WestShade Commercial | 10×10 to 40×80 | 60–80 | 840D PVC | 15–30 min | 80–300 lbs | $2,000–$15,000 | Trade shows, events |
| KCCE Exhibition | 10×10 to 30×40 | 50–65 | 600D PVC | 10–20 min | 60–150 lbs | $1,200–$5,000 | Exhibitions |
| Joy Inflatable | カスタムサイズ | 55–70 | 700D TPU | 10–20 min | 異なる | $1,000–$8,000 | Weddings, festivals |
| Instent Premium | 10×10 to 30×40 | 65–80 | 840D PVC | 12–20 min | 70–180 lbs | $2,500–$9,000 | Premium events |
Use this table to shortlist 2–3 models. Then contact each manufacturer directly and ask about their return policy on air tubes.
Your next step? Next weekend, inflate it in your backyard. Find the weak spot 前に your big event does.
よくある質問(FAQ)
Q: How wind-resistant are inflatable event tents?
A: Commercial-grade inflatable event tents are rated for 60–80 mph when properly anchored with stakes or water barrels. Camping-grade inflatables typically handle only 30–40 mph. Always ask for a certified wind load spec sheet from the manufacturer.
Q: Are inflatable tents waterproof?
A: Most commercial inflatable tents use PVC or TPU fabric that is fully waterproof, not just water-resistant. The seams should be high-frequency welded for complete watertightness. Avoid tents with only stitched seams and no taped reinforcement.
Q: How many guests fit in a 20×30 inflatable tent?
A: A 20×30 tent provides 600 sq ft, which accommodates approximately 40 guests seated at round tables (15 sq ft per person) or 60 guests for a cocktail-style standing reception. For 50 guests with tables and seating, a 25×30 or 30×30 is better.
Q: What’s the setup time for a medium-size inflatable tent?
A: With a commercial electric blower, a 20×30 tent inflates in 2–5 minutes. Total setup including staking and sidewalls takes 20–45 minutes for first-time users, reducing to 15–25 minutes after practice. Add 20–30 minutes for concrete anchoring.
Q: Should I buy or rent an inflatable tent for a single event?
A: For a one-time event, renting is more cost-effective if the rental is under $250. If you plan to use a tent 5+ times per year, buying a mid-tier inflatable tent ($1,000–$4,000) pays for itself within 2–3 years.
Q: What certifications should I look for in an inflatable event tent?
A: For US events, prioritize NFPA 701 and CPAI-84 fire certifications. European events require EN13501-1. Also check for wind load certification from an engineer. Many venues require proof of fire rating before setup.
参考文献
- The Ultimate Guide to Inflatable Tents: Everything You Need to Know – Westshade
- ベスト展示用インフレータブルテント:設置ガイド&ブランド比較 – KCCE Event
- Ultimate Inflatable Party Tent FAQ: Answers on Setup – Joy Inflatable
- 5 Essential Considerations For Buying Event Tents – Epic Advertising
イベント用シェルターの進化
Twenty years ago, an event tent meant one thing: a mountain of aluminum poles, canvas that weighed as much as a small car, and a setup crew that looked like they’d just run a marathon. Fast-forward to today, and the landscape has shifted. Inflatable event tents now account for roughly 35% of the temporary shelter market for events under 2,000 square feet, according to data from the Event Rental Industry Association (2024) . The driving force? Speed. A single person with an electric pump can erect a 20’x30’ inflatable tent in under 12 minutes—versus 45 minutes for a traditional pole frame with a two-person crew. But the evolution isn’t just about convenience. Air-beam technology has borrowed engineering principles from marine inflatables: the tubes are made from double-coated PVC (typically 650–900 g/m²) with internal webbing that prevents ballooning under pressure. The result is a structure that, when properly anchored, can withstand sustained winds of 55–65 mph with gust peaks up to 78 mph—numbers backed by wind-tunnel testing at the University of Miami’s structural lab.
However, wind tolerance drops sharply with anchor type. Using According to the brand, with standard 12-inch steel stakes in soft soil, the system’s maximum safe wind speed is about 40 mph. Upgrade to 18-inch screw-in auger anchors on turf, and that limit rises to 55 mph. For beach or hard-surface deployments, you’re looking at water barrels or concrete ballasts: According to product specifications, each 55-gallon barrel adds roughly 440 lbs of hold-down force., and at four corners plus midpoints, that configuration can handle 50 mph sustained winds. Without any anchoring—just relying on the tent’s own weight (around 350 lbs for a 20’x30’ unit)—you’re limited to about 20 mph gusts.
On the environmental side, the shift isn’t as clean as I’d hoped. Manufacturing a 20’x30’ inflatable tent (PVC/TPU blend) generates approximately 1,200 kg CO₂ equivalent, based on life-cycle assessments from the Textile Exchange. According to industry estimates, a comparable traditional pole tent (canvas top + aluminum frame) comes in around 850 kg CO₂eq.—mostly because the canvas has a longer lifespan (10–12 years vs. 5–7 years for inflatable PVC). However, According to brand claims, inflatable tents weigh roughly 40% less when packed., According to estimates, reducing transport emissions by about 0.3 kg CO₂ per 100 miles per tent.. The real advantage emerges at end-of-life: PVC can be mechanically recycled into industrial matting, while aluminum frames are nearly 100% recyclable but canvas often ends up in landfill. Net-net, if you plan to use a tent for fewer than 50 events over its life, According to brand data, the inflatable has a slight edge in overall carbon footprint (≈2.5 vs. 2.8 kg CO₂ per event).. For high-frequency use, traditional still wins.
インフレータブルイベントテント購入時に避けるべき一般的な失敗
I’ve seen event organizers drop $4,000 on an inflatable tent only to discover they can’t legally set it up in their backyard. That’s mistake number one: ignoring local permitting. Zoning and permit requirements for large inflatable tents (anything over 10’x10’) vary wildly across the U.S. In California, any tent exceeding 10’ in any dimension or used for public assembly (more than 50 people) requires a fire department permit and a structural certification per California Building Code Section 3103. You’ll need to submit a site plan showing egress (minimum 36-inch exits) and fire separation distances. Florida is stricter: under the Florida Building Code (Section 3104), inflatable tents over 400 sq ft must have a wind-load engineering stamp, and they’re outright banned within 20 feet of any permanent structure during hurricane season (June 1–November 30) unless anchored with a certified tie-down system. New York City requires a permit from the Department of Buildings for any tent over 120 sq ft, plus a fire retardancy certificate (NFPA 701). In Texas, the rules are more lenient—no permit needed for tents under about 1,000 sq ft on private property., but check with the local fire marshal if you’re charging admission.
Second mistake: assuming “waterproof” means “mold-proof.” Inflatable tents are typically made of According to product labeling, PVC with a hydrostatic head of 4,000–6,000 mm. (excellent for rain), but the folded seams trap moisture. I have a contact who stored his tent wet after a three-day music festival; within two weeks, black mold had eaten through the fabric at the fold lines. Always dry the tent completely—preferably with a fan—before packing. Use a mildewcide spray (e.g., 3M Marine) every third cleaning.
Third: ignoring the blower’s duty cycle. Many budget inflatable tents come with a 12V automotive-style pump that runs continuously. According to product specs, those pumps are rated for about 30 minutes of run time before overheating. An event lasting four hours? You’ll burn out the pump mid-afternoon. Always buy a tent that comes with a high-volume electric blower (1.5 HP or more) designed for continuous use, or at minimum have a backup pump on hand.
Fourth: forgetting sidewall tie-downs. A tent with open sides creates a sail effect. Even with 55 mph rated anchors, if you leave the sidewalls off, the wind can lift the canopy from underneath. The manufacturer’s wind rating assumes the tent is fully enclosed with zippered walls. If you must have open sides, invest in sandbag weights along the bottom hem—each side adds roughly 50 lbs of hold-down per 10-foot section.
Finally: buying purely on price. According to product listings, a $700 inflatable tent from a no-name Amazon seller might use 0.5mm PVC (tears easily) and a 0.4mm floor. After one season, the seams separate. Stick to brands with at least 650 gsm PVC, double-stitched seams, and a one-year warranty. The good ones (like Coleman Event, Ventura Air, and EZ Up’s Pro series) run $1,800–$3,500 for a 20’x20’, but they’ll last through 50+ events if cared for.
インフレータブルイベントテント決定チェックリスト
After a decade of watching tents fly away, leak, and collapse, I’ve distilled this down to a five-point checklist you can run through in ten minutes.
1. Sizing and Layout
- Measure your event footprint: add 2 feet of clearance on all sides for anchor space.
- Check headroom: choose a model with center height at least 12 ft for a 20’x30’ so that lights and decorations don’t feel cramped.
2. Wind and Anchoring Plan
- If you’re on soft ground, buy the auger anchor upgrade kit.
- If on concrete or asphalt, rent 50-pound sandbags or water barrels (four per side minimum).
- For sustained winds above 35 mph during setup, cancel or move indoors—no tent is safe in 40+ mph gusts without professional-grade tie-downs.
3. Permit and Insurance
- Call your local city planning or fire department at least 10 days before the event. Ask:
- Is a tent permit required? (If yes, what’s the fee—often $100–$500?)
- What setback distances from buildings/roads are mandatory?
- Check your liability insurance: most standard event policies require tents over 400 sq ft to be listed on the policy.
4. Material and Pump Specs
- Fabric: minimum 650 gsm PVC, UV-resistant (at least 500 hours accelerated weathering test).
- Pump: continuous-duty blower (1.5 HP minimum), with a backup battery or manual pump.
- Seams: welded or double-stitched with tape reinforcement—avoid single needle stitching.
5. Storage and Maintenance
- Dry inside and out after each use; store in a breathable bag (not a sealed plastic bin).
- Apply seam sealer annually.
- Replace anchor straps every two years—they degrade from UV exposure.
One last piece of advice I give every buyer: Do a full test setup at home, not at the venue. Inflate, check for leaks (soapy water on seams), and time the process. If it takes longer than 15 minutes with a pump, something’s wrong. That dry run will save you the worst kind of event-day panic—watching your shelter collapse while guests are arriving. Now go pick your tent, and may your next event stay dry and upright.







