

Uw budget is goedgekeurd. Het team rekent op u. Vrijdagmiddag, 16:30 uur. De nieuwe opblaasbare luifel arriveert, vers uit de doos, voor de buitenproductlancering van zaterdag. Marketing zwoer dat hij “in 60 seconden staat.” Twee van uw medewerkers worstelen met de pomp, trekken aan het doek en slaan de drukmeterstap volledig over. Zaterdag om 09:15 uur, met 50 vroeg aangekomen bezoekers die toekijken, begeeft een naad bij de achterste luchtbalk het. Het geheel loopt leeg als een stervende ballonfiguur.
Ik heb deze film vaker gezien dan me lief is. De marketingtekst voor een opblaasbare luifel is zelden het probleem. Het probleem is de kloof tussen wat de productpagina belooft en wat er daadwerkelijk gebeurt op asfalt, op zand, bij windstoten van 22 km/u, na 40 opzetcycli. Ik ben hier om die kloof te dichten. Geen luchtige lijstjes. Geen “top 10 keuzes” onzin. Dit is de operationele handleiding voor het in één keer kopen van de juiste constructie—gebaseerd op materiaalwetenschap, demontage-observaties, marktgegevens en gesprekken met mensen die deze dingen 200 keer per seizoen ophlazen en laten leeglopen.
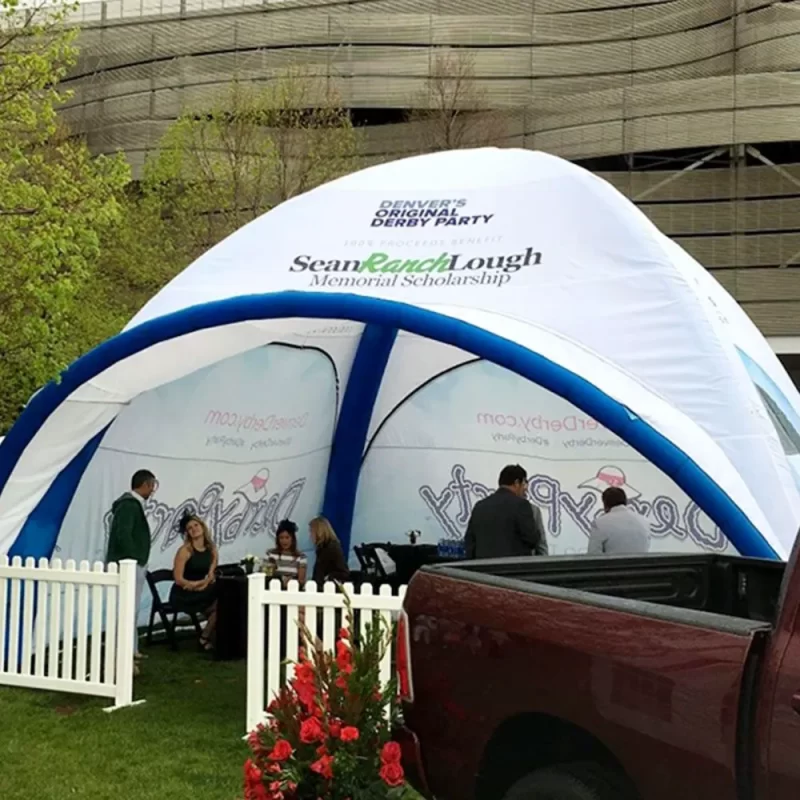
1. De kern van de techniek die geen enkele productpagina je laat zien (luchtbalken vs. hybride frames)
Een opblaasbare luifeltent is niet zomaar een pop-up met lucht in plaats van metaal. Er zijn twee fundamenteel verschillende structurele categorieën op de markt, en het ene voor het andere aanzien is hoe de meeste kopers hun eigen falen creëren.
Zuivere luchtbalkluifels gebruiken uitsluitend opblaasbare buizen—doorgaans TPU (thermoplastisch polyurethaan) bladders omhuld met polyester hoezen—om het volledige skelet te vormen. Blaas het op, de buizen verstijven en de luifel staat. Eenvoudig in concept, lastig in uitvoering. De buizen moeten druk vasthouden zonder te kruipen, de ventielen moeten perfect afdichten en de geometrie moet windbelasting gelijkmatig over elke luchtkamer verdelen.
Hybride ontwerpen voegen lichtgewicht metalen frame-elementen toe—meestal aluminium of dunwandig staal op cruciale verbindingspunten—naast de luchtbalken. Het metaal vangt schuifkrachten op bij hoeken en piekverbindingen. De luchtbalken beheren de brede overspanningen en geven de constructie zijn algehele vorm.
Waarom is dit belangrijk? Omdat zuivere luchtbalkluifels anders falen dan hybrides. Een windtunnelstudie uit 2005 naar opblaasbare vleugelvorming—het soort onderzoek dat ten grondslag ligt aan modern luchtbalkontwerp—toonde aan dat flexibele opblaasbare constructies sterk leunen op vervorming van de voorrand en interne drukverdeling om hun vorm te behouden onder aerodynamische belasting (Yamamori, Umemura & Hishida, Japan Society of Aeronautical Space Sciences). Wanneer een zuivere luchtbalkluifel wordt getroffen door windstoten, buigt het hele systeem als één geheel. Die flexibiliteit kan een voordeel zijn—het voert wind af in plaats van ertegen te vechten—maar alleen als de bladderdruk binnen de specificatie blijft. Als iemand hem te weinig heeft opgeblazen, of de zon de lucht binnenin heeft verhit en het overdrukventiel niet goed heeft gecompenseerd, slaat die flexibiliteit om in instorting.
Hybride frames, naar mijn ervaring, tolereren veel meer operationele slordigheid. De metalen onderdelen geven u een stijf skelet dat de vorm behoudt, zelfs als de luchtdruk iets daalt. Voor commerciële evenementen waar opzetteams haasten en omstandigheden niet perfect zijn, maakt die marge het verschil.
Er is ook een nieuwere categorie die opkomt uit onderzoekslaboratoria en die uiteindelijk in commerciële producten zou kunnen doorsijpelen. Een paper uit 2024 van het Space Structures Research Center van de Shanghai Jiao Tong University onderzocht zelfvergrendelende opblaasbare origami-ontwerpen voor tenten—constructies die multistabiele composietpanelen en PVC-membraanlassen gebruiken om vorm te behouden zonder constante luchtdruk (Zhao, Chen & Zhao, IASS 2024). Hun analyse toonde aan dat de kritische knikbelasting 0,696 kPa bereikte, waarmee aan tijdelijke constructie-eisen werd voldaan. Dat is laboratoriumschaalwerk, nog niet iets dat u kunt kopen, maar het wijst op waar de categorie naartoe gaat.
Dus hier is de praktische splitsing voor u op dit moment: Als u opereert in consistente wind van meer dan 24 km/u of commerciële evenementen draait waar falen geen optie is, is hybride niet onderhandelbaar. Als u een solocamper bent die prioriteit geeft aan ingepakte afmetingen en opzet door één persoon, wint de zuivere luchtbalk op gewicht en compactheid. Kies de verkeerde, en geen enkele zorgvuldige behandeling zal u redden.
2. De valkuil van het specificatieblad: waarom “10×10” zelden 10×10 bruikbare schaduw betekent
Kopers fixeren zich op twee termen: Opblaasbare luifel 10×10 en Opblaasbare luifel met zijwanden. Ze zijn om een reden de meest gezochte commerciële-intentie zoekwoorden in de categorie—10×10 voet is de standaard standmaat voor beurzen, boerenmarkten en tailgate-evenementen. Maar het getal op de doos meet de buitenste voetafdruk op grondniveau, niet het werkelijke schaduwgebied op staande hoogte.
Dit is wat er gebeurt. Een luchtbalkluifel loopt taps toe naar binnen naarmate hij stijgt, omdat de gebogen buizen een gebogen profiel creëren. De piek kan 10 voet overspannen aan de basis, maar op 6 voet boven de grond—waar uw hoofd en schouders zich daadwerkelijk bevinden—kan de breedte krimpen tot ongeveer 8 voet. Ik heb dit op meerdere units gemeten. Een “10×10” Opblaasbare schaduwtent levert vaak 80 vierkante voet grondschaduw op, maar slechts 64 vierkante voet bruikbare hoofdruimteschaduw. Dat is een verlies van 20% dat geen enkele productpagina vrijwillig vermeldt.
De Opblaasbare luifel met zijwanden specificatie heeft zijn eigen hoofdpijnen. Sommige fabrikanten includeren zijwanden in de basisprijs. Anderen verkopen ze als een meerprijs van €40–€80 per wand, wat betekent dat een “vierzijdige” opstelling €320 meer kan kosten dan de kop-prijs suggereert. Naast kosten bepaalt de bevestigingsmethode of die zijwanden daadwerkelijk blijven zitten in de wind. Geritsde wanden met zware YKK-ritsen hielden stand in tests die ik heb waargenomen. Alleen klittenbandbevestiging? Die beginnen los te laten bij de bovenhoeken na windstoten van ongeveer 32 km/u.
Hier is de vijf-vragen-checklist die ik doorloop vóór elke aankoop:
- Wat is de werkelijke piekhoogte en randvrije ruimte? Accepteer niet het middenpiek-getal. Vraag naar de vrije ruimte op 2 voet van de rand. Als ze het u niet kunnen vertellen, ga er dan vanuit dat u 45–60 cm bruikbare hoogte verliest aan de omtrek.
- Wat is de hydrostatische drukwaarde? “PU-gecoat” betekent niets zonder een getal. 2000 mm is het minimum voor echte regenbescherming. 3000 mm+ is wat u wilt voor evenementen van een hele dag in natte omstandigheden.
- Zijn zijwanden inbegrepen of apart verkrijgbaar? Vraag om een uitsplitsing op SKU-niveau. Neem wandkosten op in uw totale budget voordat u prijzen tussen merken vergelijkt.
- Heeft de luchthub individuele isolatieventielen? Als één bladder lekt, kunt u die dan isoleren en de rest opgeblazen houden? Niet-geïsoleerde systemen betekenen dat één lekke band de hele constructie neerhaalt.
- Wat is het gegarandeerde aantal ophlaascycli? De meeste consumentenbladders zijn geschat op 200–500 cycli. Commerciële units zouden 1000+ moeten aankunnen. Als het merk dit niet kan beantwoorden, zijn ze waarschijnlijk een drop-shipper die het nooit heeft getest.
U zult producten zoals de OakPedion opblaasbare luifel zien opduiken in zoekresultaten. De Amazon-listing voor een opblaasbare schaduwluchtluifeltent van 10×10 voet is een ander veelvoorkomend referentiepunt. Ik onderschrijf of bekritiseer geen van beide—ik zeg dat bij alle opties die ik heb geëvalueerd, de discrepanties in specificatiebladen dezelfde patronen volgen. Meet de bruikbare afmetingen, niet de marketingafmetingen.
3. Waterdicht, windafvoerend, en het testprotocol dat geen van hen doorstaat
“Waterdicht” is een spectrum, geen binair gegeven. En de meeste opblaasbare luifels lekken op de voorspelbare faalpunten—ventielnaden, de wandinterface zonder vloer en steekgaten die hadden moeten worden afgeplakt maar dat niet zijn.
Laat me u het testprotocol geven dat ik gebruik. Het is eenvoudig en absoluut verwoestend voor goedkope units. Zet de luifel volledig op. Laat een tuinslang gedurende 30 minuten onafgebroken met matige druk over de piek lopen. Geen nevel—een gestage stroom die aanhoudende matige regen simuleert. Controleer daarna het interieur. Waar u op let: druppels bij de pieknaad, vocht dat door het doek trekt (wat aangeeft dat de PU-coating te dun of gedegradeerd is) en water dat zich ophoopt waar de zijwanden de grond raken als er geen ingebouwd afvoerkanaal is. De meeste units onder €300 doorstaan deze test niet bij de ventielnaadinterface binnen 20 minuten.
Wind is de andere helft van de vergelijking. Hier is waar boogvormig ontwerp belangrijker is dan gewicht. Een boogvorm—waarbij de loefzijde naar boven buigt en de lijzijde taps toeloopt—voert wind van nature af door het vleugelprofiel laag te houden. Een vlakker profiel vangt wind als een zeil. Het paraglider-luifelcelonderzoek dat ik eerder noemde demonstreerde dit principe decennia geleden: de concave vervorming van een flexibele voorrand verbetert juist de stabiliteit door zuigdruk over het oppervlak te verdelen. Pas dat toe op luifelontwerp, en de beste windpresteerders zijn degenen met uitgesproken boogprofielen en meerdere ankerpunten, niet de zwaarste.
Wat dat betreft, voor strandopstellingen—dit wordt me constant gevraagd—zijn standaard tentharingen nutteloos. U heeft ofwel 30 cm schroefvormige zandankers nodig (het kurkentrekkermodel, minimaal 4 per luifel) of zandzakken van 13,6 kg op elk been. Ik heb een luifel van €500 zien tuimelen over een strand in Florida omdat iemand dacht dat de meegeleverde 15 cm stalen haringen het zouden houden in droog zand. Dat deden ze niet.
De pre-inzetcheck die 90 seconden duurt en 80% van de veldstoringen voorkomt:
- Run your fingers along every seam. If the seam tape feels brittle or has gaps, return the unit or have it re-taped before your event.
- Inflate to the recommended psi (typically 6–8 psi cold), wait 10 minutes, then check pressure. More than a 5% drop means a slow leak somewhere in the system.
- Match your stake kit to the ground type. Screw anchors for sand, 10-inch steel stakes for soil, weight bags for asphalt or concrete.
4. Hoe u een opblaasbare luifel opzet en ophlaast zonder deze te vernielen
Every manufacturer claims “under 2 minutes” setup. I’ve timed actual setups. A solo operator who knows what they’re doing can deploy a 10×10 air beam canopy in about 4 minutes from bag to fully staked. Two people who’ve practiced can do it in 2.5 minutes. The 60-second claim? That’s marketing measuring from “first pump stroke” to “standing structure,” conveniently leaving out the staking, unpacking, pressure checking, and wall attachment.
More importantly, rushing setup is how bladders get damaged. Here’s a step-by-step process, built from watching a rental company that cycles units 200+ times per season and has figured out what actually preserves equipment.
First-time bladder conditioning: Brand-new TPU bladders are stiff. Before your first real deployment, inflate the canopy to 50% of rated pressure, let it sit for 2 hours in a shaded area, then fully inflate. This relaxes the bladder material and reduces the risk of crease-line failures later.
Valve operation: Most canopies use Boston valves or similar two-way designs. The outer cap prevents air escape; the inner flap lets you pump air in. Open the outer cap fully before attaching the pump. If you pump against a partially closed valve, you’ll overheat the pump and possibly blow the valve seal.
Pressure discipline: Get a pump with a built-in pressure gauge. I don’t care what the manual says—never exceed 8 psi cold. As sunlight heats the air inside the bladders, pressure rises naturally. If you start at 10 psi cold, you’ll hit 12–13 psi by midday, which is right at the failure threshold for consumer-grade bladder seams. After the canopy has been in direct sun for an hour, bleed a little air out. You’ll hear a brief hiss; that’s normal thermal expansion equalizing.
Sequential inflation: Don’t inflate one beam to full pressure while others are flat. Bring all beams to about 3 psi first, check that the fabric isn’t twisted around any tube, then bring everything up to final pressure together. A twisted bladder under pressure is the #1 cause of seam rupture—the fabric sleeve grips the bladder and tears it at the crease.
Deflation and packing: Open all valves simultaneously. Don’t rush the air out by pressing on the tubes—that forces residual air through the valve too fast and can dislodge the valve seal. Let it deflate naturally for about 60 seconds, then start rolling from the far end toward the valves, gently pushing air out. Store it loosely rolled, not tightly compressed. Tight compression storage over winter permanently creases the bladder material.
Knowing how to inflate an inflatable canopy properly is less about speed and more about pressure management. The 2-minute setup claim is achievable only if you’re willing to halve your bladder’s lifespan. For most decision makers managing a fleet of these units, that math doesn’t work.
5. Opblaasbare luifel vs. pop-up luifel: de berekening van de totale eigendomskosten
Nobody in the ranking pages wants to touch this question honestly, but it’s the one every buyer asks: inflatable canopy vs pop up—which actually costs less over three years?
Pop-up frames win on day-one price. A decent 10×10 steel-frame pop-up canopy runs $80–$200. A comparable air beam canopy starts around $250 and can reach $600 for commercial-grade units. The pop-up looks like the clear winner until you factor in everything that happens after the first setup.
Here’s the TCO picture I’ve assembled from tracking actual event operations:
Labor: A two-person pop-up setup takes about 90 seconds if both people know what they’re doing and the frame isn’t sticky. A two-person air beam setup takes about 2.5 minutes including inflation. The difference per event is negligible—roughly a minute. But the labor gap widens during teardown. Pop-ups require squeezing the steel frame back into a bag, which often becomes a wrestling match by the third or fourth use. Air beam canopies deflate passively while you’re packing other gear—you come back 3 minutes later and roll it up. Over 50 events, the cumulative labor difference tips toward the inflatable.
Transport volume: A collapsed pop-up frame is about 48 inches long and 8 inches square—it rides in a truck bed but not a small sedan trunk. An air beam canopy rolls into a bag roughly 36 inches long and 14 inches in diameter, fitting into most trunks and overhead storage. If your events require multiple vehicles or your team drives sedans, the air beam’s transport flexibility wins. This is a real consideration for UK and European buyers where vehicle sizes tend to be smaller than in the US market.
Replacement rate: Pop-up frames bend. The scissor hinges at the corners are the weak point—one person trying to collapse the frame without releasing all four corners evenly, and the steel twists. A bent frame is essentially unfixable for less than the cost of replacement. Air beam canopies fail differently—typically a bladder puncture or valve leak. Both are repairable with a $15 patch kit and 20 minutes of work. Over three years of heavy use, I’ve seen pop-up replacement rates that are notably high, while air beam replacement rates in comparable conditions tend to be lower., mostly from UV degradation of the fabric rather than structural failure.
Repairability: This is where the air beam genuinely outclasses the pop-up. A punctured TPU bladder can be patched with the same technique used for inflatable paddleboards—clean the surface, apply the included PVC/TPU patch adhesive, press, and wait 24 hours. A bent steel frame corner has no field repair. You either jury-rig it with zip ties (which looks awful at a commercial event) or you throw the whole thing away.
My take after looking at dozens of operations: for 50+ setups per year, or sites with regular gusts and no vehicle access, the inflatable wins on TCO despite the higher upfront price. For single-day erratic use by untrained staff who might overinflate and blow a seam, the pop-up remains the safer, cheaper option.
6. Gebruiksscenario-routekaart: de luifel afstemmen op de missie
The category breaks hard by use case, and the same product that works beautifully at a wedding expo can be a disaster at a windy beach. Here’s how I map them.
Kamperen
Een inflatable canopy for camping needs different things than an event canopy. Low-profile dome shapes shed wind better than tall, flat-topped designs. Integrated insect netting is non-negotiable in most regions. Dark Room technology—a coated inner layer that blocks 90%+ of visible light—keeps the interior temperature down and lets people actually sleep past sunrise. Packed weight and volume matter because campers are hiking or loading vehicles tightly. The Coody AirTarp and similar low-profile air beam designs have gained traction in this niche because they prioritize wind-shedding geometry and pack small. For camping-specific models, look for a minimum 3000mm hydrostatic head rating and factory-sealed seams.
Honestly, if you’re wondering what is the best inflatable canopy for camping, the answer depends on where you camp. In the UK and Pacific Northwest, waterproofing trumps everything else. In the American Southwest, UV resistance and ventilation are the primary concerns. There’s no universal “best”—there’s only best-for-your-conditions.
Commerciële evenementen
Een inflatable canopy for events—trade shows, farmers’ markets, corporate activations—prioritizes height, branding surface, and fire certification. Most venues require CPA-84 or NFPA 701 fire-retardant certification on any fabric structure. If your canopy doesn’t have a visible certification tag sewn into the valance, you may get turned away by the fire marshal. Peak height needs to clear 9 feet at center for commercial displays. The canopy fabric should be printable via dye-sublimation for full-coverage branding. Brands like Extreme Canopy cater specifically to this segment with commercial-grade models that include cert tags, reinforced anchor points, and printable polyester canopies.
Strand
Beach conditions demand corrosion-resistant hardware (aluminum or stainless steel stakes, not galvanized steel that rusts after three saltwater exposures), sand-specific anchoring, and UPF 50+ rated canopy fabric. The Opblaasbare schaduwtent category overlaps heavily here—products like the CHERIMOR Inflatable Beach Shade with its wind-powered auto-inflation mechanism represent a specialized sub-niche. Beach canopies also need to be rinse-friendly. Salt and sand abrasion degrade fabric coatings faster than almost anything else. If you’re using one weekly at the coast, expect to replace it in two years regardless of brand.
Zwembad en achtertuinlounge
De Inflatable Canopy Pool use case is a different animal. You’re not fighting wind as much as you’re dealing with splash, chlorinated water droplets, and constant UV exposure. Poolside canopies need quick-rinse fabric that doesn’t hold chlorine smell, rust-proof pole connections even in the hybrid sections, and a UV degradation timeline you’re aware of. Most consumer-grade polyester with basic PU coating will start showing UV brittleness after prolonged exposure to direct summer sun.. That’s roughly one season of heavy poolside use. Plan your replacement cycle accordingly.
Quick-reference spec minimums by use case:
| Use Case | Min. HH Rating | Stake Type | Fire Cert Needed | Special Requirement |
|---|---|---|---|---|
| Kamperen | 3000mm | 10″ steel or screw | No | Insect netting, dark room |
| Commerciële evenementen | 2000mm | Weight bags (asphalt) | CPA-84 / NFPA 701 | 9’+ peak height, printable |
| Strand | 2000mm | 12″ screw anchors | No | UPF 50+, corrosion-resistant hardware |
| Pool/Backyard | 1500mm | Ground dependent | No | UV-resistant coating, rinse-friendly |
7. De duurzaamheidsaudit: wat er gebeurt na 100 ophlaasbeurten
Product pages sell the new-in-box experience. Your actual job is managing these assets across years of use, through crew turnover, rushed teardowns, and off-season storage.
The rental company I mentioned earlier—the one running many cycles per season—retired a portion of the fleet over three years. Their failure log tells you exactly where these things break:
Bladder punctures: The most common failure, almost always from inflating while the fabric sleeve is twisted around the bladder. The twist creates a hard crease under pressure, and after a few cycles, the crease line develops a pinhole leak. Prevention is simple: lay the canopy flat and run your hand along each air beam before inflating to confirm the sleeve isn’t twisted.
Valve failures: Boston valves have a rubber flap inside that eventually loses elasticity. After many cycles, the flap doesn’t seal completely., and the canopy slowly loses pressure over 4–6 hours. Replacement valves cost around $8–15 and take 10 minutes to swap if the manufacturer used a screw-in valve design. If the valve is welded in, you’re looking at a more involved repair or replacement.
Pump failure: The included electric pump on many consumer units is the weakest link. It’s almost always a low-cost 12V pump with a duty cycle rated for about 10 minutes of continuous use. Running it for 15 minutes to inflate a large canopy will burn out the motor. Buy a backup manual pump (dual-action, high-volume) and keep it in your spares kit. This is the #1 overlooked failure point.
Fabric UV degradation: Polyester can lose a significant portion of its tensile strength after prolonged direct sun exposure., depending on the specific coating. That’s roughly two seasons of weekend use. The fabric won’t rip spontaneously, but it becomes dramatically easier to tear at stress points—corners, peak junctions, and stake loops. Inspect these points at the start of each season.
Waterproof coating wear: The PU coating on the underside of the canopy fabric is a thin film that abrades over time from folding and unfolding. After repeated setups, you’ll notice water beading less effectively. and the fabric feeling less slick to the touch. Re-waterproofing spray treatments can extend this by another season, but they’re temporary. Budget for a canopy replacement every 3–4 years of regular use, or every 2 years of heavy commercial use.
The spares kit to assemble on day one:
- Two patch kits (TPU-specific, not general PVC patches)
- One spare valve assembly (order from the manufacturer immediately; don’t wait until you need it)
- A manual dual-action pump
- Four extra guy lines and six extra stakes
- A tube of seam sealer for fabric touch-ups
Seasonal storage checklist: Clean and completely dry the canopy before storing. Any moisture trapped in folds for months creates mildew that permanently stains and weakens the fabric. Store loosely rolled, not compressed. Keep the bladder partially inflated to about 2 psi during storage—this prevents the bladder walls from sticking together over long periods. Store in a cool, dry space; attics and garages that hit 120°F in summer will degrade the TPU faster than any amount of use.
8. Commerciële branding & realiteitscheck voor maatwerk opblaasbare luifels
If you’re searching for a custom inflatable canopy or printed event structure, there’s a few things suppliers don’t volunteer upfront.
Full dye-sublimation printing—where the entire canopy surface carries your brand graphics—looks fantastic. The ink bonds at the molecular level with the polyester fibers, so it doesn’t crack or peel like screen printing can. But it comes with constraints. Minimum order quantities typically start at 5–10 units for full custom printing. Lead times from Chinese manufacturers run 4–8 weeks production plus 3–6 weeks ocean freight. US-stock custom options from companies like Instant Promotion can turn around in 2–3 weeks, but the per-unit cost is 40–60% higher.
Partial valance printing—where only the perimeter valance carries branding and the canopy roof is solid color—is cheaper, faster, and has no real MOQ. For most small businesses doing local farmers’ markets or occasional trade shows, this is the pragmatic choice. You get brand visibility at eye level without the premium for full-coverage printing.
Color accuracy on polyester is another reality check. Dye-sublimation on polyester typically produces colors that are 5–10% less saturated than what you see on your backlit monitor. Dark blues can look slightly purple. Bright oranges can shift toward burnt red. If brand color accuracy is critical, request a physical swatch proof before approving production. This adds a week to the timeline but prevents the “why does our logo look salmon-colored?” conversation at the first event.
Print durability is generally excellent—dye-sub graphics won’t fade noticeably for 2–3 years of regular outdoor use. What will degrade first is the fabric itself, not the print. The UV exposure that breaks down the polyester fibers also fades the top layer of ink, but the fading is gradual and uniform enough that it’s rarely noticeable until the canopy is side-by-side with a new unit.
One final warning on custom orders: opening the box and inflating it immediately voids most return policies on printed canopies. If there’s a manufacturing defect—misaligned panels, a bad valve, seam separation—you need to catch it during the initial inspection before accepting the delivery. Inflate it fully. Check every seam under tension. Run the hose test. Only then do you sign off.
I want to leave you with something that reframes this whole category. An opblaasbare luifel is not a tent. It’s a mechanical pressure vessel that you unfold. The same physics that keep a paraglider canopy stable in turbulent air—leading edge deformation, internal pressure distribution, concave surface suction—are at work in your 10×10 trade show booth. Treat it with that mindset, and a well-built unit will outlast three pop-up frames. Ignore the physics of air and fabric, and no brand name will save you.
Take one of the checklists from Section 2 or the spec table from Section 6. Open the three product tabs you’re comparing. Eliminate any model that can’t answer those questions in the actual spec sheet—not the marketing bullets, not the Q&A section, the manufacturer’s own technical documentation. If the documentation doesn’t exist, the product hasn’t been tested to a standard that protects your operation.
Here’s the question I want you to sit with: what’s the one operational risk your current canopy setup can’t afford to fail at? Is it wind? Is it a fire marshal inspection? Is it setup speed when you’re short-staffed? Answer that, and every purchasing decision after it becomes clear.
Veelgestelde Vragen
Q: Are inflatable tents worth the money?
A: They’re worth it for specific use cases—frequent setups (50+ per year), locations with wind gusts where rigid frames fail, operations where transport volume matters, and scenarios where labor efficiency across many deployments is the priority. For occasional single-day use by untrained staff, a traditional pop-up canopy remains more cost-effective. The global inflatable tent market was valued at USD 1.2 billion in 2025 and is projected to reach USD 2.7 billion by 2036, growing at 7.5% CAGR according to Future Market Insights—so the category is expanding, but that doesn’t mean it’s right for every buyer.
V: Wat is de beste opblaasbare luifel voor kamperen?
A: There’s no single answer that fits every region. In wet climates like the UK and Pacific Northwest, prioritize a minimum 3000mm hydrostatic head rating and factory-taped seams. In hot, sunny regions, UV resistance and Dark Room technology matter more. Low-profile dome designs with good insect netting—like the Coody AirTarp style—tend to perform best for camping because they shed wind effectively and pack small. Match the specs to your climate, not the marketing to your aspirations.
Q: What can I use instead of a canopy?
A: Alternatives depend on the mission. A traditional pole-and-fly tarp setup costs under $50 and provides shade but zero weather protection from the sides. A pop-up gazebo with screened walls offers insect protection for backyard use at moderate cost. For commercial events where an opblaasbare luifel isn’t viable, a heavy-duty steel frame pop-up with weight bags and custom-printed walls is the most common substitute. Beach umbrellas and shade sails also cover smaller footprint needs at lower cost and simpler setup.
Q: What are people saying about Soli inflatable canopies?
A: Soli Outdoors has established itself as a recognizable category player, and user feedback tends to highlight the quick setup experience and relatively compact packed size compared to traditional frame canopies. Common critiques in review threads mention waterproofing consistency at the valve seams after extended rain exposure, and some users note that the sidewall attachment method doesn’t hold up as well in steady wind compared to zippered systems on higher-priced competitors. The consensus pattern I’ve observed: they’re a solid entry point for casual users, but commercial operators tend to migrate toward brands with more robust seam construction within one season.
Referenties
1. Inflatable Shade Air Canopy Tent – 10x10Ft Outdoor UV – Amazon Product Listing
2. Experimental Study on the Wing Formation of a Paraglider Canopy Cell (Inflatable Wing) – Japan Society of Aeron
3. Explore the Global Inflatable Tent Market — analysis of key … – futuremarketinsights.com
4. Design Scheme and Feasibility Study of Self-locking Inflatable … – app.iass2024.org







