

你的预算已获批。团队指望着你。周五下午4:30,全新的充气遮阳篷到货,刚从箱子里取出,准备用于周六的户外产品发布会。市场部信誓旦旦地说它“60秒即可完成搭建”。两名员工手忙脚乱地操作气泵,拉扯面料,完全跳过了气压表检查步骤。周六上午9:15,在50名提前到场观众的目光下,后部空气梁附近的一条接缝崩开了。整个遮阳篷像一只泄气的充气动物一样瘪了下去。.
这一幕我见过的次数多得数不清。充气遮阳篷的营销文案 很少是问题所在。问题在于产品页面承诺的内容与实际使用之间的差距——在沥青路面上、在沙地上、在14英里/小时的风阵中、在40次搭建循环之后。我在这里就是为了弥合这一差距。不是空洞的清单式文章,也不是“十大推荐”之类的废话。这是一份关于如何一次就买对结构的操作手册——基于材料科学、拆解观察、市场数据以及与那些每季充放气200次的从业者的深入交流。 充气遮阳篷不仅仅是用空气代替金属的弹开式帐篷。市场上存在两种根本不同的结构类型,把两者混为一谈正是大多数买家自食其果的原因。.
1. 任何产品页面都不会展示的核心工程原理(空气梁 vs. 混合框架)
אוהל פרסום מתנפח אוהל קנופי מתנפח 纯空气梁遮阳篷完全依靠充气管——通常是TPU(热塑性聚氨酯)内胆外加聚酯纤维套筒——来构成整个骨架。充气后,管体变硬,遮阳篷便立起来了。概念简单,执行却很有讲究。管体需要保持压力而不发生蠕变,气阀必须完美密封,几何结构必须将风荷载均匀分布到每个气室。.
混合设计则在空气梁之外增加了轻量金属框架元件——通常是在关键节点处使用铝或薄规格钢材。金属件承担转角处和顶部交叉点的剪切力,空气梁则负责大跨度区域并赋予结构整体造型。.
这为什么重要?因为纯空气梁遮阳篷的失效方式与混合结构不同。2005年一项关于充气翼型结构的风洞研究——这类研究正是现代空气梁设计的基础——发现柔性充气结构在很大程度上依赖前缘变形和内部压力分布来在气动载荷下保持形状(Yamamori、Umemura & Hishida,日本航空航天学会)。当纯空气梁遮阳篷遭遇阵风时,整个系统作为一个整体弯曲。这种柔性可能是一种优势——它疏导风力而非硬抗——但前提是内胆压力保持在规格范围内。如果有人充气不足,或者阳光加热了内部空气而泄压阀未能正常平衡,这种弯曲就会演变为坍塌。.
根据我的经验,混合框架对操作上的马虎有更大的容忍度。金属部件提供了刚性骨架,即使气压略有下降也能保持形状。对于搭建人员匆忙、条件不理想的商业活动来说,这一余量至关重要。.
还有一个从研究实验室中涌现出的较新类别,最终可能会渗透到商业产品中。上海交通大学空间结构研究中心2024年发表的一篇论文探讨了用于帐篷的自锁充气折纸设计——这类结构利用多稳态复合面板和PVC膜焊接来在无需持续气压的情况下保持形状(Zhao、Chen & Zhao,IASS 2024)。他们的分析发现临界屈曲载荷达到0.696 kPa,满足临时结构要求。这还属于实验室规模的工作,目前尚无法购买,但它指明了该品类的发展方向。.
所以,现在给你一个实用的划分:如果你在持续15英里/小时以上的风速下运营,或者经营不容许失败的商业活动,混合结构是必须的。如果你是独自露营者,优先考虑收纳尺寸和单人搭建,纯空气梁在重量和紧凑性上胜出。选错了,再小心操作也救不了你。.
买家总是盯着两个关键词:.
2. 规格表的陷阱:为什么“10×10”很少意味着10×10的有效遮阳面积
充气遮阳篷10×10 带侧壁的充气遮阳篷 ו 它们是该品类中搜索量最高的商业意图关键词,原因很简单——10×10英尺是贸易展、农贸市场和车尾派对的标配展位尺寸。但包装上的数字测量的是地面水平的外围尺寸,而不是站立高度处的实际遮阳面积。. 实际情况是这样的。空气梁遮阳篷在升起时向内收窄,因为拱形管形成了弧形轮廓。顶部跨度在地面可能是10英尺,但在离地6英尺处——也就是你的头和肩膀实际所在的位置——宽度可能缩小到约8英尺。我在多个产品上实测过。一个’10×10”的.
充气遮阳帐篷“ 通常能提供80平方英尺的地面阴影,但只有64平方英尺的有效头部空间遮阳。这是一个产品页面绝不会主动披露的20%损失。 规格也有自己的麻烦。有些制造商将侧壁包含在基础价格中,另一些则将其作为每面40至80美元的加购项,这意味着一个“四面”配置的总成本可能比标价高出320美元。除了成本之外,固定方式决定了侧壁在风中是否能真正保持稳固。在我观察过的测试中,配备重型YKK拉链的拉链式侧壁表现良好。仅靠魔术贴固定的?在约20英里/小时的阵风下,顶部边角就开始脱落。.
ה 它们是该品类中搜索量最高的商业意图关键词,原因很简单——10×10英尺是贸易展、农贸市场和车尾派对的标配展位尺寸。但包装上的数字测量的是地面水平的外围尺寸,而不是站立高度处的实际遮阳面积。 这是我在每次采购前都会执行的五项检查清单:.
实际顶高和边缘净空是多少?
- 不要接受中心顶点的数字。要求提供距边缘2英尺处的净空数据。如果他们无法告知,默认你会在周边损失18至24英寸的有效高度。 静水压头等级是多少?.
- 没有数字的“PU涂层”毫无意义。2000mm是真正防雨的最低标准。3000mm以上才是你在潮湿条件下全天候活动所需要的。 “侧壁是包含在内还是单独出售?.
- 获取SKU级别的明细。在跨品牌比较价格之前,先将侧壁成本计入总预算。 气路中枢是否有独立隔离阀?.
- 如果一个内胆漏气,你是否能将其隔离并保持其余部分充气?无隔离系统意味着一次穿刺就会导致整个结构坍塌。 质保充气循环次数是多少?.
- 大多数消费级内胆的额定循环为200至500次。商用级别应能承受1000次以上。如果品牌方无法回答这个问题,他们很可能是从未做过测试的代发货商。 你会看到像.
OakPedion充气遮阳篷 这样的产品出现在搜索结果中。亚马逊上10×10英尺的充气遮阳空气帐篷列表也是另一个常见的参考点。我不是在推荐或贬低这两者——我想说的是,在我评估过的所有选项中,规格表的差异遵循相同的模式。测量实际可用尺寸,而不是营销尺寸。 “防水”是一个范围,而不是一个二元概念。大多数充气遮阳篷在可预测的失效点漏水——气阀接缝、无底板的侧壁接口,以及本应进行接缝密封却未处理的针孔。.
3. 防水、抗风以及它们全都无法通过的测试标准
“让我给你我的测试方案。它很简单,但对廉价产品来说绝对致命。将遮阳篷完全搭建好。用花园水管以中等水压对着顶部持续冲淋30分钟。不是喷雾——是模拟持续中雨的稳定水流。然后检查内部。你要找的是:顶部接缝处的滴水、透过面料渗入的水分(表明PU涂层过薄或已老化),以及在没有内置排水槽的情况下侧壁与地面交汇处的水积聚。大多数300美元以下的产品在20分钟内就会在气阀接缝处败下阵来。.
风是方程式的另一半。在这里,弓形设计比重量更重要。拱形——迎风面向上弯曲、背风面收窄——通过保持低翼型轮廓自然地疏导风力。较平坦的轮廓则像帆一样兜风。我之前提到的滑翔伞翼型单元研究在几十年前就证明了这一原理:柔性前缘的凹形变形通过将吸力分布在整个表面上来增强稳定性。将其应用于遮阳篷设计,抗风表现最好的产品是那些具有明显拱形轮廓和多个锚固点的型号,而不是最重的那些。.
说到这个,关于海滩搭建——我经常被问到这个问题——标准帐篷地钉毫无用处。你需要12英寸螺旋式沙地锚(开瓶器设计,每个遮阳篷至少4个)或每条腿配30磅沙袋。我曾亲眼目睹一个500美元的遮阳篷在佛罗里达海滩上翻滚,因为有人以为附带的6英寸钢钉能固定在干沙中。结果当然不能。.
Speaking of which, for beach setups—I get asked this constantly—standard tent stakes are useless. You need either 12-inch screw-type sand anchors (the corkscrew design, minimum 4 per canopy) or 30-pound sandbags on each leg. I’ve watched a $500 canopy tumble down a Florida beach because someone thought the included 6-inch steel stakes would hold in dry sand. They didn’t.
部署前检查需时90秒,可预防80%的现场故障:
- 用手指沿每条接缝滑动检查。若接缝胶带感觉脆硬或存在间隙,请在活动前退回设备或重新压胶。.
- 充气至建议压力(通常为冷态6–8 psi),等待10分钟,然后检查压力。压力下降超过5%意味着系统某处存在缓慢泄漏。.
- 根据地况选择对应的地钉套件。沙地使用螺旋锚,土壤使用10英寸钢钉,沥青或混凝土使用配重袋。.
4. 如何在不毁坏充气遮阳篷的前提下完成搭建和充气
每个制造商都声称“2分钟内完成搭建”。我实际计时过真实搭建过程。一名熟练的独立操作员从开袋到完全固定,搭建一个10×10气梁篷房大约需要4分钟。两名经过练习的人员可在2.5分钟内完成。60秒的说法?那是营销话术——从“第一次泵气”到“结构立起”计时, conveniently 忽略了打钉、拆包、压力检查和墙体安装。.
更重要的是,仓促搭建正是气囊受损的原因。以下是一套分步流程,源自对一家每季循环使用设备200次以上、并总结出真正能保护设备的租赁公司的观察。.
首次气囊预处理: 全新TPU气囊材质偏硬。在首次正式部署前,将篷房充气至额定压力的50%,在阴凉处静置2小时,然后完全充气。这能使气囊材料松弛,降低日后折痕线处失效的风险。.
阀门操作: 大多数篷房使用Boston阀或类似的双向设计。外盖防止漏气;内瓣允许泵入空气。连接气泵前务必完全打开外盖。若在阀门半开状态下泵气,会导致气泵过热,甚至损坏阀密封。.
压力管控: 使用带内置压力表的气泵。我不在乎说明书怎么说——冷态压力绝不超过8 psi。阳光加热气囊内空气时,压力会自然上升。若冷态起始压力为10 psi,中午将达到12–13 psi,正好处于消费级气囊接缝的失效阈值。篷房在直射阳光下放置一小时后,应释放少量空气。你会听到短暂的嘶嘶声;这是正常的热膨胀平衡。.
顺序充气: 不要在一根梁完全充气而其他梁仍扁平时操作。先将所有梁充至约3 psi,检查布料是否缠绕在任何气管周围,然后一起升至最终压力。受压状态下扭曲的气囊是接缝破裂的首要原因——布料套筒紧箍气囊并在折痕处撕裂它。.
放气与收纳: 同时打开所有阀门。不要通过按压气管强行排气——这会使残余空气过快通过阀门,可能使阀密封移位。让其自然放气约60秒,然后从远端向阀门方向滚动,轻轻推出空气。松散卷起存放,不要紧压压缩。冬季紧密压缩存放会使气囊材料产生永久性折痕。.
了解 如何正确充气充气式篷房 的重点不在于速度,而在于压力管理。2分钟搭建的说法只有在愿意将气囊寿命减半的前提下才可实现。对于大多数管理设备车队决策者来说,这笔账不划算。.
5. 充气遮阳篷 vs. 弹开式遮阳篷:总拥有成本计算
排名页面中没有人愿意诚实回答这个问题,但这是每个买家都会问的: 充气式篷房 vs 折叠式篷房——三年内哪个实际成本更低?
折叠式框架在首日价格上胜出。一台像样的10×10钢架折叠篷房售价为180–200美元。同等气梁篷房起价约250美元,商用级可达600美元。折叠式看似明显胜出——直到你把首次搭建之后发生的一切都算进去。.
以下是我通过追踪实际活动运营汇总的总拥有成本(TCO)全貌:
人工: 两人搭建折叠式篷房约需90秒(前提是两人都熟练且框架不卡滞)。两人搭建气梁篷房约需2.5分钟(含充气)。单次活动的差异可忽略不计——大约一分钟。但拆除时人工差距拉大。折叠式需要将钢架挤压回收纳袋,通常用到第三四次就变成一场搏斗。气梁篷房在您整理其他装备时可被动放气——3分钟后回来直接卷起即可。50场活动下来,累计人工差异倾向于充气式。.
运输体积: 折叠后的折叠式框架长约48英寸、截面8英寸见方——可放入皮卡货斗,但放不进小型轿车后备箱。气梁篷房卷起后装入约36英寸长、14英寸直径的袋子,可放入大多数后备箱和顶部储物空间。如果您的活动需要多辆车或团队驾驶轿车,气梁的运输灵活性胜出。这对英国和欧洲买家来说是一个实际考量,因为当地车辆尺寸通常小于美国市场。.
更换率: 折叠式框架会弯曲。四角的剪刀铰链是薄弱点——一个人若未均匀释放四个角就强行收折,钢架就会扭曲。弯曲的框架基本无法以低于更换成本的价格修复。气梁篷房的失效方式不同——通常是气囊刺穿或阀门泄漏。两者都可用15美元的修补套件和20分钟工时修复。在三年重度使用中,我观察到折叠式的更换率明显偏高,而气梁在同等条件下的更换率往往较低,且多因布料紫外线老化而非结构失效。.
可修复性: 这是气梁真正超越折叠式的地方。刺穿的TPU气囊可用与充气桨板相同的技术修补——清洁表面,涂抹附带的PVC/TPU补片胶粘剂,按压,等待24小时。弯曲的钢架角则无法现场修复。要么用扎带临时固定(在商业活动中看起来非常糟糕),要么整件丢弃。.
在考察了数十个运营场景后,我的结论是:每年50次以上搭建、或场地常有阵风且车辆无法进入的情况下,充气式尽管前期价格更高,但在TCO上胜出。对于未经培训、可能过度充气导致接缝爆裂的员工进行的一次性零散使用,折叠式仍是更安全、更便宜的选择。.
6. 使用场景路线图:将遮阳篷与任务匹配
这个品类按使用场景截然分化,同一款产品在婚礼展会上表现出色,在多风海滩上可能就是灾难。以下是我的分类方式。.
露营
אוהל פרסום מתנפח 露营用充气式篷房 与活动篷房的需求不同。低矮圆顶造型比高顶平顶设计更能抗风。一体式防虫网在大多数地区是硬性要求。Dark Room技术——一种可阻挡90%以上可见光的涂层内层——可降低内部温度,让人们真正睡过日出。打包重量和体积很重要,因为露营者需要徒步或紧凑装车。Coody AirTarp及类似低矮气梁设计在这一细分市场中获得了关注,因为它们优先考虑抗风几何结构和紧凑收纳。针对露营专用型号,请寻找至少3000mm静水压头等级和工厂密封接缝的产品。.
说实话,如果你想知道 什么是最好的露营充气式篷房, ,答案取决于你在哪里露营。在英国和太平洋西北地区,防水性压倒一切。在美国西南部,抗紫外线和通风是首要考量。没有通用的“最好”——只有最适合你条件的。.
商业活动
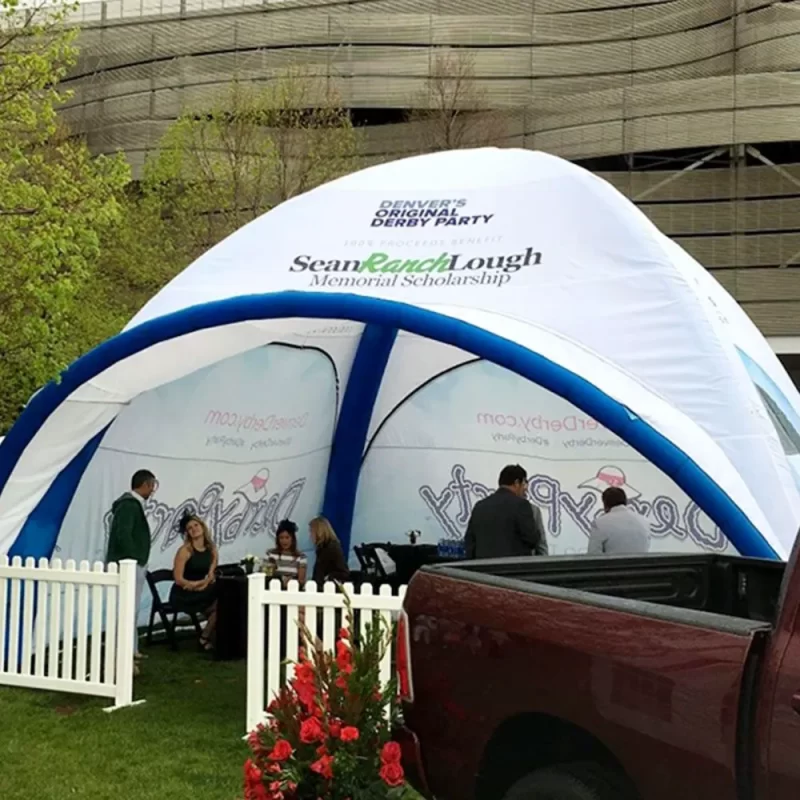
אוהל פרסום מתנפח 活动用充气式篷房——贸易展、农贸市场、企业活动——优先考虑高度、品牌展示面和防火认证。大多数场馆要求任何织物结构具备CPA-84或NFPA 701阻燃认证。如果篷房没有缝在帷幔上的可见认证标签,消防检查员可能会拒绝你入场。商业展示的顶高需在中心处超过9英尺。篷房布料应可通过热升华印刷实现全幅品牌覆盖。Extreme Canopy等品牌专门针对这一细分市场,提供含认证标签、加固锚点和可印刷聚酯篷布的商用级型号。.
海滩
海滩条件要求耐腐蚀五金件(铝或不锈钢地钉,而非三次盐水暴露后即生锈的镀锌钢)、沙地专用锚固系统,以及UPF 50+等级的篷房布料。该 通常能提供80平方英尺的地面阴影,但只有64平方英尺的有效头部空间遮阳。这是一个产品页面绝不会主动披露的20%损失。 类别在此高度重叠——CHERIMOR充气式海滩遮阳棚及其风力自动充气机构代表了这一细分中的专门子类。海滩篷房还需便于冲洗。盐和沙子的磨蚀对布料涂层的破坏速度几乎超过任何其他因素。如果你每周在海边使用一次,无论什么品牌,预计两年内需要更换。.
泳池与后院休闲
ה 泳池用充气式篷房 使用场景则完全不同。你要对抗的主要不是风,而是水花、含氯水滴和持续紫外线照射。池畔篷房需要快干布料,不残留氯气味,混合结构部分的杆件连接也要防锈,并且你要清楚其紫外线降解时间线。大多数消费级PU涂层聚酯布料在长时间暴露于夏季直射阳光后会出现紫外线脆化——大约一个季度的重度池畔使用。请据此规划更换周期。.
按使用场景的快速参考规格最低要求:
| 使用场景 | 最低静水压头 | 地钉类型 | 是否需要防火认证 | Special Requirement |
|---|---|---|---|---|
| 露营 | 3000 מ"מ | 10″ steel or screw | No | Insect netting, dark room |
| 商业活动 | 2000 מ"מ | Weight bags (asphalt) | CPA-84 / NFPA 701 | 9’+ peak height, printable |
| 海滩 | 2000 מ"מ | 12″ screw anchors | No | UPF 50+, corrosion-resistant hardware |
| Pool/Backyard | 1500mm | Ground dependent | No | UV-resistant coating, rinse-friendly |
7. 耐久性审计:100次充气后会发生什么
Product pages sell the new-in-box experience. Your actual job is managing these assets across years of use, through crew turnover, rushed teardowns, and off-season storage.
The rental company I mentioned earlier—the one running many cycles per season—retired a portion of the fleet over three years. Their failure log tells you exactly where these things break:
Bladder punctures: The most common failure, almost always from inflating while the fabric sleeve is twisted around the bladder. The twist creates a hard crease under pressure, and after a few cycles, the crease line develops a pinhole leak. Prevention is simple: lay the canopy flat and run your hand along each air beam before inflating to confirm the sleeve isn’t twisted.
Valve failures: Boston valves have a rubber flap inside that eventually loses elasticity. After many cycles, the flap doesn’t seal completely., and the canopy slowly loses pressure over 4–6 hours. Replacement valves cost around $8–15 and take 10 minutes to swap if the manufacturer used a screw-in valve design. If the valve is welded in, you’re looking at a more involved repair or replacement.
Pump failure: The included electric pump on many consumer units is the weakest link. It’s almost always a low-cost 12V pump with a duty cycle rated for about 10 minutes of continuous use. Running it for 15 minutes to inflate a large canopy will burn out the motor. Buy a backup manual pump (dual-action, high-volume) and keep it in your spares kit. This is the #1 overlooked failure point.
Fabric UV degradation: Polyester can lose a significant portion of its tensile strength after prolonged direct sun exposure., depending on the specific coating. That’s roughly two seasons of weekend use. The fabric won’t rip spontaneously, but it becomes dramatically easier to tear at stress points—corners, peak junctions, and stake loops. Inspect these points at the start of each season.
Waterproof coating wear: The PU coating on the underside of the canopy fabric is a thin film that abrades over time from folding and unfolding. After repeated setups, you’ll notice water beading less effectively. and the fabric feeling less slick to the touch. Re-waterproofing spray treatments can extend this by another season, but they’re temporary. Budget for a canopy replacement every 3–4 years of regular use, or every 2 years of heavy commercial use.
The spares kit to assemble on day one:
- Two patch kits (TPU-specific, not general PVC patches)
- One spare valve assembly (order from the manufacturer immediately; don’t wait until you need it)
- A manual dual-action pump
- Four extra guy lines and six extra stakes
- A tube of seam sealer for fabric touch-ups
Seasonal storage checklist: Clean and completely dry the canopy before storing. Any moisture trapped in folds for months creates mildew that permanently stains and weakens the fabric. Store loosely rolled, not compressed. Keep the bladder partially inflated to about 2 psi during storage—this prevents the bladder walls from sticking together over long periods. Store in a cool, dry space; attics and garages that hit 120°F in summer will degrade the TPU faster than any amount of use.
8. 商业品牌定制与充气遮阳篷的现实检验
If you’re searching for a custom inflatable canopy or printed event structure, there’s a few things suppliers don’t volunteer upfront.
Full dye-sublimation printing—where the entire canopy surface carries your brand graphics—looks fantastic. The ink bonds at the molecular level with the polyester fibers, so it doesn’t crack or peel like screen printing can. But it comes with constraints. Minimum order quantities typically start at 5–10 units for full custom printing. Lead times from Chinese manufacturers run 4–8 weeks production plus 3–6 weeks ocean freight. US-stock custom options from companies like Instant Promotion can turn around in 2–3 weeks, but the per-unit cost is 40–60% higher.
Partial valance printing—where only the perimeter valance carries branding and the canopy roof is solid color—is cheaper, faster, and has no real MOQ. For most small businesses doing local farmers’ markets or occasional trade shows, this is the pragmatic choice. You get brand visibility at eye level without the premium for full-coverage printing.
Color accuracy on polyester is another reality check. Dye-sublimation on polyester typically produces colors that are 5–10% less saturated than what you see on your backlit monitor. Dark blues can look slightly purple. Bright oranges can shift toward burnt red. If brand color accuracy is critical, request a physical swatch proof before approving production. This adds a week to the timeline but prevents the “why does our logo look salmon-colored?” conversation at the first event.
Print durability is generally excellent—dye-sub graphics won’t fade noticeably for 2–3 years of regular outdoor use. What will degrade first is the fabric itself, not the print. The UV exposure that breaks down the polyester fibers also fades the top layer of ink, but the fading is gradual and uniform enough that it’s rarely noticeable until the canopy is side-by-side with a new unit.
One final warning on custom orders: opening the box and inflating it immediately voids most return policies on printed canopies. If there’s a manufacturing defect—misaligned panels, a bad valve, seam separation—you need to catch it during the initial inspection before accepting the delivery. Inflate it fully. Check every seam under tension. Run the hose test. Only then do you sign off.
I want to leave you with something that reframes this whole category. An 很少是问题所在。问题在于产品页面承诺的内容与实际使用之间的差距——在沥青路面上、在沙地上、在14英里/小时的风阵中、在40次搭建循环之后。我在这里就是为了弥合这一差距。不是空洞的清单式文章,也不是“十大推荐”之类的废话。这是一份关于如何一次就买对结构的操作手册——基于材料科学、拆解观察、市场数据以及与那些每季充放气200次的从业者的深入交流。 is not a tent. It’s a mechanical pressure vessel that you unfold. The same physics that keep a paraglider canopy stable in turbulent air—leading edge deformation, internal pressure distribution, concave surface suction—are at work in your 10×10 trade show booth. Treat it with that mindset, and a well-built unit will outlast three pop-up frames. Ignore the physics of air and fabric, and no brand name will save you.
Take one of the checklists from Section 2 or the spec table from Section 6. Open the three product tabs you’re comparing. Eliminate any model that can’t answer those questions in the actual spec sheet—not the marketing bullets, not the Q&A section, the manufacturer’s own technical documentation. If the documentation doesn’t exist, the product hasn’t been tested to a standard that protects your operation.
Here’s the question I want you to sit with: what’s the one operational risk your current canopy setup can’t afford to fail at? Is it wind? Is it a fire marshal inspection? Is it setup speed when you’re short-staffed? Answer that, and every purchasing decision after it becomes clear.
שאלות נפוצות
Q: Are inflatable tents worth the money?
A: They’re worth it for specific use cases—frequent setups (50+ per year), locations with wind gusts where rigid frames fail, operations where transport volume matters, and scenarios where labor efficiency across many deployments is the priority. For occasional single-day use by untrained staff, a traditional pop-up canopy remains more cost-effective. The global inflatable tent market was valued at USD 1.2 billion in 2025 and is projected to reach USD 2.7 billion by 2036, growing at 7.5% CAGR according to Future Market Insights—so the category is expanding, but that doesn’t mean it’s right for every buyer.
ש: מהי החופה המתנפחת הטובה ביותר לקמפינג?
A: There’s no single answer that fits every region. In wet climates like the UK and Pacific Northwest, prioritize a minimum 3000mm hydrostatic head rating and factory-taped seams. In hot, sunny regions, UV resistance and Dark Room technology matter more. Low-profile dome designs with good insect netting—like the Coody AirTarp style—tend to perform best for camping because they shed wind effectively and pack small. Match the specs to your climate, not the marketing to your aspirations.
Q: What can I use instead of a canopy?
A: Alternatives depend on the mission. A traditional pole-and-fly tarp setup costs under $50 and provides shade but zero weather protection from the sides. A pop-up gazebo with screened walls offers insect protection for backyard use at moderate cost. For commercial events where an 很少是问题所在。问题在于产品页面承诺的内容与实际使用之间的差距——在沥青路面上、在沙地上、在14英里/小时的风阵中、在40次搭建循环之后。我在这里就是为了弥合这一差距。不是空洞的清单式文章,也不是“十大推荐”之类的废话。这是一份关于如何一次就买对结构的操作手册——基于材料科学、拆解观察、市场数据以及与那些每季充放气200次的从业者的深入交流。 isn’t viable, a heavy-duty steel frame pop-up with weight bags and custom-printed walls is the most common substitute. Beach umbrellas and shade sails also cover smaller footprint needs at lower cost and simpler setup.
Q: What are people saying about Soli inflatable canopies?
A: Soli Outdoors has established itself as a recognizable category player, and user feedback tends to highlight the quick setup experience and relatively compact packed size compared to traditional frame canopies. Common critiques in review threads mention waterproofing consistency at the valve seams after extended rain exposure, and some users note that the sidewall attachment method doesn’t hold up as well in steady wind compared to zippered systems on higher-priced competitors. The consensus pattern I’ve observed: they’re a solid entry point for casual users, but commercial operators tend to migrate toward brands with more robust seam construction within one season.
הפניות
1. Inflatable Shade Air Canopy Tent – 10x10Ft Outdoor UV – Amazon Product Listing
2. Experimental Study on the Wing Formation of a Paraglider Canopy Cell (Inflatable Wing) – Japan Society of Aeron
3. Explore the Global Inflatable Tent Market — analysis of key … – futuremarketinsights.com
4. Design Scheme and Feasibility Study of Self-locking Inflatable … – app.iass2024.org







