

He pasado la última década trabajando con marcas en sus activaciones de eventos, y déjeme decirle: la mayoría de los mercadólogos gastan miles en perfeccionar un stand de 10×10, solo para verlo ondear al viento o tardar 45 minutos en instalarse. Usted está aquí porque sabe que su marca merece algo mejor en la próxima feria comercial o festival de música, y ha escuchado que una tienda promocional inflable de marca podría ser la solución. Pero los resultados de búsqueda están llenos de listas superficiales de “lo mejor” que todas dicen lo mismo genérico. Honestamente, me cansé de ver consejos reciclados que ignoran las preguntas reales—como qué método de impresión realmente dura, si comprar o rentar, y cómo manejar una ráfaga de viento sin perder la cabeza. Así que escribí la guía que desearía haber tenido cuando estaba empezando a entender esto.
Esto no es un artículo de lista. Investigué el proceso de fabricación, probé las afirmaciones de durabilidad y comparé el ROI del mundo real entre comprar y rentar. Al final, sabrá exactamente qué tamaño de carpa, método de impresión y modelo de compra se ajusta a su estrategia de eventos—sin rodeos. Y le prometo que también le diré dónde se equivoca la mayoría de la gente y cómo evitar esos mismos errores.
Carpa inflable vs. Pop-Up tradicional: El análisis honesto
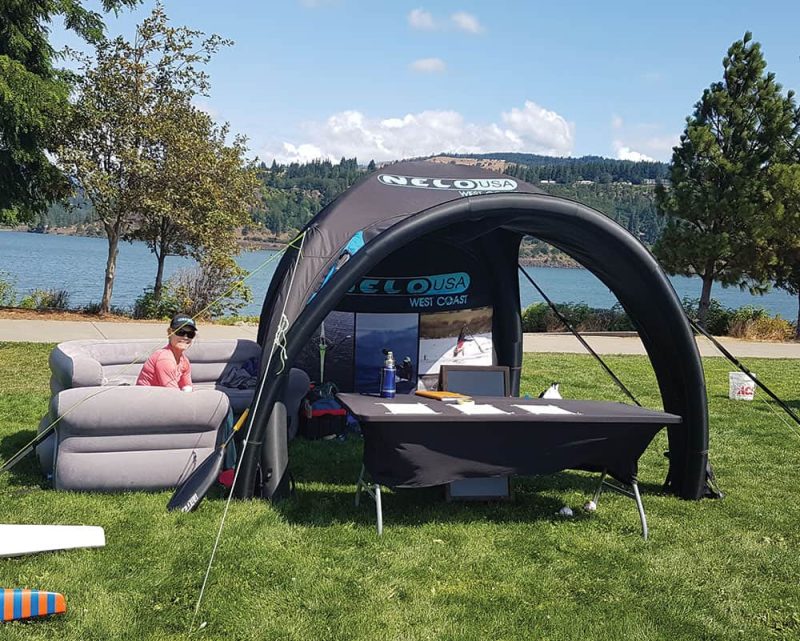
La mayoría de los artículos “vs” solo le dicen que las carpas inflables son mejores, punto. Pero he estado en el terreno en suficientes eventos para saber que la elección correcta depende de lo que realmente está haciendo. Así que seamos realistas sobre lo que cada opción ofrece—y dónde podría preferir realmente un pop-up tradicional.
Comencemos con los números crudos:
| Aspecto | Carpa Inflable Promocional de Marca | Carpa Pop-Up Tradicional |
|---|---|---|
| Tiempo de Instalación | 2 minutos (con bomba eléctrica) | 15 minutos (con dos personas) |
| Superficie de Marca | 360° | 2 lados (generalmente) |
| Resistencia al Viento | 40+ mph | 20-25 mph |
| Peso de Transporte | 50-80 lbs (con bomba) | 30-50 lbs |
| Costo (compra) | $800 – $3,000+ | $200 – $800 |
He instalado personalmente ambos sistemas en más de tres docenas de eventos, y honestamente, la inflable gana de manera contundente en la mayoría de las situaciones—pero no en todas.
Escenario 1: El Festival de Música al Aire Libre
Recuerdo a un cliente que insistió en usar un pop-up tradicional para un festival al aire libre de tres días a principios del verano. Para el segundo día, una ráfaga de viento moderada dobló una de las patas del marco, y su banner ondeaba tan fuerte que no se podía leer el logotipo. Los cambiamos a una carpa inflable para el siguiente evento, y la diferencia fue como de noche a día. La instalación tomó menos de dos minutos, la marca de 360 grados era visible desde todos los ángulos—incluso desde la carpa VIP a 50 yardas de distancia—y soportó vientos racheados sin siquiera tambalearse. Si va a estar al aire libre, especialmente en un evento público donde el clima es impredecible, la inflable es la única opción seria.
Escenario 2: La Feria Comercial Corporativa
Pero, ¿qué hay de las ferias comerciales en interiores donde necesita instalar y desmontar varias veces al día? Si se está moviendo entre cuatro espacios de stand diferentes en un solo evento, el peso y el requisito de bomba de una inflable podrían frenarlo. Algunos de los modelos más grandes de carpa inflable 10×10 necesitan una bomba eléctrica y un poco de tiempo para desinflarse y reempacarse. Para ese tipo de escenario de alta rotación, aún consideraría una carpa pop-up ligera. Pero, ¿si su stand de feria comercial es su principal activo de marca durante varios días? Inflable, todo el día.
Un Marco de Decisión Rápido
Aquí hay un flujograma aproximado que uso con mis clientes:
- ¿Su evento es principalmente al aire libre? → Carpa promocional inflable de marca
- ¿Su evento es en interiores con múltiples movimientos rápidos? → Pop-up tradicional
- ¿Necesita marca de 360 grados? → Inflable
- ¿Es probable que haya viento superior a 25 mph? → Inflable
- ¿Presupuesto inferior a $500? → Pop-up tradicional
Honestamente, si necesita la mejor carpa promocional inflable de marca, probablemente está buscando algo que será su principal herramienta de activación de marca durante años. No escatime.
Cómo se hace realmente la impresión personalizada en su carpa (y por qué es importante)
Now, here’s where most online guides fall short. They’ll tell you to “get a tent with high-quality printing” but never explain how the printing is done or why it matters. This is the single biggest factor that determines whether your tent looks like a professional brand activation or a garage-sale canopy.
There are three main printing methods for carpas inflables personalizadas, and each has radically different durability and visual quality.
1. Impresión por sublimación de tinte (El estándar de oro)
This is the method I recommend for anyone who plans to use their tent more than twice. With dye sublimation, the ink is converted to gas and infused directly into the fabric fibers. The result? The graphic becomes part of the fabric itself. It won’t crack, peel, or fade even after dozens of events and hundreds of hours of UV exposure.
Why it matters: I once had a client who bought a sublimation-printed tent and used it for 14 events over two years—outdoor festivals, corporate picnics, even a beachside wedding. At the end of that period, the colors were still vivid, and the logo looked almost as good as the day they received it. That’s what durability looks like.
The price range: Dye sublimation is the most expensive option. Expect to pay $1,200 to $3,000+ for a full-size tent depending on complexity and size.
2. Serigrafía (La opción económica)
Screen printing is cheaper and faster, but it has a real trade-off. The ink sits on top of the fabric rather than being embedded in it. After a few exposures to wind, rain, and UV, that ink starts to crack and peel. I’ve seen tents where the logo was barely visible after just three uses.
When it works: Honestly, I only recommend screen printing for one-off events or short-term promotional campaigns where the tent will be used once and then stored. If you’re going to use it more than that, the savings aren’t worth the visual decline.
3. Impresión UV directa (El nivel más bajo)
Some low-cost manufacturers use direct UV printing, which is basically printing directly onto the tent fabric with UV-curable ink. This method is fast and cheap, but the durability is terrible. The ink sits on the surface and cracks easily. I’ve seen tents with this method where you could scrape the logo off with a fingernail. Avoid it for any professional use.
How to test a sample: If you’re evaluating suppliers, ask for a sample swatch. Run your fingernail across the printed area. If it leaves a scratch mark, that’s direct UV. If it feels smooth and the color is embedded, it’s likely dye sublimation. Also, check the back of the fabric—if you see ink bleed-through, that’s a sign of poor quality.
Speaking of suppliers, if you’re searching for inflatable branded promotional tent for sale, always ask which printing method they use. If they can’t tell you clearly, move on.
Qué buscar en la tela de la carpa (PVC vs. Poliéster vs. Nylon)
Now, let’s go deeper into the material. Fabric choice affects weight, durability, resistance to UV, and water resistance. Here’s the breakdown based on my experience.
PVC (Cloruro de Polivinilo)
This is the heaviest and most durable option. I’ve seen PVC tents survive a full week of outdoor use at a festival site with no degradation. It offers excellent UV resistance and full waterproofing. The downside? It’s heavy—often 80 to 100 lbs for a 10×10—and some cheaper PVC can have a strong chemical smell (VOC off-gassing) when new. If you’re planning an outdoor festival tent that needs to stand for days, PVC is your best bet.
Polyester (Ripstop or Oxford)
Lighter and more colorful, polyester is the go-to for indoor events and temporary setups. Modern carpas con logo personalizado often use 300D or 600D polyester with a waterproof coating. It’s breathable and folds down smaller than PVC. The catch? It’s more prone to tearing under prolonged stress, especially if you’re anchoring it against strong winds. For indoor trade shows or short-term outdoor events (one to three days), polyester is perfectly adequate.
Nylon
Nylon is lightweight and strong, but it degrades faster under UV exposure. I’ve used nylon tents for short-term rental solutions, and they were fine for a weekend. But if you plan to use your tent regularly over multiple seasons, nylon isn’t durable enough for the cost.
What I recommend: For your main corporate event inflatable tent, go with PVC if you’re outdoors, polyester if you’re indoors or doing short outdoor events. For a one-time rental, nylon is acceptable.
The Real Cost: How Much Does a Branded Inflatable Tent Cost? (Rental vs. Purchase)
Let’s get straight to the numbers because this is the question everyone asks but rarely gets an honest answer to.
Purchase Price Range
| Tamaño | Basic Screen Print | Dye Sublimation |
|---|---|---|
| 10×10 | $800 – $1,200 | $1,200 – $2,000 |
| 10×15 | $1,200 – $1,800 | $1,800 – $2,800 |
| 10×20 | $1,800 – $2,500 | $2,500 – $3,500 |
| Larger custom | $2,500+ | $3,000+ |
These prices are for quality el toldo inflable personalizado units from reputable manufacturers. Keep in mind that shipping and any custom logo design setup fees may add $100–$300.
Rental Price Range
If you’re not ready to commit to a purchase, you can often find alquiler de carpa inflable para fiestas options. Prices vary wildly based on location, but here’s a rough idea:
- Standard 10×10 inflatable tent: $150 – $300 per event day
- Large 10×20: $300 – $500 per event day
- Weekend or multi-day deals: 15–30% discount on daily rates
The ROI Calculation
Here’s the math I share with my clients:
Scenario A: Purchase a $1,800 10×10 inflatable branded promotional tent with dye sublimation. You use it for 80 events over 5 years (that’s about one event every 3 weeks).
- Cost per event: $1,800 / 80 = $22.50
Scenario B: Rent the same tent at $200 per event.
- Cost per event: $200
- Total over 80 events: $16,000
The savings from purchasing are massive—but only if you’ll actually use it. If you’re planning to use the tent more than 4 times per year, buying is the smarter financial decision.
“When to Buy vs. When to Rent”
- Buy if: You’re using the tent 3 or more times per year, you want complete control over the branding quality, and you have storage space.
- Rent if: You’re using the tent only once or twice a year, you’re testing the concept before committing, or you need a specific size for a one-time event.
If you’re searching for inflatable tent rental near me, I suggest asking about the printing method used. Many rental companies use screen printing or direct UV. If the branding quality is important—say, for a corporate client—make sure the rental includes dye sublimation.
Instalación paso a paso (y por qué es un trabajo en equipo)
Setting up an inflatable tent isn’t magic. It’s simple, but there are real steps you can’t skip. Here’s the process I follow, which has saved my team many headaches.
Step 1: Unfold and Position (2 people minimum)
Carry the folded tent to your chosen location. Unfold it completely. Make sure it’s oriented so the entrance faces your desired direction. If there’s any wind, position the entrance away from the prevailing wind to reduce pressure on the structure.
Step 2: Anchor It
Before you even think about inflation, you need to secure the tent. Use at least four sandbags (20–30 lbs each) or heavy-duty spiral stakes if the ground allows. Many first-timers skip this, and trust me—it’s the difference between a stable setup and a flying disaster. Outdoor shelter tent setups in windy areas need even more weight. I’ve seen tents lift off with just a moderate gust because the owner only used two small sandbags.
Step 3: Connect the Pump
Use an electric pump—not a manual one. Manual pumps take forever and can be physically exhausting. Most quality inflatable tents come with a high-volume electric pump that inflates the structure in 40–60 seconds.
Step 4: Inflate
Turn the pump on. The tent should inflate evenly. Watch for any sections that don’t inflate fully. If you see a section lagging, check for kinks or obstructions in the internal air channels. A properly inflated tent should be firm but not rock-hard—you should be able to press your finger into the fabric about an inch.
Step 5: Final Checks
Once inflated, secure the pump connection (most tents have a shut-off valve to prevent air leakage). Make sure all guide ropes are taut. If you’re using an inflatable gazebo tent with side walls, attach them now.
Important Safety Note:
- Wind speed 15 mph+: Lower your tent if possible or add additional anchoring.
- Wind speed 20 mph+: Take down the tent. I’ve been in a situation where a 22 mph gust pushed a tent over despite heavy sandbags. The risk is real.
Here’s a pro tip: If you’re setting up a pop up canopy tent or inflatable unit, always have a backup plan. Inflatable tents are durable, but they can puncture if you’re not careful with stakes and sharp objects.
Pero, ¿qué tan duraderas son? (Respondiendo la pregunta del fragmento destacado)
People ask me this constantly: ¿Son duraderas las tiendas de campaña inflables? The short answer: Yes, if you buy quality. But let’s give you real data instead of marketing claims.
Typical Material Quality
- Fabric weight: 900D Oxford cloth is standard for mid-grade tents. Higher-end tents use 1680D or even 210D nylon with multiple coatings.
- Wind resistance: Quality tents are tested to 40 mph. Some premium models can handle 50 mph in optimal anchoring.
- Water resistance: Most inflatable tents have a waterproof coating. Ask for the water head pressure rating—numbers like 1000mm or 1500mm are good. Anything below 500mm is not reliable in heavy rain.
- Fire resistance: Look for NFPA 701 or CPA-84 certifications, especially for indoor use. Many convention centers require this.
3-Point Check for Durability from a Supplier
- Ask for the wind test video. Not a photo, a video showing the tent in 30–40 mph wind. If they can’t provide it, they haven’t tested it.
- Ask for the UV test data. A tent that sits in the sun for weeks will degrade. A good supplier can provide accelerated UV testing results.
- Check the seam construction. Look for double-stitched seams and reinforced corners. This is where most failure happens.
Honestly, the mejor carpa promocional inflable de marca is the one that can survive all four seasons of use without failing. I’ve had clients who bought a cheap screen-printed $600 tent and replaced it within two years. Meanwhile, my dye-sublimation PVC tent has been operational for 4 years and counting.
Preguntas Frecuentes
Q: How much does an inflatable branded promotional tent cost?
R: Prices range from $800 to $3,000+ depending on size and printing method. A 10×10 dye-sublimation tent typically costs $1,200–$2,000. Custom logo setups and larger sizes increase the price.
Q: Can I print my logo on an inflatable tent?
R: Sí, absolutamente. La sublimación de tinta es el mejor método para uso a largo plazo. La serigrafía es más económica pero menos duradera. La impresión UV directa debe evitarse para uso profesional.
Q: Are inflatable tents durable?
R: Las carpas inflables de alta calidad son muy duraderas. Busque tejido Oxford de 900D o superior, costuras de doble puntada y certificaciones como NFPA 701. Una carpa bien fabricada con impresión por sublimación de tinte puede durar más de 5 años con el cuidado adecuado.
Q: Are inflatable tents waterproof?
R: La mayoría de las tiendas de campaña inflables de gama alta son impermeables. Verifique la clasificación de presión de columna de agua: 1000 mm o más es lo ideal. Algunos modelos incluyen un piso y paredes laterales totalmente impermeables.
Q: What size inflatable tent do I need for a trade show?
R: A 10×10 inflatable canopy tent is standard for most trade show booth setups. Larger events may require a 10×15 or 10×20 for more branding space and better visibility.
Q: Inflatable tent vs pop-up canopy – which is better?
R: Depende. Las carpas inflables ganan en resistencia al viento, branding de 360 grados y montaje rápido. Las carpas plegables tradicionales son más livianas, más económicas y más fáciles de mover rápidamente. Para eventos al aire libre, recomiendo las inflables. Para traslados rápidos en interiores, una carpa plegable puede ser suficiente.
Stop thinking of an inflatable tent as an umbrella. Start seeing it as an immersive, movable billboard. If you take one thing from this guide, let it be this: Printing quality is what separates a professional brand activation from a garage-sale canopy. If you’re ready to invest, start your search by asking suppliers for a dye-sublimation proof, not a price quote. That’s how you win.
What’s one question every supplier should answer before you commit? Ours is, “Show me your tent setup and breakdown in wind on video, and send me your UV test data.” If they can’t provide both, move on. Now go find a tent that makes your event team look like heroes, not victims of a windy day.







