

Why Custom Printed Inflatable Domes Are the Future of Event Branding
Events these days—music festivals, sports activations, trade shows, even construction site enclosures—demand more than a generic tent. They need a statement. A custom printed inflatable dome does something a flat-walled tent can’t: it encloses your audience in your brand. I remember setting up a 20ft dome at a city marathon. The sponsor’s logo wrapped 360° around the interior, so every selfie a runner took automatically became a branded moment. That’s the kind of immersive marketing that makes inflatable domes give event participants a 360º experience. It’s why you see them popping up everywhere from Coachella activations to mobile COVID-testing sites.
But “custom inflatable domes” covers a massive range. Some are heavy-duty air-supported structures meant for long-term installations. Others are lightweight frame-and-air-beam hybrids you can pitch in 20 minutes. The common thread? When you print your logo, your patterns, your colors across the whole surface, that structure stops being a tent and becomes an architectural billboard. And unlike a standard pop-up canopy, the dome’s curved shape pulls the eye—people naturally gather around it.
Yet most product pages do a terrible job explaining what you’re actually buying. They bury the lead times, skip wind ratings, and plaster “weatherproof” everywhere without a single standard to back it up. I’m going to fix that right now.
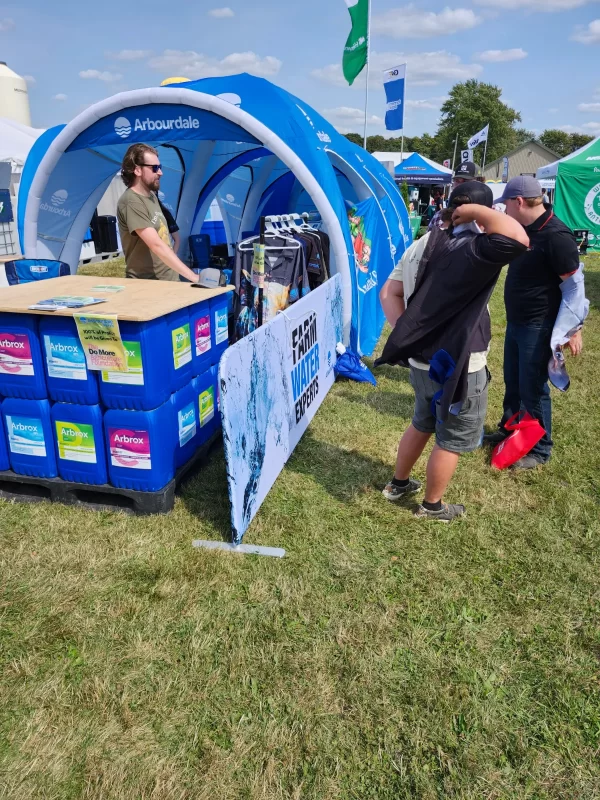
What Is a Custom Printed Inflatable Dome?
At its core, a custom printed inflatable dome is a semi-permanent or portable structure made from heavy-duty polyester or nylon fabric, formed into a dome shape, and held up by a continuous blower and a network of inflatable tubes (air beams) or an air-supported single-skin envelope. The dome can be printed on all exterior surfaces—and often interior too—with full-color graphics, logos, and complex designs. It’s one of many types of custom inflatable tents, but the dome shape gives you height, panoramic visibility, and a futuristic look that boxy tents just can’t match.
Suppliers toss around terms like “custom air inflatables,” “dome custom inflatable tents,” or even “air supported advertising dome.” All point to the same idea: an inflatable shell that serves as a portable promotional structure. The key differentiator from, say, a tunnel or an arch is the dome’s cubic footage and the way it can host small crowds, booths, or immersive brand experiences under a single seamless canopy.
I always tell buyers to think in terms of the end use before they even open a quote. Are you creating a temporary storefront that needs to stay up for a week? A VIP lounge at a music festival? A walk-through planetarium for a school tour? The best custom inflatables for events are those where the design and structural specs match the actual on-the-ground conditions.
Key Applications: Events, Sports, Trade Shows, and Beyond
Let’s kill the myth right now: inflatable domes aren’t just for bounce houses. In my experience, the most impressive deployments happen when the structure has a practical job и a branding job simultaneously.
Trade show inflatable tent setups have become a staple at big expos because they stand taller than the booth partitions and draw foot traffic from across the hall. I’ve seen a 15ft dome pull in double the visitors of a neighboring 10×10 pop-up simply because people wanted to know what was inside the glowing orb.
Outdoor brand activation domes shine at music festivals and sports events. Companies install a branded inflatable canopy near the main stage, outfit it with cooling fans and product demos, and end up with a line out the door. I’ve personally helped a beverage brand set up a custom printed inflatable dome that functioned as a 360° tasting room—every inch of the fabric carried the brand’s pattern. That’s what “inflatable domes give event participants a 360º experience” really means: your surroundings, not just a banner, reinforce the message.
Beyond marketing, inflatable event shelters solve serious logistical problems. Construction crews use them to contain dust and noise when cutting concrete in urban areas. They protect the surroundings from dust and noise pollution while keeping the site operational. Party inflatable dome rental companies offer them for weddings and corporate galas in unpredictable climates. And for community sports, a portable air structure can serve as a covered warm-up area without the permanent footprint of a brick building.
The flexibility of custom inflatable domes extends into unexpected niches: pop-up classrooms, emergency relief field hospitals, immersive art installations, even a 50m-tall inflatable dome that once transformed a public square into an interactive light show. Honestly, I think that’s why decision-makers gravitate toward them—you’re buying a modular asset, not a single-use tent.
Technical Specifications: Fabrics, Denier, UV Resistance, and Fire Certifications
Here’s where most buyer conversations go off the rails. Suppliers will say “durable commercial-grade PVC” or “heavy-duty oxford polyester” without giving you the numbers that matter. I want you to walk into request-for-quote calls armed with terms like denier, tear strength, and UV protection factor.
The fabric weight for a print-ready dome typically starts at 400 denier (400D) and runs up to 600D polyester. LushBanners mentions that their custom printed inflatables use oxford polyester with a water-resistant backing, but you need to ask about the specific denier. A 600D fabric has roughly 1.5 times the tear resistance of a 400D version of the same weave—critical if your dome will see repeated setup and takedown. I’ve seen cheaper 200D domes start showing pinholes after three uses in a dusty parking lot.
UV resistance isn’t a yes/no checkbox. It’s a gradient. Most quality domes incorporate UV inhibitors in the fabric coating and use dye-sublimation printing with UV-cured inks. In my experience, a well-treated print can withstand 200+ hours of direct summer sun before you notice any fading, but a cheap solvent ink job can look washed out after a single weekend festival. Ask for accelerated weathering test data; if the supplier can’t produce it, assume the graphics have a limited outdoor lifespan.
Fire certifications are absolutely non-negotiable. I’ll cover the specific standards in the Safety section, but here on the tech side, know that the fabric itself must pass either NFPA 701, CPAI-84, or equivalent tests. Many custom inflatable tents for events will claim “flame retardant” without specifying which standard. Don’t accept that. Insist on the certificate number. WestShade explicitly states that their printed inflatables meet NFPA 701, which gives me a baseline I can verify.
One more detail that separates great domes from mediocre ones: seam construction. RF-welded or heat-welded seams are far stronger than stitched and taped seams, and they’re essential for maintaining air pressure without constant blower cycling. If I’m comparing two quotes and one mentions RF-welded seams while the other just says “double-stitched,” I go with the welded one every time.
Customization Options: Printing Methods, Design Guidelines, and Color Matching
“Custom printed” shouldn’t mean a one-color logo slapped on white fabric. Real custom inflatable tents with logo for events and branding should deliver edge-to-edge, vibrant, scalable graphics. The dominant printing method today is dye-sublimation—ink gasifies and bonds at the molecular level with polyester fibers. The result is a graphic that won’t crack, peel, or feel like a stiff plastic sheet. It moves with the fabric as the dome inflates and deflates.
When I order custom air inflatables, I submit artwork at 300 dpi at final output size (or at a scale that preserves at least 100 dpi at full size). Vector files are ideal for logos and text, but photographic backgrounds work well if you allow for some softening due to the fabric texture. If you’re curious what a specific layout looks like before production, look for suppliers offering a “Custom Printed Inflatable Dome Tent – Design 1” style preview—many will generate a 3D rendering with your artwork mapped onto the dome panels so you can see how seams might interrupt text. This is crucial because what looks perfect on a flat monitor can become distorted across an 18ft curved surface.
Color matching can be a headache. Dye-sublimation prints on polyester are not identical to Pantone-coated paper proofs. Some shops provide a printed fabric swatch for approval before full production. I always request one, even if it adds a few days to the timeline. I’ve had a brand’s signature magenta shift into a muddy purple because nobody verified the swatch. One more tip: for a custom printed inflatable dome 20ft in diameter, you need to consider bleed margins of at least 2–3 inches along panel edges. Otherwise, slight misalignment during sewing can leave slivers of white fabric between adjacent printed sections.
And yes, you can print on the interior surface too. A few companies now offer interior liner printing for an extra fee, which turns the inside into a fully immersive environment. If you want inflatable domes to give event participants a 360º experience, interior graphics are the ultimate power move.
Sizing, Space Planning, and Recommended Layouts
Diameter is the number everyone fixates on, but it’s the square footage and interior height that determine how many people you can actually accommodate. A 10ft dome has about 78 square feet of floor space. Standing cocktail-style, that’s 15–20 people if they’re cozy. For seated presentations with a small stage, maybe 10. A custom printed inflatable dome 20ft offers 314 square feet, enough for 50–65 standing attendees or a central bar with lounge seating for 35.
I’ve built a cheat sheet I use for event planning:
- 10ft dome: cocktail 15–20 pax, theater seating 10, exhibit booth 1–2 displays
- 15ft dome: cocktail 30–40, theater 25, booth 3–4 product stations
- 20ft dome: cocktail 50–65, theater 40, small reception with bar
- 25ft dome: cocktail 80–100, theater 65, full lounge setup
Height matters too. A 10ft dome might peak at 8–9ft, which feels okay for mingling but cramped if you want to hang a large interior banner or light rig. A 20ft dome usually peaks around 12–14ft, giving you room for overhead branding and atmospheric lighting.
Don’t forget the footprint beyond the dome itself. You need space for anchoring lines and guy ropes. A 20ft dome with staked tie-downs might need a 30x30ft clear zone. If you’re on pavement and using water weights, that reduces lateral space somewhat but still requires about 5 feet of clearance around the perimeter. I once squeezed a 15ft dome into a space that looked just big enough on the venue map, only to realize that the blower cord needed to reach an outlet 40ft away—and no extension cord on site was rated for continuous outdoor use. We scrambled. Learn from my mistake.
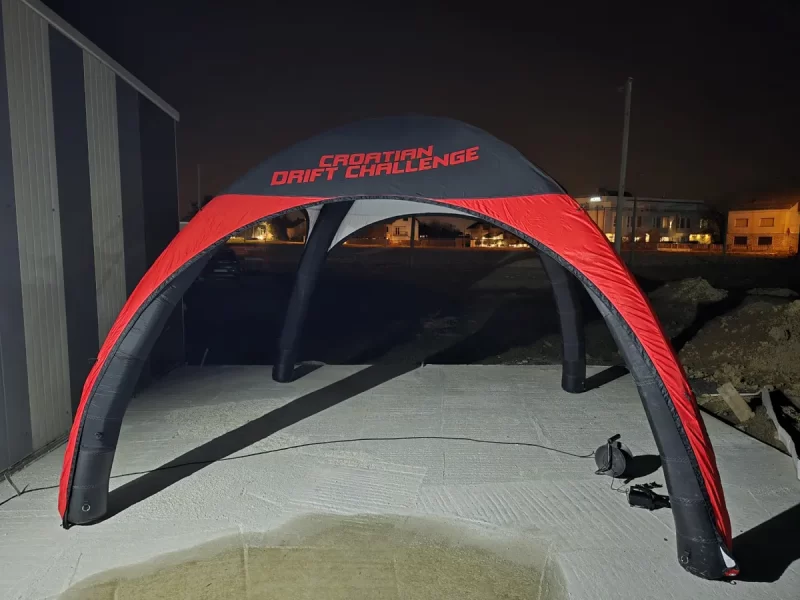
Setup and Takedown: Step-by-Step Guide with Time Estimates and Manpower
That “15-minute assembly” claim you see on some product pages? It assumes a crew that’s done it ten times, in zero wind, on a flat grass lawn, with all parts perfectly organized. Real first-time setup usually takes 25 to 45 minutes with two or three people.
Here’s the rhythm we follow from bag to fully inflated branded shelter:
- Site prep (5–10 min): Clear debris, lay a ground tarp if needed, position anchors. On grass, I use 12-inch steel stakes driven at a 45° angle away from the dome. On concrete, I rely on 50-gallon water weight containers—each weighing about 400 lbs when filled—or heavy-duty sandbags.
- Unfold and connect (5 min): Spread the deflated dome flat. Locate the blower inflation tube and ensure the zipper or hook-and-loop closure is accessible. If the dome has separate air beams, check that all valves are open. Connect the blower to a GFCI-protected outlet or generator.
- Inflation (3–5 min): Turn on the blower. The dome will rise gradually. Keep an eye on the air beams to make sure they’re filling evenly and not twisting. Once it reaches full pressure, the blower will shift to a lower hum to maintain pressure.
- Adjust and anchor (5–10 min): With the dome standing, attach the perimeter tie-down straps to stakes or weights. Tighten them so the dome doesn’t rock. If wind is over 10 mph, add extra ground anchors at midpoint locations. I always carry a few extra stakes and a rubber mallet in my kit.
Takedown is the reverse, but packing it back into the carry bag is its own workout. Deflate completely, fold in thirds along the seams, then roll tightly from the farthest end toward the inflation tube. It takes practice to get it back to the original rolled size. I suggest practicing the fold at home once so you’re not wrestling with a 100-pound fabric taco in a dark parking lot at midnight.
The blower is the pulse of the entire operation. If the blower fails, the dome deflates in minutes. I recommend having a backup blower on site for critical events, and always test the GFCI before plugging in. I’ve seen blowers trip circuits that were running other loads, so run a dedicated line if possible.
Accessories and Add-ons: Blowers, Tethers, Anchoring, and Storage
When you’re comparing quotes, don’t just look at the “base” dome price. The included accessory kit can swing the real cost by hundreds of dollars. A complete package should include:
- Continuous-duty air blower: Usually a centrifugal blower rated for 24/7 operation. Some domes come with a single 0.5 HP blower; larger domes (20ft+) may need two.
- Tie-down ropes and adjustable straps: At least 6 for a 15ft dome, 8–10 for a 20ft.
- Ground stakes: Steel pegs for grass, not the flimsy tent stakes that come with discount camping tents.
- Carry bag with wheels: Because a 20ft dome rolled up weighs 80–120 lbs and you do не want to haul it without wheels.
- Набор для ремонта: Fabric patches, a tube of seam sealer, and spare valve caps. Inevitably, a rogue chair leg will poke a small hole.
If you’re buying a custom printed inflatable dome for use on pavement, you’ll need to purchase water ballasts or suction-cup anchors separately. Not all suppliers include them in the standard bundle, so I always ask. Some manufacturers now offer integrated water weight channels around the base that you fill on-site, which is smarter than separate jugs that clutter the entrance.
Power consumption matters for multi-day festivals. A typical blower for a 15ft dome draws 300–500 watts and hums at about 65 decibels—similar to a normal conversation but less noticeable outdoors. I’d still position the blower away from the guest seating area if you can; that constant hum can grate on people after a few hours.
Safety and Compliance: NFPA 701, CPAI-84, Wind Load Ratings, and Local Permits
This section is the most skipped in every competitor’s content, and it’s the one that can land your event in legal trouble. Let me be direct: if your supplier can’t produce a valid fire certificate and a structural wind rating, walk away.
Custom inflatable domes used in the U.S. must meet NFPA 701 (Standard Methods of Fire Tests for Flame Propagation of Textiles and Films) or CPAI-84 (Specification for Flame-Resistant Materials Used in Camping Tentage). NFPA 701 involves a vertical burn test where a sample is exposed to an open flame for 12 seconds—the material must self-extinguish and not drip flaming particles. Ask for a copy of the test report from an accredited lab. WestShade explicitly lists NFPA 701 compliance on their custom inflatables page, which is the kind of transparency I look for.
If you’re planning to use the dome in Europe, you might need certifications like DIN 4102 B1 (Germany) or BS 7837 (UK). These are similar but not identical tests, so a structure that passes U.S. standards may still require recertification for an overseas event. I’ve had clients burn two weeks expediting a British standard certificate because the venue refused to accept the U.S. label—expensive and avoidable.
Wind is the biggest structural risk. Most quality domes
Weather Resistance and Durability: UV, Rain, Heat, and Cleaning Recommendations
I’ve lost count of how many product pages claim “all-weather” performance without a single test standard to back it up. When you’re spending five figures on a custom inflatable dome, you need to know exactly what happens when the wind picks up, the sun beats down for 12 hours a day, or a sudden downpour turns your activation site into a paddling pool.
Let’s start with the one question nobody asks until it’s too late: wind. Most air‑beam or arch‑frame domes (what suppliers sometimes call “column‑style” or “inflatable tube frame”) are engineered for continuous wind speeds of 30–35 mph (48–56 km/h) and gust survival up to 45–50 mph (72–80 km/h) when properly anchored. I’ve seen a 20‑ft dome ride out a 40‑mph squall on a grass field with six heavy‑duty ground stakes, while a nearby unweighted promotional arch got ripped out and cartwheeled into a fence. The difference was the anchoring system. Here’s the anchor comparison I run through with every client:
- Grass ground stakes (spiral or duckbill): Ideal for soil or turf. For a 15–20 ft dome, I spec 6–10 stakes rated at 1,500–2,000 lb (6.7–8.9 kN) pull‑out resistance each. In sandy or loose soil you’ll need more or longer stakes. Always ask your supplier for the required stake capacity per tie‑down point based on the dome’s projected wind area.
- Concrete ballast blocks: Mandatory on asphalt, concrete, or roof‑top installations where you can’t penetrate the surface. For a 20‑ft dome with an estimated wind sail area of roughly 250–300 ft², I typically spec four 55‑gallon water barrels (approx. 450 lb each) or equivalent concrete blocks at each main anchor point. The dead weight needed is calculated from the uplift force: at 45 mph wind, a dome can generate 1,500–2,000 lbf of lift; with a 2:1 safety factor, you’re looking at 4,000 lb of total ballast. This isn’t guesswork—a decent structural engineer or experienced supplier can provide a load calculation sheet.
- Suction‑cup systems: Rare but useful on smooth, sealed floors indoors (exhibition halls). I only recommend these for lightweight, small‑dome setups (under 12 ft) with a blower that cycles on and off; they’re not for outdoor use. Each cup must be independently rated for shear and pull‑off and mapped to the specific flooring material.
Now UV and fading. Not all printed domes are equal. Quality outdoor fabric should carry a UPF rating of 50+ and, after 500 hours of accelerated weathering (AATCC 16 or ISO 105‑B02), hold a blue‑wool fade rating of 4–5 (out of 5). What does that mean in real life? A dome I installed for a beach bar in southern Spain maintained vivid cyan and magenta after six months of continuous summer exposure, while a cheaper dome used by a pop‑up cinema started bleaching to pastel within six weeks. The difference was the supplier’s use of UV‑stabilized 600D polyester with sealed‑edge dye‑sublimation printing and an additional UV‑inhibitive over‑laminate. When you’re budgeting, insist on seeing third‑party fade test reports, not just a “UV resistant” sticker.
Rain and heat put the fabric coating and seams to the test. A proper dome should have a hydrostatic head rating above 2,000 mm and heat‑welded (not just stitched) main seams. I’ve opened up domes after a tropical downpour and found water pooling in the base channel because the seam tape had degraded. Ask for a sample of the seam construction and the waterproofing standard (CPA‑84 or equivalent). In terms of temperature, the fabric itself can handle 160°F (70°C) continuous surface heat without delamination, but if you’re deploying in a desert, the internal air temperature will skyrocket. This is where the single‑skin vs. double‑skin conversation becomes critical.
Single‑layer vs. double‑layer fabric structure isn’t just about aesthetics. A single‑skin dome is lighter, packs smaller, and inflates faster. But in cold or humid climates you’ll battle condensation: the inside feels like the inside of a soda can on a humid day. A double‑layer (or dual‑skin) dome, where a separate inner liner creates an insulating air gap, dramatically reduces condensation and improves thermal performance. I’ve measured a 15–20°F (8–11°C) difference between the inner surface of a single‑layer dome and the interior of a double‑layer one on a chilly morning, with no dripping. For a heated brand activation in northern Europe, that’s the difference between a VIP lounge and a rejected insurance claim. Double‑skin also cuts blower energy by reducing heat loss; the R‑value might only improve by around 1.5–2.5, but in a space that small, it’s noticeable. If you plan to heat or cool the interior for more than a few hours, double‑layer is worth every extra dollar.
Finally, cleaning recommendations: bird droppings, dust, and beer spills happen. For standard 600D polyester, a mild soap and water solution with a soft brush is safe. Never pressure‑wash a printed dome—you’ll embed dirt into the coating and ruin the graphics. I instruct teams to wipe down with a pH‑neutral cleaner monthly during long‑term installations, and if mold appears (rare but possible in storage), a 1:10 bleach/water rinse followed by thorough air drying is okay. Store the fabric bone‑dry. More on that in the maintenance section.
I’d be remiss without addressing fire certification, because venues and insurance companies increasingly demand it. The big three standards you’ll see quoted:
- USA: NFPA 701 (Small Scale), the standard test method for flame propagation of textiles. A compliant fabric will self‑extinguish after the flame source is removed. Most polyester‑supported PVC‑coated fabrics can meet this when treated.
- EU: DIN 4102‑B1, a more stringent classification that certifies material as “low flammability.” Products meeting B1 are widely accepted across EU events and building codes. In practice, B1‑rated material will pass a 15‑second flame exposure test with minimal burning drips.
- UK: BS 7837, specifically for tent and membrane structures. If you’re setting up at Glastonbury or a UK‑regulated venue, this one is non‑negotiable. It tests both surface and edge ignition.
I always ask for a valid test certificate that matches the specific fabric batch—not a generic brochure claim. Some suppliers will offer multi‑certified materials, which simplifies multi‑country deployments.
Cost Breakdown: Pricing Factors, Budgeting, and ROI Comparisons
I’ve been on both sides of the quote table, and I know the price range for a custom printed inflatable dome can swing from $3,000 for a simple 10‑ft print‑one‑side promo ball to $50,000+ for a multi‑chamber, fully‑branded 26‑ft immersive dome with HVAC integration. The factors that gate that spread are entirely predictable once you pull them apart.
The largest single cost driver is the fabric and printing area. Every square foot of 600D or 900D coated polyester with full‑bleed dye‑sublimation costs money. On average, expect a base cost of $12–$18 per square foot of printed surface area for a standard single‑skin dome in the 15–20 ft range, including the air tubes, blower, and basic anchoring. A double‑skin design can add 40–60% to the material and labor costs because you’re essentially manufacturing a second inner tent and integrating a critical air gap. Complex artwork with intricate gradients or photorealistic faces also pushes up the print cost, not because the ink is pricier but because the approval and color‑matching rounds chew up hours.
Next is the structural hardware: blower, air‑pump backup, zippered doors, windows, and flooring options. A continuous‑duty 1‑HP blower that runs at 110V/220V will set you back $500–$1,200 depending on IP rating. If you need battery‑powered or solar solutions for off‑grid deployments, add another $1,500–$3,000. Custom‑branded flooring (carpet, interlocking tiles, inflatable floor) ranges from $5/sqft to $20/sqft installed.
Then there’s certification and testing. A full engineering wind‑load report and flame certificate for North America and Europe can add $800–$1,500 to the total. Don’t skip it—some venues won’t let you unload without stamped paperwork.
Now, something most first‑time buyers forget: shipping and logistics. You’re moving a giant balloon, not a crate of t‑shirts. The HS code for customs that I’ve used consistently for inflatable promotional domes is 6306.22.9000 (tents of synthetic fibers), though if the item is predominantly PVC‑coated some forwarders prefer 3926.90.9985 (other articles of plastics). Always confirm with your broker. A typical 20‑ft dome, deflated and folded in its carry bag, occupies a palletized volume of roughly 1.2 m × 0.9 m × 0.9 m (1.0 m³) and weighs 90–120 kg (200–260 lbs). For air freight, that dimensional weight can murder your budget; the volumetric weight often comes to 200–250 kg. Ocean freight on a shared container is far more palatable, but you’ll need 4–6 weeks of lead time. I always build shipping into the initial quote—if the supplier says “free shipping to port,” ask which port and who handles customs clearance.
Budgeting and ROI turn this from a cost into an investment. Let’s compare: a premium 20×20 pop‑up custom tent with full‑print canopy, frame, and walls runs about $5,000–$8,000 and reaches maybe 50–200 people per hour at an expo. A 20‑ft custom printed dome of the same footprint, with immersive 360° branding and the wow factor that compels visitors to walk inside, can cost $15,000–$22,000 all‑in. But the experiential engagement rate is demonstrably higher. I worked with a tech accessory brand that swapped their standard 10×20 booth for a 16‑ft dome at IFA Berlin. Their cost per meaningful lead dropped from €28 to €11, and the dome paid for itself in three shows. Another client, a beverage company, used a dome for a 10‑city summer festival tour, avoided renting a tent at each stop (saving $800/day), and racked up over 120,000 social media impressions per weekend. If your activation generates even a modest lift in sales or leads, the payback period for a dome is typically under 12 months for frequent users.
If you can share the dome across departments (trade shows, HR events, community outreach), the per‑use cost plummets, making a compelling business case for a capital purchase over continuous rental.
Supplier Selection Checklist: 3D Rendering, Warranty, Support, and Turnaround
Choosing a supplier for a custom inflatable dome is like hiring a contractor to build a tiny venue. You want someone who knows structural load paths, print gamuts, and international shipping, not someone who just fires up a heat sealer and hopes for the best. Over the years I’ve developed a checklist that weeds out the dabblers.
1. 3D rendering and design validation. Any serious supplier should provide a free or low‑cost 3D proof that shows your artwork mapped onto an accurate dome model, including seam placements, doors, and windows. I want to rotate that model, check how the logo splits across seams, and see if the zipper lines break critical graphic elements. The rendering should also include a basic structural model indicating anchor points and blower duct locations. If they can’t produce a DXF or 3D PDF, I walk.
2. Warranty and materials guarantee. The best suppliers offer at least a 2‑year warranty on seams and welds and a 1‑year warranty on the blower and electronics. Look for explicit coverage of seam failure, delamination, and UV‑related fading within defined limits. I always ask: “What percentage of domes shipped in the last three years required a warranty claim?” A reputable factory will cite numbers below 2–3% and will show you their repair process. If they duck the question, assume the worst.
3. Support and documentation package. Before paying a deposit, I require the supplier to confirm they will provide: a) a wind‑load and anchoring specification sheet signed by an engineer, b) valid flame‑retardant certificates for the fabric batch, c) a complete setup and takedown video (not just a manufacturer’s generic YouTube clip), and d) a 24/7 emergency contact number that rings a real person during your event time‑zone. I once had a blower fail at 11 p.m. on a Friday in Las Vegas; the supplier walked me through a field‑fix over WhatsApp, and the dome was back up in 30 minutes. That kind of support is priceless.
4. Turnaround and production transparency. Standard production for a fully custom 15–20 ft dome is 4–6 weeks, plus shipping. Expedited production (2–3 weeks) is possible at a 25–35% surcharge, but only if the supplier has dedicated capacity. I always request a production calendar showing the cutting, printing, welding, and quality‑control phases with expected completion dates. If the factory can’t tell me when the fabric will hit the printing table, they probably don’t have true control over their supply chain. Also, check their peak season: the run‑up to CES, SXSW, and spring festival season creates a bottleneck from December to February. Book early.
5. References and off‑site inspection. Ask for three recent clients in your industry and actually call them. I want to know if the dome held up in the wind, if the colors matched the proof, and if spare parts were easy to get. If you can’t visit the factory, request a live video walkthrough of a dome being packed and inflated. A decent supplier will be proud to show you their work—not just a catalog photo.
Case Studies and Real-World Success Stories
Let me walk you through a few installs that show what happens when the product, the supplier, and the setup team all click.
Desert music festival activation (Arizona, USA, June). A streaming platform wanted a 24‑ft glow‑in‑the‑dark dome to host VR demos. Temperatures touched 110°F, so we opted for a double‑skin roof with a 4‑inch air gap over a white reflective outer shell. The inner liner stayed 18°F cooler than the single‑skin test dome we’d pitched nearby, and condensation never formed on the electronics. We anchored with six concrete blocks weighing 500 lb each on hard‑pack dirt, engineered for 50‑mph gusts. Despite a dust storm that sent smaller tents flying, our dome held steady and the client logged 4,000 demos in three days. The UV‑stabilized print with a 4‑5 fade rating survived the intense sun without color shift, and post‑event cleaning took two workers 45 minutes with a hose and mild soap.
Construction site enclosure (London, UK, February). A developer needed a temporary heated enclosure to continue bricklaying on an exposed site. They ordered a 20‑ft inflatable dome with a flame‑retardant BS 7837‑certified fabric and heavy‑duty zippered pass‑throughs for material carts. Because of the outdoor risk and proximity to residential housing, the council required documentation of both wind load calculations and fire safety. The dome used a combination of water‑filled ballast barrels (330 lb each) and two anchor bolts drilled into existing concrete footings, satisfying the structural engineer’s uplift requirement of 3,200 lb per side. Inside, two electric fan heaters kept the temperature at 50°F while outside hovered at 28°F; the double‑layer skin eliminated dripping condensation that could have ruined mortar. The builder’s schedule saved three weeks, paying for the dome many times over.
Trade‑show island alternative (CES, Las Vegas). A consumer robotics startup had a 10×20 booth space and wanted to stand out. Instead of a traditional backwall, they deployed a 16‑ft custom printed dome printed with a planetary graphic on the outside and a fully branded white interior. The HS code for customs was 6306.22.9000; the dome shipped in a single palletized bag (1.1 m³, 98 kg) via air freight to hit the show deadline. Inside, the curved walls gave the product demos a cocoon‑like feel, free from aisle distractions. Attendee dwell time averaged 9 minutes versus the show average of 3 minutes. Post‑show, the same dome was repurposed for in‑store pop‑ups and college recruiting events. The marketing director told me the dome delivered a 150% ROI within six months solely on lead quality.
Maintenance, Repairs, and Long-Term Storage Best Practices
A custom inflatable dome is not a “blow it up, forget it” asset. The structures I see lasting five or more years share a common discipline of post‑event care that takes less than an hour.
Immediate post‑event cleaning: As soon as the dome deflates, wipe down the fabric with a dry microfiber cloth to remove surface dust and debris before it gets ground into the coating. For mud or food stains, a sponge with lukewarm water and mild dish soap works. Avoid any solvent‑based cleaners—I’ve seen acetone accidentally applied to remove tape residue, and it stripped the print clean off. Rinse thoroughly and, crucially, let the fabric dry completely before rolling it up. A moisture meter reading above 10% inside the roll is an invitation for mildew. I always pack a couple of moisture‑absorbing silica gel sachets in the carry bag.
Repair kit and field fixes: Your supplier should include a basic repair kit with matching fabric swatches, clear PVC patches, and a tube of two‑part flexible adhesive (HH‑66 or equivalent). Small punctures (under 1 cm) can be patched on‑site in 10 minutes by cleaning the area with alcohol, cutting a patch with 1‑inch overlap, and clamping it with a squeeze clamp while the glue sets. For larger seam splits, you’ll need an industrial hot‑air welder and an experienced hand; I recommend sending the dome back to the factory or a certified repair center. If a blower goes down, first check the GFCI or circuit breaker. Keep a spare blower or at least a backup capacitor kit—I’ve revived dead blowers with a $5 start capacitor more often than I’d like to admit.
Long‑term storage: Store the dome in a cool, dry environment (ideally 50–70°F, humidity below 60%). Never store it in a metal container that bakes in the sun; the heat can accelerate plasticizer migration and make the fabric tacky. Fold the dome loosely—not in the same precise creases every time—to prevent cracking along fold lines. I number the domes and track their storage cycles on a simple spreadsheet. Every six months of storage, I recommend a “health check” inflation: blow it up in a warehouse, inspect all seams under light tension, and verify the blower’s amp draw. This 30‑minute ritual has saved me from discovering a mouse‑chewed seam five minutes before a live event.
Blower maintenance: Clean the blower’s intake filter regularly. A clogged filter can overheat the motor and cause an automatic thermal shutdown. Once a year, oil the motor bearings if the manufacturer recommends it, and check that the air‑outlet flange isn’t cracking. I keep a maintenance logbook for each dome and its accessories so any operator can see its history.
Часто задаваемые вопросы
Q: Can I use a custom inflatable dome in winds over 30 mph?
A: Yes, but with caveats. A properly anchored dome rated for continuous 35 mph winds and gusts to 50 mph can operate safely. You must match the anchoring to the surface (ground stakes in soil, ballast blocks on hard surfaces, and engineered tie‑downs for odd configurations). Always monitor wind forecasts and deflate if sustained winds exceed the manufacturer’s rated limit, because a sudden increase in sail area (like an open door) can multiply the load.
Q: What UPF and fade ratings should I demand?
A: Ask for UPF 50+ fabric and a fade test according to AATCC 16 or ISO 105‑B02 showing a rating of 4–5 after 500 hours. In plain English: after 6–8 months of continuous summer exposure, the colors should still look vibrant, not washed out. If the supplier can’t produce this data, the fabric likely isn’t outdoor‑grade.
Q: How do I import a dome? What HS code applies?
A: For most promotional inflatable domes made of synthetic fabric, I use HS code 6306.22.9000 (tents of synthetic fibers). If the structure is predominantly plastic‑coated, 3926.90.9985 may be accepted. Always provide your customs broker with the product description, material composition, and a photo. Factor in shipping volume: a deflated 20‑ft dome typically packs into a 1.0–1.2 m³ crate weighing 90–120 kg. Air freight will be charged on volumetric weight, often 200–250 kg.
Q: What flame certifications should I look for?
A: The three critical standards are NFPA 701 (USA), DIN 4102‑B1 (EU), and BS 7837 (UK). If you’re touring globally, a multi‑certified fabric exists that satisfies all three. Always get a certificate that references the specific fabric lot number; generic compliance statements are not sufficient for venue safety checks.
Q: Do I need a double‑layer dome to prevent condensation?
A: If you’re in a humid or cold environment, yes. A single‑skin dome will drip when warm interior air hits a cold external surface. The air gap in a double‑layer design acts as a thermal break, significantly reducing condensation and improving heat retention. For heated or air‑conditioned activations, dual‑skin is the standard I recommend.
Q: Can the graphics be seen at night?
A: Absolutely. Many domes can be fitted with internal or external LED lighting that transforms the entire structure into a glowing lantern. The printed graphics remain visible as long as there’s at least some backlight. For maximum nighttime impact, I spec a white or light‑colored print base and 360° internal uplighting.
Making Your Brand Unmissable with a Custom Inflatable Dome
Here’s the bottom line after years of sweating through setup guides and wind‑assaulted activations: a custom printed inflatable dome isn’t just a tent you put your logo on—it’s an architecture of attention. It bends the sightlines of a crowded festival, it swallows the static of a trade show aisle, and it turns a pass‑by moment into a walk‑in memory. The 360° print capability, the curved walls, the cocooned interior—they conspire to make every visitor’s photo a branded asset you never paid for per click.
But that only happens if you do the unsexy homework. You need to know your wind zone and require the anchoring system to match. You need to demand the UV test reports, fire certificates, and seam warranties that separate outdoor‑grade engineering from fair‑weather playthings. You need to budget not just for the dome but for the double‑skin option that keeps your VIPs from getting dripped on, and for the logistics of a 200‑lb pallet that travels by ocean freight under HS code 6306.22.9000. When you select a supplier who treats your project like a miniature venue—providing 3D walk‑throughs, engineering stamps, and after‑hours support—you don’t just buy a product; you buy the confidence to deploy overnight in a desert, a London construction site, or a Las Vegas convention center.
The teams I’ve seen succeed are the ones that treat the inflatable dome as a repeatable marketing platform, not a one‑shot stunt. They clean it, store it properly, track its maintenance, and re‑deploy it across trade shows, community events, and retail pop‑ups until the cost per impression drops to pennies. In a world where audiences are harder to hold than ever, a dome doesn’t just grab their gaze—it encloses them in an experience they’ll talk about long after the blower is packed away. Make your brand unmissable, and do it with a structure that’s as serious about safety and longevity as you are about your image.
Ссылки
1. Custom Inflatable Tents – Get Your Inflatable Dome Canopy! – instent.com
2. How to Customize an Inflatable Dome Tent: A Budget … – mvpvisuals.com
3. Inflatable Dome Tent Buyer’s Guide: Why Beam Material … – kcce-event.com
4. Custom Inflatable Tents with Logo for Events & Branding – westshade.com
5. Custom Printed Inflatables of All Shapes & Sizes – lushbanners.com







