

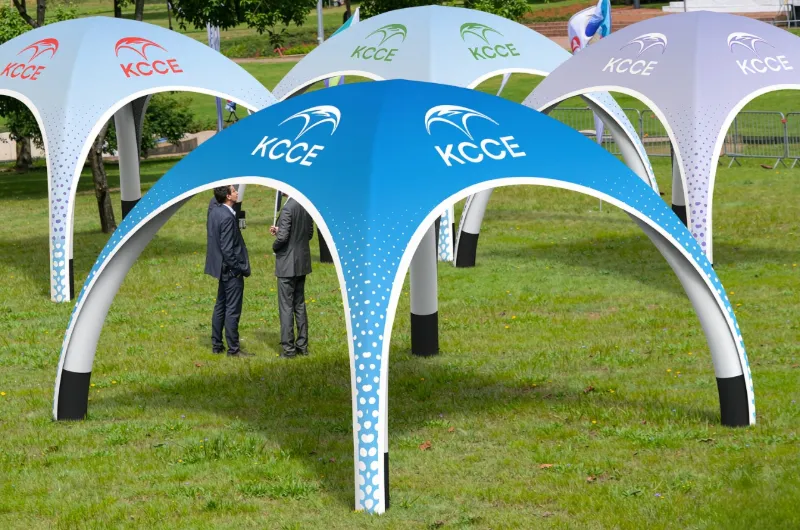
You’ve got three seconds. That’s roughly how long a conference attendee, a festival-goer, or a potential client takes to scan a crowded outdoor space and decide where to walk. If your booth looks like every other white canopy on the lawn, you’ve already lost them. The fix? Custom inflatable tents with logo for events & branding. These aren’t just shelters—they’re three-dimensional billboards that make your brand impossible to miss.
But here’s the catch: choosing the wrong tent can burn your budget, arrive late, or collapse at the worst possible moment. I’ve seen all three happen. In this guide, I’m breaking down everything you need to know before you order—types, sizes, printing methods, real pricing, lead times, and the vendor red flags that most buyers only learn after a costly mistake.
Quick Answer
Custom inflatable tents with logo for events & branding are air-supported marketing structures that combine shelter with high-impact, full-color branding—offering faster setup, larger print areas, and more visual drama than traditional frame tents, with prices and lead times varying by size, material, and printing method.
Why Choose Inflatable Over Frame Tents?
Let’s get one thing straight: traditional frame tents aren’t bad. They’ve been the workhorse of outdoor events for decades. But when you put an inflatable tent next to a standard pop-up, the difference is like comparing a billboard to a business card.
Setup speed is the first thing you’ll notice. A typical 10×10 frame tent may take two people some time to assemble, while an inflatable tent of the same size can be set up more quickly with a blower, according to product descriptions. One person can handle it. You plug in the fan, watch the structure rise, and stake it down. That’s it. For event teams running multiple activations in a single day, this time saving is enormous.
This is where the inflatable tent vs pop up comparison gets interesting. Pop-up tents are convenient, sure, but they rely on a central hub-and-pole system that creates a blind spot in the middle of your canopy. Your branding gets split into panels. Inflatable structures, by contrast, use air beams—no center pole, no visual obstruction. The entire ceiling and walls become one continuous branding surface.
Speaking of branding surface area—this is the real reason brands make the switch. A standard frame tent gives you four walls and a roof, but the frame itself eats into your printable space. Inflatable tents have smooth, uninterrupted surfaces. Full-color dye sublimation printing means your logo, your messaging, and even photorealistic graphics wrap around the entire structure. From a distance, attendees see a solid block of your brand colors, not a tent with a logo stuck on the side.
Portability is another win. Air beams collapse down to a fraction of their inflated size. A 20×20 inflatable tent is designed to pack into bags that can fit in the back of an SUV, according to the manufacturer’s specifications. The same size in a frame structure requires a truck and a lot of muscle.
Now, let’s talk about wind resistance, because someone always asks. Frame tents have a lower profile and can handle higher winds when properly ballasted. Inflatable tents have made huge strides here—modern designs with multiple air chambers and guy lines can handle respectable wind loads. But if you’re setting up in an exposed field where gusts regularly hit 30+ mph, a frame tent with heavy weights is the safer bet. For most event scenarios—trade shows, festivals, corporate gatherings—inflatable tents perform admirably.
One more thing: the “wow” factor. Inflatable tents look different. They look intentional. They look like you invested in your brand presence. And honestly, that perception matters. A custom canopy tent with logo that draws eyes from across the venue is worth more than the cost difference.
Sizing Guide: From 10×10 to 20×20
Size matters. Not just for your budget, but for how your brand is perceived and how your space functions. Let me walk you through the most common sizes and what they’re actually good for.
10×10 Custom Canopy Tent
The 10×10 is the workhorse of the event industry. It’s the standard booth size at most trade shows and expos. Think of it as your mobile storefront. You can fit a small table, a couple of display stands, and still have room for you and a colleague to move around.
For a custom 10×10 canopy tent with company logo, the space is commonly used for trade show booths, farmer’s markets, school events and fundraisers, and small product demos.demos
The layout tip here: don’t clutter it. One table, one banner stand, and your branded tent walls doing the heavy lifting. The 10×10 custom canopy tent is also the most budget-friendly entry point, which makes it popular for small businesses testing the waters with branded outdoor presence.
10×20 Custom Tents with Logo
Double the length, double the possibilities. The 10×20 is perfect for businesses that need more breathing room. You can set up a demo area at one end, a meeting table in the middle, and storage at the back. This size is common for:
- Larger trade show booths (two standard 10×10 spaces)
- Outdoor festivals where you need display space
- Sports events and sponsorships
- Corporate launches with product showcases
With custom tents with logo 10×20, you get a longer branding canvas. The side walls become prime real estate for your messaging. I’ve seen companies use the extra length to create a walk-through experience—entrance branding, product displays along one side, and a consultation area tucked at the back.
20×20 and Beyond
This is where things get serious. A 20×20 inflatable tent is a statement. It’s not a booth anymore—it’s a pavilion. You can host presentations, set up multiple demo stations, create lounge areas with our inflatable furniture, and still have room to spare.
This size is ideal for:
- Major trade shows and expos
- Unternehmensevents und Produktpräsentationen
- Sports sponsorships with hospitality areas
- Large outdoor festivals
The layout considerations change at this scale. You need to think about traffic flow. Where do people enter? Where do they congregate? How do you guide them through the space? The branding surface area is massive—you can wrap the entire structure in your campaign visuals.
What Size Inflatable Tent Is Best for a Trade Show?
If you’re asking this question, start with your booth space. Most trade shows sell booth space in 10×10 increments. If you’ve booked a 10×10 space, get a 10×10 tent. If you’ve booked 10×20, get a 10×20. It sounds obvious, but I’ve seen people order the wrong size and struggle with setup in a cramped booth space.
For maximum impact within a standard booth, the 10×10 is your safest bet. For brands that want to stand out and have the budget, going with a 10×20 gives you that extra presence that makes attendees pause.
Customization Options: Printing, Shapes, and Accessories
This is where the fun begins. A custom printed inflatable tent is a blank canvas, and how you fill that canvas determines your event success.
Full-Color Dye Sublimation vs. Vinyl
The printing method matters more than most buyers realize. Here’s the breakdown:
Dye Sublimation is the gold standard for inflatable tents. The ink is transferred into the fabric itself at high temperatures, becoming part of the material. The result? Vibrant colors that won’t crack, peel, or fade easily. The print is also breathable, which prevents condensation issues inside the tent. This is the method used by professional-grade manufacturers for custom inflatable tents with logo for events & branding.
Vinyl Printing uses adhesive vinyl graphics applied to the tent surface. It’s cheaper and works well for simple logos and text. But it has drawbacks: vinyl can peel at the edges over time, especially in wind and sun. It’s also less breathable, which can lead to moisture buildup. For temporary use—a single event or a few weekends—vinyl might be acceptable. For ongoing brand use, dye sublimation is worth the extra cost.
Shape Options
Beyond the standard box tent, inflatable technology allows for creative shapes:
- Aufblasbare Bögen for entrances and finish lines
- Inflatable tunnels for walk-through experiences
- Custom inflatable shapes like product replicas or brand mascots
- Inflatable domes for immersive environments
These shapes aren’t just gimmicks. They serve specific marketing functions. An inflatable arch at a race finish line creates a memorable photo moment. A product replica outside your booth draws attention from across the venue. At KCCE, we’ve seen brands use aufblasbare Formen to create visual anchors that attendees remember long after the event.
Accessories That Matter
Don’t overlook the add-ons. They can make or break your event experience:
Weights and Ballasting — Inflatable tents are light. Without proper weighting, they can shift in the wind. Most manufacturers offer water-fillable weights or sandbag options. Never skip these.
Lighting — If your event runs into the evening, internal lighting transforms your tent. LED light kits that attach to the frame or hang from the ceiling make your branded space visible after dark.
Carrying Bags — Quality bags protect your investment between events. Look for heavy-duty bags with reinforced handles and wheels for larger sizes.
Reparatursets — Accidents happen. A basic repair kit with patches and adhesive can save you from a ruined event.
Transparent Pricing Breakdown
Let’s talk money. This is where most buyers get confused, and honestly, where some vendors take advantage. The custom inflatable tent cost isn’t a single number—it’s a stack of components.
The Base Tent Cost
Your starting point is the tent structure itself. For a custom canopy tent 10×10 price, expect to pay less than you would for a 20×20, obviously. But within each size, prices vary based on:
- Materialqualität — Commercial-grade PVC costs more than lighter materials but lasts longer
- Die Druckmethode — Dye sublimation adds to the cost vs. vinyl
- Print coverage — Full-wrap printing costs more than single-panel branding
- Frame vs. inflatable — Inflatable structures are generally comparable to premium frame tents
Setup Fees and Hidden Costs
Here’s where the “sticker shock” comes in. According to industry pricing analysis from InStent, professional-grade custom tents involve more than just the tent purchase price. You need to account for:
- Design and proofing fees — Some vendors include this, others charge separately
- Versand und Fracht — Large tents ship in bulky packages; freight costs can be significant
- Setup equipment — Blowers, stakes, and guy lines may or may not be included
- Storage bags — Premium bags sometimes cost extra
- Customs and duties — If you’re importing, factor these in
Realistic Price Ranges
I’m going to give you ballpark figures based on industry norms, but understand that prices vary by vendor and specifications:
- 10×10 custom canopy tent: Entry-level pricing is often in the lower range, while professional-grade with full dye sublimation printing typically costs more.
- 10×20 custom tents with logo: Expect to pay roughly double the 10×10 for the larger footprint
- 20×20 inflatable tent: This is a significant investment, often several times the cost of a 10×10
The key takeaway: get itemized quotes. A vendor who gives you a single “all-in” price without breaking down tent cost, printing, and shipping is hiding something. Transparency is a green flag.
Is a Cheap Tent Costing You Leads?
Here’s a question worth asking yourself: what is a missed lead worth to your business? If a cheap tent means faded colors, a wobbly structure, or a print that peels after three events, you’re not saving money—you’re losing opportunities. The custom canopy tent 10×10 price difference between budget and premium might be a few hundred dollars. Over the life of the tent, that’s pennies per event.
Lead Times and Production Schedule
You found the perfect tent design. Now, how long until it’s in your hands? The custom tent lead time is a critical planning factor, and it varies more than you’d think.
The Production Timeline
A typical custom inflatable tent order follows a timeline that includes design and proofing, production, and shipping, with total time often ranging from a few weeks to over a month, depending on the manufacturer and order specifics. look on the tent. This step involves back-and-forth until you approve. Rushing this step is a mistake—errors caught at proof stage are cheap; errors caught after printing are expensive.
Production (2-4 weeks) — Once approved, your tent goes into manufacturing. Dye sublimation printing, cutting, sewing, and assembly all take time. Complex designs with full-wrap printing take longer than simple one-panel logos.
Shipping (3-10 days) — Domestic shipping is faster, but international orders require freight time and customs clearance.
Total: typically 3-6 weeks from order to delivery. Some vendors offer expedited production for rush orders, but this comes at a premium.
Planning Around Event Deadlines
Here’s my advice: order at least 6-8 weeks before your event. This gives you breathing room for design revisions, production delays, and shipping hiccups. I’ve seen too many brands scramble because they ordered three weeks before a major trade show and the tent arrived two days after the event ended.
Rush Orders: Worth It?
Most established vendors offer rush production. The cost is usually a percentage markup on your order. Is it worth it? Only if you have no other option. The risk is that rush orders leave less time for quality control. A small flaw that would be caught in normal production might slip through.
If you’re in a time crunch, communicate your deadline upfront. A good vendor will tell you if your timeline is realistic or if you need to adjust your expectations.
Material Quality and Weather Performance
The waterproof inflatable tent question comes up constantly. “Will my tent survive rain?” “What about the sun?” “How long will it last?” These are fair questions, and the answers come down to materials.
PVC vs. Nylon
Most professional-grade inflatable tents use PVC-beschichtetem Polyester oder PVC tarpaulin. These materials offer:
- Waterproofing — PVC is inherently waterproof when seams are properly welded or taped
- UV-Beständigkeit — Quality PVC includes UV inhibitors that prevent sun damage and color fading
- Haltbarkeit — Commercial-grade PVC withstands repeated setup and takedown
- Rip resistance — The material resists punctures and tears better than lighter fabrics
Nylon is lighter and packs smaller, but it’s generally less durable and more prone to UV damage over time. For occasional indoor use, nylon might suffice. For outdoor events where weather is a factor, PVC is the safer choice.
Waterproofing: What It Actually Means
A waterproof inflatable tent isn’t just about the fabric—it’s about the construction. Seams need to be welded or sealed. Zippers and closures need weather protection. The floor, if included, needs to be waterproof too.
Here’s a practical tip: even the most waterproof tent will collect water on the roof in heavy rain. A properly designed tent has a slight dome or slope that lets water run off. Flat-roofed tents can sag and pool water, which stresses the structure. Look for designs with adequate drainage.
UV and Heat Performance
In direct sun, tent interiors can get hot. Lighter-colored fabrics reflect more heat but show dirt more easily. Darker colors absorb heat but hide stains. Some manufacturers offer silver-coated or reflective materials that reduce interior temperatures significantly.
For summer events, consider a tent with ventilation options—open sides, mesh windows, or vents that allow airflow. Your attendees and staff will thank you.
Maintenance and Repair Best Practices
Your inflatable tent is an investment. Treat it right:
- Clean after each use — Wipe down with mild soap and water; never use harsh chemicals
- Dry completely before storage — Storing a damp tent invites mold and mildew
- Store in a cool, dry place — Extreme heat degrades PVC over time
- Inspect before each event — Check seams, zippers, and inflation valves
- Patch small tears immediately — Small issues become big problems if ignored
Most vendors offer repair services, and basic repair kits are available. A small puncture is fixable; a torn seam from neglect is not.
How to Choose a Vendor: Red Flags and Green Lights
Choosing the right vendor is arguably more important than choosing the right tent. A great vendor guides you through the process, catches design issues, and delivers a quality product on time. A bad vendor leaves you with a tent that looks nothing like the proof and a customer service black hole.
Green Lights
Transparent Pricing — A vendor who itemizes costs—tent, printing, shipping, accessories—is showing you they have nothing to hide. Look for clear breakdowns on their website or in their quotes.
Proofing Process — Quality vendors provide detailed digital proofs before production. They show you how your logo will look from multiple angles. They welcome revisions.
Sample Options — Some vendors offer sample swatches or even sample tents. This is a strong signal of confidence in their product.
Industry Experience — Vendors with years in the event industry understand the practical challenges: wind, weather, setup logistics. Some companies in the industry have established reputations, such as TentCraft, WestShade, and MVP Visuals.
Responsive Communication — How quickly do they answer your questions? Do they provide useful answers or generic responses? The pre-sale experience predicts the post-sale experience.
Red Flags
Vague Pricing — “Contact us for a quote” without any ballpark figures can be legitimate for complex custom projects. But if they refuse to give even a range after you share your requirements, be wary.
No Proof Before Production — If a vendor says they’ll print your logo “and you’ll see the result,” run. Professional vendors always provide proofs.
Unrealistic Lead Times — If a vendor promises delivery in a week when the industry standard is 3-6 weeks, they’re either lying or cutting corners.
No Physical Address or Portfolio — A vendor without a verifiable location or past work examples is a risk.
Pressure Tactics — “This price is only valid today” is a sales tactic, not a business practice. Legitimate vendors let you think.
Questions to Ask Before Ordering
- What material do you use, and what’s the warranty?
- Can I see a sample or visit your facility?
- What does the proofing process look like?
- What’s included in the price—blowers, stakes, bags?
- What’s your production timeline and shipping estimate?
- Do you offer rush production?
- What’s your repair policy?
- Can you provide references from past clients?
The Vendor Search
If you’re looking for custom inflatable tents with logo for events & branding near you, start with local event supply companies. They understand local weather conditions and event regulations. But don’t limit yourself—many of the best manufacturers ship nationally and internationally.
For brands considering custom canopy tents with logo, the search process is the same regardless of location. Look for proven track records, transparent processes, and quality materials.
Final Thought
Choosing the right custom tent is about balancing your brand’s visual impact, practical needs, and budget. Whether you’re a startup looking for a simple pop-up or a large enterprise investing in a fleet of inflatable structures, the options are vast—and the payoff, when done right, is a portable billboard that draws crowds and builds recognition. Start with a clear design, request samples, and compare quotes from multiple suppliers to ensure you get the best value for your investment.
Take the time to review the supplier’s portfolio and ask for references from past clients—this can reveal the real-world quality of their stitching, printing, and assembly. Also, confirm the lead time early; custom production can take anywhere from 2 to 6 weeks depending on complexity and shipping distance, so plan your order well ahead of your event date.
Once your tent arrives, treat it as a key part of your marketing toolkit. Set it up once at home or in the office to check for any defects, practice the assembly, and photograph it from every angle for future promotional use. Keep a small repair kit handy—duct tape, spare stakes, and a patch kit can save you on-site.
Finally, remember that your custom tent is more than just shelter—it’s a stage for your brand. Pair it with branded tablecloths, banners, and flags to create a cohesive booth that stands out in a crowded venue. With the right planning and a reliable supplier, your custom tent will pay for itself many times over in visibility and customer trust.
Häufig gestellte Fragen
F: Wo kann ich individuelle aufblasbare Zelte finden?
A: You can find custom inflatable tents through specialized event supply manufacturers and branding companies. Look for vendors like TentCraft, WestShade, MVP Visuals, or KCCE that specialize in custom inflatable structures. Search for “custom inflatable tents with logo for events & branding near” to find local options, or work with national manufacturers who ship to your location.
Q: Where can I find a custom canopy tent with a business logo?
A: Many event supply companies and online retailers offer custom canopy tents with logos. You can order directly from manufacturers, use print-on-demand services, or work with local sign shops that partner with tent manufacturers. For best results, choose a vendor that offers dye sublimation printing for vibrant, long-lasting logos.
Q: What’s the best inflatable tent on the market?
A: The best inflatable tent depends on your specific needs—size, budget, and use case. Professional-grade options from established manufacturers like WestShade and TentCraft are well-regarded for quality materials and printing. For a balance of quality and value, consider working with a manufacturer like KCCE that offers kundenspezifische aufblasbare Zelte with full-color printing and commercial-grade durability.
Q: How to put a logo on a tent?
A: The most common methods are dye sublimation printing, where ink is infused into the fabric for vibrant, durable graphics, and vinyl application, where adhesive vinyl is applied to the tent surface. Dye sublimation is preferred for professional results. The process involves sending your logo to the vendor, receiving a digital proof, and approving before production begins.
How long does it take to receive a custom tent?
Production typically takes 2–4 weeks depending on the design complexity, quantity, and manufacturer workload. Rush orders are often available for an additional fee—ask your supplier about expedited timelines before placing an order.
Can I wash a printed custom tent?
Yes, but gently. Use mild soap, cold water, and a soft sponge or cloth. Avoid machine washing, bleach, and abrasive scrubbers, which can damage the print or fabric coating. Always air-dry completely before folding to prevent mildew.
What is the minimum order quantity (MOQ) for custom tents?
Most manufacturers require a MOQ of 1–5 units for standard sizes, though bulk orders (10+) usually unlock significant per-unit discounts. Some premium suppliers offer single-piece customization at a higher price point.
Are custom tents waterproof?
Most professional-grade tents use PVC or polyester with a waterproof coating (typically 3000mm–5000mm hydrostatic head). Always confirm the fabric’s waterproof rating with your supplier, especially if you plan to use the tent in heavy rain.
Can I reuse the tent after an event?
Absolutely. With proper care—cleaning, drying, and storing in a protective bag—a quality custom tent can last for years and be used across multiple events, trade shows, or campaigns.
Quellen
1. Custom Canopy Tents with Logo | Branded Pop-Up Tents – mvpvisuals.com
2. Branded Outdoor Canopy Tents In Miami FL – getundercover.com
3. 9 Branded Inflatable Tent Designs That Will Inspire Your … – tentcraft.com
4. Custom Inflatable Tents with Logo for Events & Branding – westshade.com
5. Sticker Shock? Understanding The Price Range of … – instent.com







