

I watched a brand manager lose a significant amount of money in one afternoon. Their 20×20 pop-up canopy collapsed during a gust of wind at a product launch., sending samples flying, guests scrambling, and the whole activation straight into damage-control mode. The worst part? Nobody had even checked the wind rating before they bought it.
That’s the thing about event tents. Most buyers pick the wrong material, the wrong anchoring system, or the wrong vendor entirely—and they don’t find out until it’s too late. The good news? A custom inflatable event tent solves most of those problems before they start, provided you know what you’re actually looking at.
I’ve spent years in the inflatable structures industry, and I’ve seen every corner cut, every shortcut taken, and every “deal” that turned out to be a liability. This guide is the one I wish someone had handed me before my first big order. We’re going to cover real pricing, wind ratings, material specs, vendor comparisons, and the exact questions to ask before you sign anything.
Quick Answer
A custom inflatable event tent is a branded, air-supported shelter that uses continuous air pressure to hold its shape, offering faster setup, safer wind performance, and 360-degree print space compared to traditional metal-frame tents—with entry-level 10×10 models starting around $1,000 to $2,000 depending on print coverage and material quality.
Why Custom Inflatable Event Tents Beat Metal Frames
Let me start with the obvious question: why would anyone choose an inflatable structure over the classic metal pole tent that’s been around for decades?
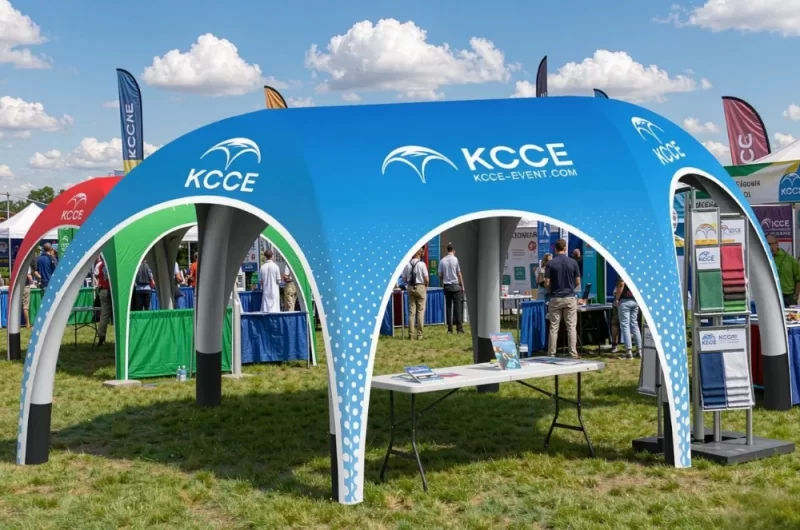
The custom inflatable event tent has one massive advantage that changes everything: there are no poles. Zero. Zilch. That means no center pole blocking your product display, no trip hazards along the edges, and no awkward headroom issues in the middle of the tent. You get a completely open interior space that you can use however you want.
Setup time is where things get really interesting. A standard 10×10 pop-up tent takes two people some time to assemble., and that’s if the poles cooperate and nobody’s wrestling with a stuck joint. A comparable inflatable canopy? One person, a blower, and a few minutes from bag to fully standing structure. I’ve watched volunteers with zero training inflate a 20×20 air beam tent in under ten minutes on their first try.
Portability follows the same trend. Metal frame tents are heavy—those steel poles add up fast, especially when you’re hauling them in and out of a van multiple times per season. Inflatable structures pack down into a fraction of the space and weigh considerably less. For event teams that travel, that difference shows up in your back, your gas mileage, and your storage closet.
But here’s where inflatable tents really shine for branding: the print space. A metal frame tent gives you fabric panels that wrap around the structure, but you’re always working around the frame. Inflatable tents give you a smooth, continuous surface—including the roof—that’s essentially one giant canvas. The 360-degree print coverage means your logo, your messaging, and your brand colors are visible from every angle, not just the front three panels.
Think about what that means for a sponsorship activation or a product launch. Your tent isn’t just shelter anymore—it’s a billboard. It’s a statement piece that draws people in from across the venue. TentCraft’s team has noted that their inflatable tents are especially effective at matching the energy and vibe of high-energy athletic events, motorsport activations, and music festivals—the kind of environments where standing out isn’t optional, it’s the whole point.
There’s also a practical safety angle that doesn’t get enough attention. When a metal frame tent goes over in the wind, it goes over hard. Poles bend, fabric tears, and if someone’s inside, they’re in real danger. Inflatable tents are more forgiving—they flex and absorb wind loads rather than fighting them rigidly, and they can be deflated quickly in an emergency.
Now, I’m not saying metal frame tents are useless. They’re cheaper upfront in many cases, and for permanent or semi-permanent installations, they’re still a solid choice. But for events, activations, and anything where setup speed and brand impact matter, the custom inflatable event tent is the better tool for the job.
Anatomy of a Custom Inflatable: Air Beams vs. Frame
Before you spend a dollar, you need to understand what you’re actually buying. Not all inflatable tents are built the same, and the differences matter a lot more than most buyers realize.
Air Beam Construction
The most common type of inflatable canopy uses air beams—essentially long, cylindrical tubes of fabric that form the structural skeleton of the tent. These beams are made from layers of PVC or TPU-coated fabric, welded or sewn into tubes, and then pressurized with air.
The key spec here is pressure. Most air beams operate at a certain PSI range., though the exact number depends on the beam diameter, the tent size, and the manufacturer’s design. The blower runs continuously to maintain that pressure, which means the tent is always “inflated” and always at full structural integrity.
Redundancy is a critical design feature in quality air beam tents. Good manufacturers build their tents with multiple air chambers, so if one beam gets punctured or loses pressure, the others keep the structure standing. You might lose some rigidity on one side, but the tent won’t collapse entirely. That’s a huge safety margin compared to single-chamber designs.
Frame-Inflatable Hybrids
Some manufacturers offer a hybrid design that combines inflatable beams with a rigid frame. These are less common, but they’re worth knowing about because they change the tradeoff calculus. The frame provides structural rigidity, while the inflatable elements add shock absorption and easier setup. The downside is that you’re carrying both the inflatable components and the frame pieces, which cuts into the portability advantage.
When Each Wins
Here’s my honest take: pure air beam tents win for most event applications. They’re lighter, faster to set up, and the absence of hard structural elements makes them safer in crowded spaces. The hybrid designs make sense if you need extremely high wind resistance or if you’re setting up in a location where you can’t run a blower continuously.
The Blower Question
Every inflatable tent needs a blower, and this is where some vendors try to nickel-and-dime you. A quality continuous-duty blower isn’t cheap—expect to pay a few hundred dollars for a good one.—but it’s the heart of your tent system. Cheap blowers fail, and a failed blower means a collapsed tent.
Make sure you’re getting a blower that’s appropriately sized for your tent. Too small, and the tent won’t reach full pressure. Too large, and you’re wasting energy and potentially over-pressurizing the beams. Reputable manufacturers will spec the right blower for their tents, so this is mostly a matter of confirming it’s included in your quote.
Valve and Repair Systems
This is a detail most first-time buyers overlook, but it matters. Good inflatable tents have high-quality inflation valves that seal properly and don’t leak. They should also come with repair kits that include patches, adhesive, and instructions. A small puncture in an air beam is fixable in the field if you have the right kit—I’ve patched a small tear at a job site in a short time.
If you’re looking for a deeper dive into how these systems work in practice, our detailed review of the Air Tight X Tent covers a specific example of what a well-engineered inflatable shelter looks like.
Print Quality & Materials: 850gsm vs. 450gsm PVC
Let’s talk about fabric, because this is where the difference between a good tent and a great tent really shows up—and where a lot of vendors cut corners.
Understanding GSM
GSM stands for grams per square meter, and it’s the standard measure of fabric weight. In the inflatable tent world, you’ll typically see two weight classes: lighter fabrics around 450gsm and heavier fabrics around 850gsm.
The 450gsm material is lighter and cheaper, which makes it attractive for budget-conscious buyers. It’s fine for indoor use, light outdoor duty, or situations where the tent won’t face much wind or rough handling. But here’s the catch: lighter fabric is more prone to punctures, tears, and wear over time. It also tends to be more translucent, which means your printed colors may look washed out when the sun hits them from behind.
The 850gsm material is the heavy-duty option. It’s significantly more durable, resists punctures and abrasion better, and provides a more opaque print surface. Colors pop more, the tent holds its shape better, and it stands up to repeated use and storage. The tradeoff is weight and cost—850gsm tents are heavier to transport and noticeably more expensive.
Dye-Sublimation vs. Screen Printing
Printing method matters just as much as fabric weight. The two main options are dye-sublimation and screen printing.
Dye-sublimation is the gold standard for custom printed tents. The process involves printing your design onto transfer paper, then using heat to transfer the dye directly into the fabric’s fibers. The result is a print that’s part of the fabric itself—it won’t crack, peel, or fade the way surface prints do. Colors are vibrant, gradients render beautifully, and the print can cover the entire surface of the tent, including seams and edges.
Screen printing, by contrast, applies ink onto the surface of the fabric. It’s cheaper for simple designs with limited colors, but it has real drawbacks. The ink can crack over time, especially in cold weather, and the print is more susceptible to fading from UV exposure. Screen printing also struggles with gradients and photo-quality images.
For a custom inflatable event tent that’s going to represent your brand in public, dye-sublimation is the way to go. The difference in quality is visible from across the venue, and the print will still look good in year three, whereas a screen-printed tent might look tired by then.
Seam Welding and Construction
Here’s another detail that separates quality manufacturers from the rest: how the fabric pieces are joined. The best tents use high-frequency welding, also known as RF welding, which fuses the PVC layers together at the molecular level. This creates a seam that’s actually stronger than the surrounding fabric and completely airtight.
Cheaper tents might use stitching or gluing. Stitched seams create needle holes that can leak air, and glue joints can degrade over time. Neither is as reliable as RF welding for a structure that needs to hold air pressure continuously.
When you’re comparing quotes from different vendors, ask specifically about their welding method. If they can’t tell you, or if they’re evasive about it, that’s a red flag. The quality of your tent’s seams will determine how long it lasts and how much maintenance it needs.
Translucency and White Balance
One thing I always tell clients to check: hold the fabric up to a light before you commit. Translucent fabric can make your printed colors look completely different in bright sunlight. White areas might look gray, and lighter colors might wash out entirely.
Quality 850gsm PVC with a proper white backing layer will minimize translucency. If you’re printing a design with lots of white or light colors, this matters even more. Don’t be afraid to ask for a fabric sample before you place your full order—any reputable manufacturer will send you one.
Custom Inflatable Event Tent Pricing: Real Numbers
Alright, let’s talk money. This is the part where most vendor websites get vague, and I understand why—pricing is complicated, and it depends on a dozen variables. But you deserve real numbers, so here’s what you should expect to pay.
Entry-Level Pricing
For a basic 10×10 inflatable canopy with simple print coverage, you’re looking at roughly $1,000 to $2,000. That gets you a functional tent with a basic single-color logo and standard 450gsm fabric. It’s a legitimate product, but it’s the bare minimum.
A 10×20 inflatable canopy tent bumps the price up to around $2,000 to $4,000. The larger footprint requires more fabric, more air beams, and a more powerful blower. Full print coverage on a 10×20 will push you toward the higher end of that range.
For a 20×20 custom inflatable event tent—the size that most serious event activations use—expect to pay $4,000 to $8,000 or more. At this size, you’re getting a substantial structure that can shelter a meaningful crowd, and the print area is large enough to make a real visual impact.
What Drives the Price
Print coverage is the biggest variable. A tent with printing on just the front panel costs significantly less than one with full 360-degree coverage. Each additional printed panel adds to the manufacturing cost, and full coverage means the entire surface of the tent becomes a branded canvas.
Material quality is the second biggest factor. Upgrading from a lighter to a heavier PVC can add to the price. The heavier material costs more to source, and it’s more expensive to ship because of the added weight.
The blower is another cost consideration. Some vendors include a blower in their base price; others sell it as an add-on. Always ask. A quality blower can cost a few hundred dollars on its own., so if a vendor’s price seems suspiciously low, check whether the blower is included.
Shipping and Freight
Here’s a cost that surprises a lot of first-time buyers: shipping. Inflatable tents are bulky, even when deflated and packed, and shipping costs scale with both weight and package dimensions. A 20×20 tent packed into its transport bag might ship as freight, which means additional handling fees and longer delivery times.
Some manufacturers, like WestShade, offer free shipping on orders over a certain threshold—their site mentions free shipping on orders over $299, though that likely applies to smaller items rather than full-size tents. Always get a shipping quote before you commit to a final price.
The “Too Good to Be True” Trap
If a vendor quotes you a very low price for a custom inflatable tent, be cautious. Don’t walk. That price is only possible if they’re cutting corners on material quality, print quality, or both. The tent might look fine in a product photo, but it won’t hold up in the field, and the print will fade or crack within a season.
I’ve seen too many buyers chase the lowest quote, only to end up with a tent that leaks air, prints poorly, or collapses in mild wind. The money they saved on the purchase got eaten up by replacement costs, event-day failures, and the embarrassment of a shoddy branded structure at their activation.
Price Per Event, Not Per Tent
Here’s the mental shift that changes everything: stop thinking about what the tent costs and start thinking about what it costs per event. A tent used at many events per year over its lifespan costs a certain amount per event. That’s nothing compared to the value of having a reliable, branded structure at every single activation.
If you’re serious about using your custom inflatable event tent regularly, the upfront price matters far less than the per-event cost. Buy quality, maintain it properly, and the economics work in your favor.
Wind Ratings & Anchoring: Safety You Can’t Skip
Now we get to the part that keeps me up at night: wind safety. This is the area where I’ve seen the most dangerous corners cut, and it’s the one thing you absolutely cannot compromise on.
Understanding Wind Ratings
Every quality inflatable tent comes with a wind rating—the maximum wind speed at which the tent can be safely used. These ratings are determined through testing, and reputable manufacturers are transparent about their numbers.
A typical inflatable tent has a wind rating that varies depending on anchoring. Some high-end models claim higher ratings, but be skeptical of any manufacturer that promises performance beyond what’s physically reasonable. Wind ratings are a function of the tent’s design, its anchoring system, and the surface it’s set up on—no tent is truly “windproof.”
Anchoring: Stakes vs. Ballast
The anchoring system is what actually keeps your tent on the ground. There are two primary approaches: stakes and ballast.
Stakes work great on grass, dirt, and other soft surfaces. They’re driven into the ground and provide solid holding power. The key is using enough stakes and placing them correctly. Most tents come with stake loops or D-rings at strategic points, and you should use every single one.
Ballast is for hard surfaces like asphalt, concrete, and pavement—places where you can’t drive stakes. Ballast comes in the form of sandbags, water barrels, or weighted plates that sit on the tent’s base or attach to its anchorage points. The weight needed depends on the tent size and the expected wind load, but a good rule of thumb is that bigger tents need more ballast.
Here’s the critical thing: A tent that’s rated for higher winds with proper staking might only be safe at lower winds with inadequate ballast. The anchoring system is not optional, and it’s not something to improvise at the last minute. Plan your anchoring before you arrive at the event site.
Beach Scenarios
Beaches are a special challenge. Sand doesn’t hold stakes as well as soil, and sea breezes can pick up quickly. If you’re using an inflatable canopy for beach events, you need longer stakes designed for sand, and you may need additional ballast as backup. I’ve also seen event teams use auger-style anchors that screw into the sand for extra holding power.
Check the weather forecast before you set up, and have a plan for what you’ll do if wind speeds pick up. Deflating the tent is always an option—it takes just a few minutes—and it’s far better than watching your branded structure tumble across the beach.
Asphalt and Concrete Scenarios
For urban events on hard surfaces, ballast is your only option. This means planning ahead: how much weight do you need, how will you transport it, and where will you get it at the venue? Some event venues provide ballast as part of their rental package, but don’t count on it. Bring your own or arrange for it in advance.
The Warning Signs
Know the signs that your tent is approaching its limits. Fabric flapping more than usual, beams feeling less rigid, or visible deformation of the structure all mean the wind is getting dangerous. If you see these signs, don’t wait—deflate the tent and secure it.
I’ll say it plainly: a collapsed tent isn’t just a financial loss. It’s a safety hazard. People can get hurt. If you’re responsible for an event, you’re responsible for your tent’s stability. This is non-negotiable.
Top 5 Custom Inflatable Tent Vendors Compared
Let’s look at the actual vendors in this space. I’m going to be honest about what each one does well and where they fall short, based on what I know from working in this industry.
1. TentCraft
TentCraft is one of the bigger names in custom inflatable structures, and they’ve built a reputation for quality. Their blog features real case studies of branded inflatable tents used for sports activations, music festivals, and retail displays. They’re based in the US, which means shorter shipping times and easier customer support for domestic buyers.
What I like about TentCraft: they’re transparent about their capabilities, and they publish educational content that helps buyers make informed decisions. Their inflatable tents are well-reviewed, and they have the production capacity to handle large orders.
The downside: they’re not the cheapest option. You’re paying for the brand name and the quality assurance. If budget is your primary concern, you might find cheaper alternatives elsewhere.
2. Creatable Inflatables
Creatable Inflatables positions themselves as a US-based manufacturer of custom inflatable event tents. They highlight their experience with major brands—their portfolio includes work for recognizable names in the beverage and insurance industries.
Their strength is in customization. They handle everything from simple branded tents to complex custom shapes, and they have the engineering expertise to tackle unusual projects. If you need something that’s not off-the-shelf, they’re worth talking to.
The catch: custom work takes time. Lead times for fully custom tents can stretch to several weeks, so you need to plan ahead.
3. WestShade
WestShade offers a range of custom inflatable tents and positions themselves as a one-stop shop for event branding. Their website is organized by use case, shape, and size, which makes it easy to browse options. They also offer free shipping on orders over $299, which is a nice perk for smaller purchases.
Their catalog includes everything from basic inflatable tents to more elaborate branded structures. They’re a solid mid-range option that balances price and quality.
4. BestFlag
BestFlag is primarily known for flags and banners, but they also offer dome-style custom inflatable tents. Their product lineup is more limited than the dedicated inflatable tent manufacturers, but they’re a legitimate option if you’re looking for a specific shape like a dome.
Their pricing tends to be competitive, and they offer free shipping on orders over $150, which is a low threshold. The tradeoff is that their inflatable tent expertise may not be as deep as the specialists.
5. Chinese OEMs (Including KCCE)
Here’s where things get interesting. A significant portion of the world’s inflatable tents are manufactured in China, where production costs are lower and manufacturing expertise is deep. Companies like 东莞凯成户外用品有限公司 (KCCE) have been in the inflatable products business for years, supplying both domestic and international clients.
The advantage of working with a Chinese OEM is cost—you can often get a comparable tent for 30% to 50% less than a US-based manufacturer. The tradeoffs are longer shipping times, potential communication barriers, and the need to manage quality control remotely.
If you go this route, do your due diligence. Ask for samples, request certifications, and get everything in writing. The good news is that many Chinese manufacturers have extensive experience producing for Western brands, so the quality gap is smaller than it used to be.
For buyers who want to explore this option, KCCE’s inflatable tent range offers a look at what a Chinese manufacturer with years of experience can produce.
The Comparison Table
| Vendor | Strengths | Considerations | 价格区间 |
|---|---|---|---|
| TentCraft | Quality, US-based, educational content | Premium pricing | $$$ |
| Creatable Inflatables | Custom work, major brand experience | Longer lead times | $$$ |
| WestShade | Range of options, free shipping threshold | Mid-range positioning | $$ |
| BestFlag | Competitive pricing, dome options | Limited inflatable specialty | $$ |
| Chinese OEMs (e.g., KCCE) | Cost-effective, deep manufacturing expertise | Shipping time, remote QC | $ |
How to Choose
Your choice of vendor depends on your priorities. If you need a tent fast and you want the reassurance of a US-based manufacturer, TentCraft or Creatable are solid choices. If budget is the primary driver and you can plan ahead for shipping, a Chinese OEM will stretch your dollar further.
Whatever you choose, get references. Talk to other customers. See the product in person if you can. A vendor’s website can tell you a lot, but nothing beats seeing an actual tent from their production line.
Setup, Maintenance & Lifespan: What to Expect
You’ve bought your custom inflatable event tent. Now what? Let’s walk through what day-to-day ownership actually looks like.
Inflation Time
This is where inflatable tents win hearts. A 10×10 inflatable canopy goes from packed to fully inflated in a few minutes. A larger 20×20 structure might take longer with a properly sized blower. Compare that to the 15 to 20 minutes you’d spend wrestling with a metal frame pop-up, and the difference is obvious.
The process is simple: unpack the tent, lay it out, attach the blower hoses to the inflation valves, and turn the blower on. The tent will inflate on its own as the air fills the beams. Once it’s at full pressure, you secure the anchors and you’re done.
Blower Specifications
Your blower needs to run continuously for the entire time the tent is up. That means it needs to be a continuous-duty blower, not the intermittent-duty type that needs to cool down. Quality blowers are designed for this, but cheaper ones may overheat if run for extended periods.
Pay attention to the blower’s power requirements. Most event tents use standard 110V or 220V power, but if you’re setting up in locations without reliable electricity, you’ll need a generator or a battery-powered blower option.
Repair Kits
Every tent should come with a repair kit, and you should know how to use it before you need it. A basic kit includes PVC patches, adhesive, and instructions. For small punctures, you clean the area, apply adhesive, and press the patch firmly. For larger tears, you may need to patch both sides of the fabric.
I’ve repaired a 2-inch tear in an air beam at a job site in about twenty minutes. The key is having the right materials on hand and knowing the procedure. Don’t wait until you’re at an event with a leaking tent to figure this out—practice on a scrap piece of fabric first.
Valve Replacement
The inflation valves are a wear point. They’re used every time you inflate and deflate the tent, and they can eventually fail. Replacement valves are available from most manufacturers, and swapping one out is a straightforward job if you have basic DIY skills.
Keep spare valves in your repair kit. They’re cheap, and having one on hand can save an event if a valve fails on setup day.
Storage Tips
How you store your tent has a huge impact on its lifespan. Always make sure the tent is completely dry before packing it away. Storing a damp tent leads to mold and mildew, which can degrade the fabric and leave a musty smell that’s hard to remove.
Store the tent in its transport bag in a cool, dry place. Avoid extreme temperatures—both heat and cold can affect the PVC material over time. If you’re storing the tent for an extended period, deflate it completely and fold it loosely to avoid creases that can weaken the fabric.
Lifespan Expectations
With proper care, a quality inflatable tent can last several years. That’s based on regular use with proper storage and maintenance. Tents used less frequently can last even longer.
The biggest factors in lifespan are material quality and care. An 850gsm tent with good seams will outlast a 450gsm tent with inferior construction. And a tent that’s dried, cleaned, and stored properly will outlast one that’s shoved in a corner wet.
When to Replace
Watch for signs of aging: fabric that’s becoming brittle, seams that are starting to separate, or a tent that needs more frequent topping up of air pressure. These are signs that the structure is nearing the end of its useful life. Replacing a tent before it fails is always cheaper than dealing with a collapse mid-event.
How to Order: Specs Sheet, Mockup & Lead Time
Ready to order? Here’s the step-by-step process for getting your custom inflatable event tent made, from initial inquiry to final delivery.
Step 1: Define Your Dimensions
Start with the size you need. Common options range from 10×10 up to 20×40 or larger. Think about how many people you need to shelter, what equipment will be inside, and the footprint of your typical event space.
A 10×10 inflatable canopy is good for a small booth or display. A 10×20 works for a larger booth with room for a table and some product displays. A 20×20 provides a substantial presence that can host a crowd. For large-scale activations, 20×40 or custom sizes give you room for multiple zones.
Here’s a practical question to ask yourself: what size tent fits 100 guests comfortably? In my experience, you’d want at least a 20×40 for that, and even then, it depends on whether you’re using tables and chairs or just standing room.
Step 2: Prepare Your Print Files
Your artwork needs to be in the right format for the manufacturer. Most accept vector files like AI or EPS, or high-resolution PDFs. If you’re providing raster images, they need to be high resolution—at least 150 DPI at the final print size.
Make sure your files include any fonts converted to outlines, and that all images are embedded. Your manufacturer should provide a template showing the exact dimensions and placement of your print area, along with any seam allowances.
Step 3: Choose Your Materials
Decide on your fabric weight (450gsm vs. 850gsm) and your printing method (dye-sublimation vs. screen printing). Your manufacturer can guide you, but it helps to have a sense of what you want before you start the conversation.
Think about your use case. If the tent will see regular outdoor use, invest in the heavier fabric and dye-sublimation printing. If it’s for occasional indoor events, you can save money with lighter materials.
Step 4: Review the Mockup
Most manufacturers will provide a digital mockup showing how your tent will look with your artwork applied. Review it carefully. Check the placement of your logo, the colors, and the overall proportions. This is your chance to catch mistakes before they’re baked into the final product.
Don’t rush this step. A mockup that looks slightly off in the digital preview will look exactly the same in the physical product. Make sure everything is right before you approve.
Step 5: Confirm the Blower and Accessories
Make sure your quote includes the blower, any anchoring equipment, and a repair kit. If these are add-ons, budget for them separately. Also confirm whether the quote includes shipping or if that’s an additional cost.
Step 6: Understand the Lead Time
Lead times for custom inflatable tents typically run several weeks., depending on the manufacturer and the complexity of your order. Simple designs with standard sizes can be faster; fully custom shapes or complex prints take longer.
Plan your order well in advance of your first event. If you need a tent for a specific date, add a couple of weeks of buffer to the manufacturer’s quoted lead time. Shipping delays happen, and you don’t want to be scrambling for a replacement tent the week before your launch.
Step 7: Arrange Shipping
Inflatable tents ship in large packages, often via freight carriers. Make sure someone will be available to receive the delivery, and check the package for damage immediately upon arrival. If there’s visible damage, document it and contact the manufacturer right away.
The Approval Process
Your manufacturer will guide you through their specific approval process, but the general flow is: artwork submission, mockup review, approval, production, and shipping. Each step has a timeline, and delays at any point push back the final delivery.
If you’re working with a Chinese OEM, factor in communication time and potential time zone differences. KCCE’s founder story gives some insight into how a Chinese manufacturer approaches the design and production process—worth a read if you’re considering that route.
One more piece of advice: get everything in writing. The quote, the lead time, the warranty terms, the shipping arrangements—all of it. A handshake and a verbal promise aren’t enough when you’re spending thousands of dollars on a branded structure.
常见问题解答
Q: How much does it cost to get a custom inflatable?
A: Entry-level custom inflatable tents start around $1,000 to $2,000 for a basic 10×10 model with simple print coverage. Larger tents like 20×20 run $4,000 to $8,000 or more, depending on material quality, print coverage, and whether the blower and accessories are included. Full 360-degree print coverage and heavier 850gsm fabric will push you toward the higher end.
Q: What size tent fits 100 guests?
A: For 100 guests, you’ll want a larger tent if you’re using tables and chairs, or a smaller one if it’s primarily standing room. Keep in mind that the tent’s interior space is reduced by any staging, product displays, or equipment. When in doubt, go bigger—a slightly oversized tent is always better than one that’s too small.
Q: How much does it cost to make a custom 10×10 tent?
A: A custom 10×10 inflatable tent typically costs a few thousand dollars. The exact price depends on your fabric choice (450gsm vs. 850gsm), the complexity of your print design, and whether the blower is included. Full-coverage printing on the entire tent surface will cost more than a simple single-panel logo.
问:充气帐篷值得购买吗?
A: For event professionals and brands that need regular outdoor presence, yes. Inflatable tents offer faster setup, better branding surface, and safer wind performance compared to metal frame tents. If you’re using the tent more than a few times per year, the per-event cost becomes very reasonable, and the visual impact is hard to beat.
Q: How long does a custom inflatable event tent last?
A: With proper care and maintenance, a quality inflatable tent should last five years or more. Key factors are material quality (850gsm lasts longer than 450gsm), how often the tent is used, and how well it’s stored. Always dry the tent completely before packing it away, and store it in a cool, dry place.
Q: Can I repair a leaking inflatable tent myself?
A: Yes, for small punctures. Most tents come with a repair kit containing PVC patches and adhesive. Clean the damaged area, apply the adhesive, press the patch firmly, and let it cure. For larger tears or valve damage, contact the manufacturer—they can provide replacement parts or professional repair services.
Q: What wind speed can an inflatable tent handle?
A: Most quality inflatable tents are rated for moderate winds when properly anchored. The anchoring system is critical—a tent that’s well-staked on grass can handle more wind than one with inadequate ballast on asphalt. Always check the forecast and have a plan to deflate the tent if winds approach the limit.
Q: How long does it take to set up an inflatable tent?
A: A 10×10 inflatable canopy takes a few minutes to inflate with a blower. Larger tents like 20×20 take longer. Add a few minutes for anchoring, and you’re ready. This is significantly faster than a metal frame pop-up, which typically takes 15 to 20 minutes with two people.
参考资料
1. Custom Inflatable Tents with Logo for Events & Branding – westshade.com
2. 9 Branded Inflatable Tent Designs That Will Inspire Your … – tentcraft.com
3. Custom Inflatable Event Tent | Made in USA – creatableinflatables.com
4. Dome Custom Inflatable Tents – bestflag.com
5. Custom Inflatable Tents for Events – inflatabletents.com







