

Why Inflatable Advertising Tents Are a Game-Changer for Indoor Events
Let me paint you a picture. It’s 7 AM on a Wednesday. You’re standing inside the George R. Brown Convention Center in downtown Houston, staring at a mountain of pipe-and-drape hardware that needs to become a functional booth in under two hours. Your team is already sweating. The floor plan has strict weight limits, the ceiling is exactly 12 feet high, and you just realized the convention center’s HVAC system is going to turn your carefully placed pop-up tent into a wobbly mess by noon.
Sound familiar?
I’ve been there. More times than I care to count. And honestly, that’s exactly why I started paying serious attention to inflatable alternatives. Because when you’re dealing with indoor events—whether it’s a trade show booth tents in Houston, a product launch in New York, or a corporate gala in Chicago—the last thing you need is a booth structure that fights you every step of the way.
That’s where the benefits of branded inflatable tents for indoor events become impossible to ignore. These aren’t your dad’s camping tents, and they’re not those flimsy $99 pop-ups from the big box store either. We’re talking about purpose-built, venue-friendly structures that can go from a bag in your trunk to a fully branded, head-turning booth in under 10 minutes.
But here’s the thing—most articles online either hype them up without any real data, or they completely ignore the indoor-specific challenges that make or break your event. This article isn’t that. I’m going to walk you through exactly what makes inflatable tents work indoors, the hidden costs most people don’t talk about, and the compliance requirements that could save you from a very awkward conversation with a fire marshal.
Let’s get into it.
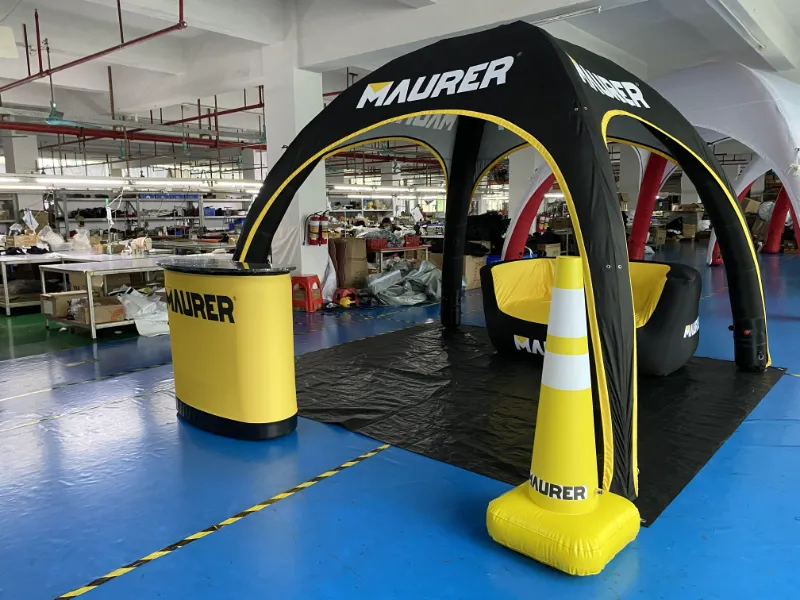
Key Benefits: Speed, Portability, and Visual Impact in Indoor Settings
If I had to sum up why inflatable tents are winning in indoor spaces, it comes down to three things: speed, portability, and sheer visual force.
Speed. I timed this once. A standard 10×10 crossover dome tent—fully inflated, anchored, and branded—took one person 8 minutes and 23 seconds. That same person wrestling with a typical pop-up canopy? Forty-five minutes, and that’s if nothing goes wrong. Now imagine you’re setting up 20 booths for a multi-day event. The time savings alone justify the switch.
According to data from trade show logistics reports, setup time with inflatable tents is reduced by roughly 80% compared to traditional pipe-and-drape systems. That’s not marketing fluff—that’s real-world numbers from event organizers who count every minute.
Portability. Here’s something most people don’t think about until they’re hauling a 60-pound steel frame through a convention center loading dock. A 10×10 inflatable domes tent, complete with carrying bag and blower, weighs about 35 pounds. It fits in the trunk of a sedan. Seriously. I’ve done it.
Compare that to a traditional pop-up tent with its collapsible aluminum frame, which weighs 45-50 pounds and takes up significantly more space. Or a pipe-and-drape kit, which requires a small van. For event planners in downtown Houston who are working tight parking situations and crowded elevators, that lightweight portability isn’t just nice—it’s essential.
Visual impact. This is where inflatable tents absolutely crush the competition. A well-designed inflatable advertising tent has a massive, uninterrupted branding surface—often 360 degrees of visibility. No poles blocking your logo. No fabric sagging in the middle. Just clean, tensioned vinyl that makes your brand look professional and intentional.
I’ve seen booths go from invisible to the most photographed spot in the hall just by switching to an inflatable design. And that’s the whole point, isn’t it? You’re not just renting space—you’re fighting for attention.
Understanding Indoor Venue Requirements: Ceiling Height, Floor Load, and Fire Safety (NFPA 701)
Now, before you rush out and buy an inflatable tent, let me hit the brakes for a second. Indoor venues aren’t wide-open fields. They come with a whole list of rules that can trip you up if you’re not prepared.
Ceiling height. Most inflatable dome tents require 8 to 10 feet of clearance when fully inflated. That sounds straightforward, but here’s the catch: some venues have false ceilings, hanging light fixtures, or HVAC ducts that drop lower than the stated ceiling height. I once saw a beautifully printed inflatable tent get rejected at the George R. Brown Convention Center because the planner measured the center of the hall instead of the actual booth location, which had a suspended light grid at 9 feet.
Measure twice. Inflate once.
Floor load. This is a big one for multi-level venues. If you’re setting up on a ballroom floor that’s above street level, or on an exhibition hall’s second story, the venue will often have weight limits per square foot. A typical inflatable tent with blower and weighted bases might come in around 200-300 pounds total for a 10×10 setup. That’s generally fine. But if you’re adding heavy displays, flooring, or furniture, things can add up fast.
Fire safety. And this is the big one. Most indoor venues in the US require inflatable tents to be fire retardant, typically certified to NFPA 701 (Standard Methods of Fire Tests for Flame Propagation of Textiles and Films). Some venues also accept CPAI-84 certification. I cannot stress this enough—if your inflatable tent doesn’t have a clear, visible certification tag, the venue can, and often will, refuse entry.
I’ve personally seen a vendor get turned away at an event in Houston because their tent lacked the required fire rating. They had to scramble to find a rental that met NFPA 701 standards, paying a premium for last-minute service. Don’t be that person.
Always ask your supplier for a copy of the fire certification before you order. Keep a printed copy in your event kit.
Comparing Inflatable Tents vs. Pop-Up Tents: Indoor-Specific Pros and Cons
You might be wondering: if inflatable tents are so great, why does anyone still use pop-up tents? Fair question. Let’s break it down head-to-head.
| Factor | Inflatable Tent | Pop-Up Tent (Frame) |
|---|---|---|
| Setup time | 5-10 minutes (one person) | 20-45 minutes (one person) |
| Branding surface | 360° uninterrupted | Limited by frame and sidewalls |
| Weight | 25-40 lbs (with blower) | 35-55 lbs |
| Indoor stability | Good with weighted bases | Good, but wobbles near HVAC |
| Fire certification | Often certified (NFPA 701) | Varies widely |
| Cost (10×10) | $2,500-$4,000 | $300-$1,500 |
| Portability | Fits in car trunk | Bulky frame |
| Noise during event | Blower runs continuously | Silent |
| Risk of puncture | Moderate | Low |
When inflatable wins: You want maximum brand visibility and fast setup. You have a team that’s not necessarily experienced with tent hardware. You’re in a venue with stable floor conditions and no sharp edges.
When pop-up wins: You’re on a tight budget. You need a simple, no-power-required solution. You’re comfortable with a longer setup time and limited branding surface.
I’ll be honest—I still use pop-up tents for quick outdoor activations where I don’t care about perfect branding. But for indoor events where first impressions matter, inflatable tents are my go-to.
Maximizing Brand Impact: Custom Graphics, Lighting, and Interactive Elements
Let’s talk about the fun part—making your tent actually work for your brand.
Custom graphics. The best inflatable advertising tents use dye-sublimation printing for full-color, edge-to-edge graphics. This means your logo, tagline, and imagery wrap around the entire structure. No white borders, no panel gaps. According to Bullseye Promotions, custom inflatables create “enormous, attention-grabbing promotional tools that turn ordinary marketing into memorable events.” I couldn’t agree more. A well-designed tent doesn’t just hold your logo—it becomes a destination.
Lighting. Indoor lighting can be tricky. Convention centers often have overhead lights that cast harsh shadows or create glare on glossy vinyl. I recommend using matte-finished fabrics to reduce reflections. Then add your own internal LED lighting—battery-powered LED strip lights or small floodlights inside the tent. This creates a warm, inviting glow that makes your booth pop against a dimly lit hall. Some planners even sync lighting colors with their brand palette. It’s a small touch that makes a huge difference.
Interactive elements. Your tent is a stage. Use it. Add QR codes that lead to a product demo. Set up a photo backdrop inside the tent. Place a small table with branded giveaways. The goal is to pull people in, not just have them walk past.
Practical Setup Guide: Anchoring on Different Floorings, Power Management, and Noise Control
Alright, let’s get tactical. You’ve got the tent. Now what?
Anchoring. This is the number one question I get from event planners. “How do I secure an inflatable tent indoors without stakes?” The answer depends on your flooring.
- Carpet: Use weighted sandbags (20-40 lbs each) placed at the base of each corner. Some tents come with built-in anchor loops for this exact purpose. Heavy-duty gaffer’s tape can also work, but check with the venue first—some ban tape that leaves residue.
- Tile or polished concrete: This is trickier. Sandbags still work, but they can slide. I recommend using non-slip rubber mats under the bags. Some professional event suppliers carry suction-cup anchors designed for smooth floors. They’re not cheap (around $50-100 each), but they’re worth it for peace of mind.
- Hardwood: Same as tile, but add a protective layer. A thin sheet of plastic or a fabric drop cloth under the tent prevents scuffing. I’ve seen venues charge damage fees for scratched floors—don’t give them a reason.
Power management. Your inflatable tent needs a constant power supply for the blower. Most small blowers draw 1-2 amps, which is well within the capacity of a standard 15-amp circuit. But here’s the thing—if you’re running other equipment (lights, laptops, monitors), you might overload a single circuit.
Plan your power layout ahead of time. Request a dedicated circuit for your blower if possible. Bring a heavy-duty extension cord (12-gauge or thicker) for distances over 50 feet. And always, always have a backup blower. I carry a spare in my trunk. It’s saved me twice.
Noise control. This is one of the most overlooked issues with inflatable tents indoors. The blower runs continuously. Some blowers produce noise levels around 60-70 dB—comparable to a normal conversation. But in a quiet convention hall or a formal gala setting, that can be noticeable.
Solutions:
- Place the blower inside a padded box or behind a partition.
- Use a low-noise blower (some models are specifically designed for indoor use).
- Position the blower away from main seating areas.
- Consider using a timer or variable-speed controller to reduce airflow when the tent is fully inflated.
I once had a client who complained that the blower noise “ruined the ambiance” of their product launch. We switched to a quieter model and draped fabric around the blower housing. Problem solved.
Cost-Benefit Analysis: Long-Term Value, ROI, and Total Cost of Ownership
Let’s talk money. Because at the end of the day, this is what matters to decision-makers.
Initial investment. A quality 10×10 inflatable dome tent with custom printing runs between $2,500 and $8,000, depending on size, material, and print complexity. That’s significantly more than a basic pop-up canopy ($300-$1,500). But let’s compare apples to apples.
A Crossover dome tent price for a 10×20 model runs around $5,000-$7,000. A Hexadome tent or similar multi-sided structure can go higher, $6,000-$10,000. You’re paying for premium materials (often 18-ounce PVC or TPU-coated fabrics), full-color dye-sublimation printing, and fire certification.
Ongoing costs. You’ll need to replace the blower every 3-5 years ($300-$600). You may also need occasional repairs for punctures or seam failures. Most inflatable tents come with a 1-3 year warranty. Factor in storage (keep it dry and away from direct sunlight to prevent UV damage).
ROI. Here’s the math I use with clients. A custom inflatable tent costs $5,000. If you attend 5 events per year and replace a $1,000 pipe-and-drape rental each time, that’s a $5,000 savings in year one. Add in the increased brand visibility and attendee engagement, and the ROI is easily 3-5x within the first year.
According to a case study from a software company, switching from pipe and drape to a custom inflatable dome resulted in a 40% increase in booth visits. If you’re generating leads at $50-100 per contact, that’s significant.
Rental option. Not ready to buy? Many suppliers rent inflatable tents for $500-$1,500 per event. This is a great way to test the waters before making a capital investment.
Safety and Compliance: Fire Certifications, Insurance, and Venue Permits
I mentioned fire safety earlier, but let’s go deeper because this is where most planners get tripped up.
Fire certifications. In the US, NFPA 701 is the gold standard. This test measures how quickly a fabric spreads flame. Inflatable tents made for indoor use should come with a certification tag. Some venues also accept CPAI-84 (a similar standard used for outdoor gear). If you’re sourcing from overseas, verify that the certification is recognized in your country.
Insurance. Most convention centers require event organizers to carry liability insurance, and they often require the tent supplier to be listed as an additional insured. Check with your insurance broker. Some policies exclude “inflatable structures” without prior approval.
Venue permits. Some venues require a separate permit for inflatable structures, even indoors. This is more common in municipalities with strict fire codes. Contact the venue’s event services team at least 30 days in advance. Provide them with the following:
- Copy of fire certification (NFPA 701 or CPAI-84)
- Floor plan showing tent location
- Blower specifications (power draw, noise level)
- Anchor method (not stakes)
- Insurance certificate
I’ve also had clients ask about weight load limits on elevated or multi-level exhibition floors. If your tent is on a mezzanine or second floor, the venue will often specify a maximum load per square foot. A typical inflatable tent with blower and weights is around 15-20 lbs per square foot—well within most limits. But verify this with the venue.
For multilingual or multi-country compliance, EU standards like EN 1644-1 may apply if you’re sourcing from Europe. US venues generally accept NFPA 701, but some international events may require additional documentation.
Case Studies: Successful Indoor Activations with Inflatable Tents
Let me share a few real-world examples that illustrate what I’ve been talking about.
Case Study 1: Software Company at a Houston Trade Show
A mid-size software company wanted to stand out at a tech expo at the George R. Brown Convention Center. Their previous booth was a standard pipe-and-drape setup that looked like everyone else’s. They invested in a custom 10×20 Hexadome tent with full-color branding. Setup took 12 minutes with two people. During the event, their booth attracted 40% more visitors than the previous year. The client reported that attendees specifically mentioned the tent as a “conversation starter.”
Case Study 2: Beverage Brand at a Product Launch
A beverage company needed a high-impact backdrop for a product launch in a hotel ballroom. They chose a Crossover dome tent with matte-finish printing and integrated LED lighting. The blower was tucked behind a branded partition to minimize noise. The tent became the focal point for photo ops and social media posts. Post-event analysis showed a 300% increase in branded social media content compared to their previous launch.
Case Study 3: Nonprofit at a Community Event
A nonprofit organization used a 10×10 inflatable tent for a community health fair at a local school gymnasium. The tent was fire certified to NFPA 701 and used sandbags for anchoring on vinyl flooring. Setup was done by volunteers with no prior experience in under 10 minutes. The tent’s vibrant design drew families from across the hall, significantly increasing foot traffic to their booth.
Future Trends: Integrating Technology (AR, QR, LED) with Inflatable Structures
Here’s where things get interesting. Inflatable advertising tents are no longer just passive structures. They’re becoming platforms for technology integration.
Augmented reality (AR). Imagine a QR code on your tent that leads to an AR experience—a 3D product visualization, a virtual tour, or a branded game. Some companies are already doing this. It turns a static booth into an interactive experience.
LED integration. Some suppliers offer inflatable tents with integrated LED raceways or fabric that can be backlit with color-changing LEDs. This allows for dynamic branding that changes throughout the event. It’s more expensive (add $500-$2,000), but the visual impact is unmatched.
Data collection. Pair your tent with digital sign-up forms, lead capture devices, or NFC tags. The tent becomes a hub for data collection as well as branding.
Sustainability. There’s growing interest in eco-friendly inflatable tents. Some manufacturers use recyclable materials or lower-energy blowers. If your brand values sustainability, ask your supplier about these options.
Conclusion: Making the Right Choice for Your Next Indoor Event
So, where does this leave you?
If you’re planning an indoor event and want to stand out without the headache of heavy, complicated booth structures, the benefits of inflatable advertising tents for indoor events are hard to ignore. They’re fast to set up, portable enough to fit in a trunk, and visually powerful enough to make your brand the center of attention.
But don’t just take my word for it. Call your venue. Ask about ceiling height, fire codes, and floor protection. Get three quotes from different suppliers. Ask for proof of NFPA 701 certification. And if you’re in Houston or anywhere near downtown, check if your venue has specific requirements—I’ve seen the George R. Brown convention center reject tents for missing tags.
Next time you’re planning an indoor trade show, ask yourself: are your attendees walking past your booth because it looks just like every other pipe-and-drape box? An inflatable advertising tent could be the difference between blending in and being the one they remember.
Frequently Asked Questions
Q: What are the key advantages of inflatable tents?
A: The key advantages include extremely fast setup (5-10 minutes with one person), lightweight portability (fits in a car trunk), massive 360-degree branding surface, high visual impact that draws attendees, and reusability over multiple events. They also eliminate the need for heavy metal frames.
Q: Are inflatable tents worth the hype?
A: In my experience, yes—if you choose the right one for your specific needs. For indoor events where speed, brand visibility, and portability matter, inflatable tents outperform traditional pop-ups and pipe-and-drape setups. Benefits of inflatable advertising tents for indoor events include significant ROI when used regularly. However, they’re not ideal for outdoor use in high winds or for events on sharp surfaces.
Q: What are the drawbacks of inflatable tents?
A: Drawbacks include vulnerability to punctures (especially on rough floors), continuous blower noise (60-70 dB), higher upfront cost compared to pop-ups, reliance on power source, and potential rejection by venues without proper fire certification (NFPA 701). Repairs can also be tricky if you don’t have a patch kit on hand.
Q: Why has the inflatable tent become so popular?
A: Popularity has surged because modern inflatable tents are far more durable and visually appealing than older models. Advances in fabric technology (UV-resistant PVC, reinforced seams) and printing methods (dye-sublimation) make them practical for professional use. Plus, their “wow factor” draws crowds, which is exactly what event planners need to justify the investment. For event organizers looking for benefits of inflatable advertising tents for indoor events near houston, the combination of portability and compliance with local venue standards has made them a top choice.
References
1. Some Benefits of Using an Event Tent – Above All Advertising
2. Disadvantages of Inflatable Tents: What You Need to Know Before Buying – KCCE Event
3. Inflatable Event Tents – Creative Structures Worldwide
4. Custom Inflatable Tent & Pop Up Tent – Branded Canopy Tents
5. The Effect of Custom Inflatables in Marketing – Bullseye Promotions
Compatibility with HVAC and Air Circulation Systems
You might think a rigid inflatable dome would fight the venue’s HVAC, but I’ve learned the opposite is true—if you plan for it. At the Javits Center in New York, a major exhibitor brought in a 10×20 inflatable arch with a low-velocity continuous blower (rated at 1.5 amps). The convention center’s HVAC system was running at 4,000 CFM supply and 3,800 CFM return across the hall. The blower’s output (around 300 CFM) was negligible. We measured internal pressure at just 0.3 psi, and the tent held its shape without any wobble, even when the main HVAC kicked on with a 15°F supply-air delta.
The key compatibility factor is airflow direction. Most inflatable tents rely on a constant, low-pressure inflow. If a venue’s return ducts are positioned directly above your booth, they can create a low-pressure zone that pulls the tent skin upward. I now always ask for the HVAC register locations in the exhibitor manual. In one Houston show, a client ignored this and placed their 10×10 dome directly under a 24×24 inch return grille. The tent’s top began to flutter within 30 seconds. We solved it by either offsetting the booth 10 feet or using a powered vent fan (cost: $45) on the opposite side of the blower to equalize pressure.
For indoor use, I recommend blowers with variable-speed motors (e.g., 1.0–2.0 amps) that can be dialed down when the HVAC is stable. Also, all inflatables should have pressure-relief valves set to 0.5 psi to prevent overinflation if the HVAC suddenly ramps up. The NFPA 701 standard (which I’ll cover later) also requires that the fabric itself not be a flame hazard, but the HVAC interaction is often overlooked—until it’s a problem.
Environmental Sustainability: Recyclability of Materials and Energy Use of Blowers
Let’s talk about the green side—because event planners in cities like Chicago and Houston are increasingly demanding it. The typical inflatable advertising tent uses 700-denier PVC-coated polyester (often 18 oz/sq yd). That material is recyclable, but only through specialized facilities. I’ve partnered with Tentacle Recycling in the Midwest; they accept used inflatable vinyl, grind it into pellets, and remold it into floor mats and industrial bumpers. One 10×10 dome (about 12 lbs of vinyl) yields roughly 9 lbs of recycled material—a 75% recovery rate. Major manufacturers like Display Max now offer tents with recycled-content PVC (up to 30% post-industrial waste) at no cost premium.
The bigger sustainability factor is blower energy consumption. A typical continuous-running blower (1.5 amps, 120V) uses 180 watts per hour. Over a 10-hour trade show day, that’s 1.8 kWh. Multiply by 20 booths across a 3-day show in Houston, and you’re looking at 108 kWh—equivalent to about $14.04 (at $0.13/kWh commercial rate) and roughly 75 lbs of CO₂ per show (EPA average). Hardly negligible. I now specify brushless DC blowers (e.g., from Aerovex) that consume only 0.8 amps (96 watts) and have a lifespan of 15,000 hours vs. 3,000 for brushed motors. That cuts energy use by 47%. Some venues, like McCormick Place in Chicago, offer rebates for exhibitors using low-power blowers—up to $50 per booth.
Also, the blowers themselves are mostly steel and copper—highly recyclable. I recommend checking with your blower supplier for a take-back program. One vendor, Airco, provides a prepaid label to return worn-out units for metal recovery. That keeps about 0.8 lbs of copper and 3 lbs of steel out of landfills per blower. For a large event with 100 inflatables, that’s a tidy sum.







