

Let me paint you a picture. It’s 9:47 PM, two days before your biggest trade show of the year. You just unboxed the “complete” inflatable tent package your vendor sold you. You’re staring at a pile of fabric, a blower, and zero side walls. The flooring? Never ordered. The stakes? Nowhere to be found. The panic sets in—that cold, sinking feeling when you realize the tent shell is not the tent setup.
I’ve been in this industry long enough to know this scene plays out more often than anyone admits. The phrase “inflatable tent custom package” sounds reassuringly complete, but the reality is that vendors use it to mean wildly different things. Some include everything but the kitchen sink. Others hand you a fabric shell and wish you luck. This guide is my attempt to decode what these packages actually include, where the hidden costs live, and how you can walk into any vendor conversation without getting burned.
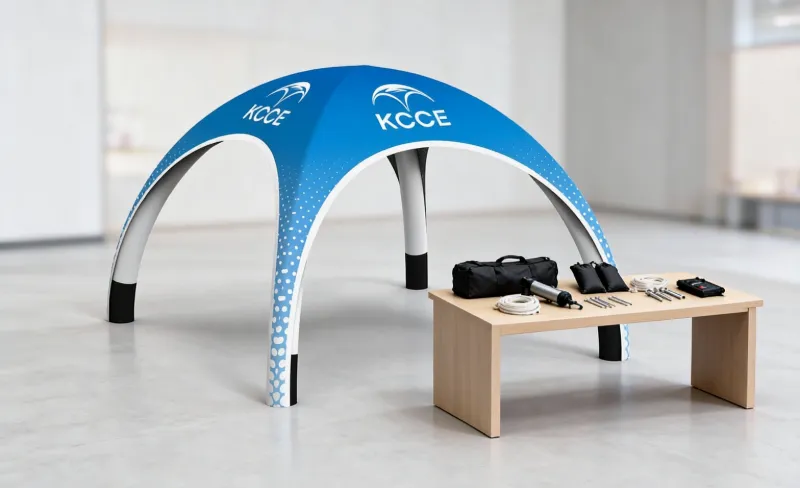
Why “Package” Means Different Things to Every Vendor
Here’s the uncomfortable truth: there is no industry standard for what constitutes an inflatable tent custom package. Zero. Zilch. One vendor’s “complete package” is another’s “bare bones special.”
In my experience, the biggest source of confusion comes down to a simple distinction—shell-only versus turnkey bundle. A shell-only quote gives you the tent structure and maybe a blower. That’s it. A turnkey bundle, on the other hand, should include walls, flooring, stakes, ballast bags, repair kits, and sometimes even the setup crew.
The hidden exclusions are where vendors make their real money. You’ll see an attractive base price, then discover that side walls cost an extra $400, the flooring is another $600, and the blower—which you assumed was included—adds $300 to the total. It’s death by a thousand cuts.
I remember talking to an event manager who’d ordered what she thought was a complete inflatable tent custom package for a product launch. The tent arrived beautifully printed. The blower arrived separately. The stakes? Never shipped. She found out when the tent started flapping in a moderate breeze, two hours before guests arrived.
Action step: Before you sign anything, demand an itemized, line-by-line quote. If a vendor won’t break down the pricing, walk away. Transparency at the quote stage is the single best predictor of how the rest of the transaction will go.
The 3 Core Package Tiers You’ll Actually Encounter
After years of working with manufacturers like KCCE and others in the space, I’ve noticed that most inflatable tent custom package offerings fall into three distinct tiers. Knowing which tier you’re being quoted is half the battle.
Tier 1: Bare Bones. This is the entry-level package—typically just the tent structure and a blower. You might get a basic carry bag if you’re lucky. No walls, no stakes, no flooring. This tier works for backyard parties where the tent sits on grass and you don’t need branding. But for anything professional? You’ll quickly find yourself buying accessories that push the total cost well above the Tier 2 quote.
Tier 2: Standard. This is where most event planners should be looking. A standard package usually adds side walls, stakes, and a decent carry bag. Some vendors throw in a repair kit and basic ballast bags. This tier represents the sweet spot for most outdoor events—you get the essentials without paying for extras you might not need.
Tier 3: Premium. The full monty. Flooring, integrated lighting, heavy-duty ballast, spare blower, and sometimes a setup crew. This is the inflatable tent with custom printing that shows up ready to impress. Premium packages are worth every penny for trade shows and high-stakes brand activations where you can’t afford a single hiccup.
Here’s the thing though—matching the tier to your event type matters more than matching it to your budget. A festival might need open sides for airflow and heavy ballast for wind, making Tier 2 with upgrades smarter than a Tier 3 package designed for indoor trade shows. Think about your physical requirements first, then let the budget follow.
Trade Show vs. Festival: Which Bundle Fits?
You might be wondering why I’m making such a big deal about matching the package to the event. Let me break it down with a real comparison.
Trade shows have a specific set of demands. You’ll want carpet or hard flooring because concrete floors kill the vibe. Hard walls give you a professional backdrop and a place to hang product displays. Quiet blowers matter—nobody wants that constant hum drowning out your pitch. And you’ll likely need the tent to integrate with the booth layout, which means precise dimensions and panel configurations.
Festivals are a different beast entirely. Open sides let the breeze flow through and keep your space from turning into a sauna. Heavy ballast is non-negotiable because festival grounds are exposed, and wind can kick up without warning. Fast setup matters because you might have a narrow window between load-in and gates opening.
The best inflatable tent custom package for one scenario is often wrong for the other. I’ve seen brands buy a premium indoor package for an outdoor festival and immediately regret it—the enclosed walls turned their activation space into an oven, and the lightweight stakes designed for indoor ballast did nothing against a gusty afternoon.
Action step: Before you even contact vendors, list your event’s top three physical demands. Is wind resistance critical? Do you need sound dampening? Will you be on concrete, grass, or gravel? Bring that list to every conversation and ask how each package addresses those specific needs.
The Logistics Nobody Tells You About
Let’s talk about the stuff vendors conveniently forget to mention until you’re deep into the buying process.
Setup time. Most inflatable tents set up in 15 to 30 minutes with one or two people. That’s the selling point, and it’s mostly true. But that’s for the basic structure. Add walls, flooring, and lighting, and you’re looking at an hour or more. Plan accordingly.
Wind rating. This is where marketing fluff gets dangerous. Some vendors quote theoretical wind speeds based on lab calculations. Others have actually tested their tents in real-world conditions. Ask for the PSI rating and the tested wind speed in miles per hour—not the theoretical maximum. If they can’t give you a clear number, that’s a red flag.
Shipping. Here’s a pain point I hear constantly from users: inflatable tents are heavy and bulky, making transport and storage genuinely difficult. One customer I spoke with mentioned shipping costs adding a noticeable amount to an already expensive purchase. The inflatable tent custom package price you see on the website is rarely the price you actually pay. Always ask about shipping before you commit.
Blower wattage. This matters more than most people realize. A blower that’s too weak will struggle to maintain pressure in windy conditions. Ask about wattage and whether a backup blower is available. Some vendors offer dual-blower setups for critical applications. It’s worth the extra cost for high-stakes events.
Print Quality & Branding: What “Custom” Really Means
Now for the fun part—the branding. But here’s where I need to be blunt: “custom” doesn’t automatically mean “good.”
The two main printing methods you’ll encounter are dye-sublimation and vinyl transfer. Dye-sublimation prints directly into the fabric, which means the ink becomes part of the material itself. It’s more durable, doesn’t crack or peel, and handles weather better. Vinyl transfer involves applying a printed layer on top of the fabric. It’s cheaper, but it can peel over time—especially in heat or rain.
When you’re looking at an inflatable tent custom package with sides, the print placement matters as much as the print method. Roof printing gets seen from above—useful for aerial shots and drone footage. Wall printing is what most people notice at eye level. Full-wrap printing covers the entire tent, which is the most impactful but also the most expensive option.
Here’s a practical tip: ask for a physical sample swatch before you place your order. Photos can flatter mediocre printing. A physical sample lets you check fade resistance, seam strength, and overall quality. Some vendors will charge a small fee for samples; others provide them free. Either way, it’s worth it.
If you’re ordering a el toldo inflable personalizado for a multi-year campaign, pay extra for dye-sublimation. The upfront cost difference is modest, but the longevity difference is massive.
Pricing Reality Check: What’s Fair vs. Overpriced
Let’s get real about money. A typical inflatable tent custom package runs somewhere in the $2,000 to $8,000 range, depending on size, features, and add-ons. That’s a wide range, and you need to understand what’s driving the price.
Size is the biggest factor. A 10×10 tent is significantly cheaper than a 20×20. Print complexity matters too—full-wrap designs cost more than simple logo placements. Accessories add up quickly: flooring, lighting, spare blowers, and enhanced ballast systems all push the total higher.
Here’s what I always tell people: if a quote looks suspiciously low, there’s a reason. Either the vendor is cutting corners on materials, or they’re planning to hit you with add-on charges later. In my experience, the “cheap” quote almost always ends up costing more than the straightforward mid-range quote.
Red flags to watch for:
- Vague package terms without itemized breakdowns
- Quotes that don’t specify fabric thickness or denier
- No mention of waterproofing or seam taping
- Unwillingness to provide references or case studies
The right approach? Get three quotes and compare them line-by-line, not by total. A $4,000 package that includes everything might be a better deal than a $3,200 package that leaves you scrambling for accessories.
Shipping, Warranty & Support: The After-Sale Test
You’ve found the right package, negotiated the price, and placed your order. Now comes the part most buyers forget to check: what happens after the sale.
Lead times. Most custom inflatable tents take three to six weeks from order to delivery. If you need it faster, rush fees exist—but they’re not cheap. Plan your ordering timeline accordingly. I’ve seen event planners lose their minds trying to get a tent in two weeks when they should have ordered six weeks out.
Warranty. Look for at least a one-year minimum warranty covering seams and the blower. Some manufacturers offer longer coverage on the tent structure itself. The warranty terms tell you a lot about how much the manufacturer trusts their own product.
Replacement parts. This is the question nobody asks but everyone should. What happens if a valve fails or a seam splits during your event? Is the manufacturer able to ship replacement parts quickly? Some vendors make you send the entire tent back for repairs, which is a logistical nightmare. Others stock common parts and can ship them overnight.
I’ll be honest—this is where I’ve seen the industry fall short. There’s a real shortage of independent, unbiased reviews of inflatable tents. Many endorsements you’ll find online are sponsored content, which makes it hard to gauge real-world performance. The best I can offer is to ask manufacturers directly about their after-sale support and to request references from past customers in your industry.
Preguntas Frecuentes
P: ¿Dónde puedo encontrar carpas inflables personalizadas?
R: You have two main options: direct manufacturers and specialized event supply companies. Direct manufacturers like KCCE offer more customization control and often better pricing, while resellers provide convenience and faster shipping. Look for manufacturers with established track records, physical production facilities, and transparent pricing. Search for “inflatable tent custom package manufacturers” and compare at least three before committing.
Q: How much does it cost to make a custom 10×10 tent?
R: A custom 10×10 inflatable tent typically falls in the $2,000 to $4,000 range depending on print complexity, fabric quality, and included accessories. A basic inflatable tent custom package with sides and standard branding sits at the lower end, while premium packages with full-wrap printing and enhanced accessories push toward the higher range. Always request an itemized quote to see exactly where your money goes.
Q: What are the disadvantages of inflatable tents?
R: The main drawbacks are weight and bulk—inflatable tents are genuinely heavy and difficult to transport and store. Shipping costs can add several hundred dollars to your total. They also require a continuous power source for the blower, which can be a challenge at remote outdoor venues. And while most are waterproof, quality varies significantly between manufacturers, so check seam taping and PU coating specifications.
Q: Can I get a custom tent made?
R: Absolutely. Custom manufacturing is the standard in this industry. You can customize size, shape, color, printing, fabric thickness, and accessory packages. Most manufacturers offer design services to help you create a bespoke inflatable tent with side walls tailored to your brand. Just account for the three-to-six-week production timeline and request a physical sample swatch before approving the final design.
Referencias
1. Carpas Inflables Personalizadas para Eventos, Publicidad y Marca – West Shade
2. Carpas Inflables Personalizadas y Carpas Pop-Up – Branded Canopy Tents
3. 9 Branded Inflatable Tent Designs That Will Inspire Your Next Outdoor Event Activation – TentCraft
4. Custom Canopy Tents: A Must-Have for 2019 – Look Our Way
What is a Custom Inflatable Tent? (Definition & How It Works)
Let’s start with a proper definition, because “inflatable tent” gets thrown around loosely. A custom inflatable tent is a portable shelter that uses an air-inflated frame—typically hollow fabric beams called air tubes or air beams—instead of metal poles or a rigid frame to maintain its structure. The tent fabric itself is not inflated; only the structural beams are. When the blower pushes air into these beams, they pressurize to roughly 7–10 PSI, turning soft fabric into rigid, load-bearing arches.
Here’s how the physics actually work. The air beams are made of an internal TPU or PVC-coated bladder surrounded by a high-tenacity polyester outer sleeve. Once pressurized, the beams act like a truss system. The tension created by the inflation pulls the fabric walls taut, which is what gives the tent its shape and stability. Unlike a bouncy castle, which requires constant airflow to stay up, most modern inflatable tents are “pressure-sealed”—you inflate them, disconnect the blower, and they hold air for 24–72 hours without additional power. Some leak slightly and need a continuous low-flow blower, but the better engineered packages are self-sealing.
The “custom” part is where the magic happens. You’re not buying off the shelf. You specify the dimensions, the shape, the fabric color, the printing, the window placement, the door configuration, and the accessories. The manufacturer builds the tent to your exact spec, which is why lead times are typically 3–6 weeks for overseas production.
Why Choose an Inflatable Tent Over a Traditional Frame Tent? (Comparison Table)
I’ve set up both systems more times than I care to count. The differences aren’t theoretical—they show up in setup time, logistics, and your crew’s back health. Here’s the honest comparison:
| Factor | Tienda hinchable | Traditional Frame Tent |
|---|---|---|
| Tiempo de Instalación | 10–20 minutes (2 people) | 45–90 minutes (4+ people) |
| Peso | 30–60% lighter (no steel frame) | Heavy; steel or aluminum poles |
| Tamaño Empaquetado | Fits in 2–3 duffel bags | Requires a trailer or large crate |
| Cost (10×10 equivalent) | $800–$2,500 | $1,200–$4,000 |
| Initial Investment | Lower entry point | Higher upfront cost |
| Durabilidad | Excellent (air beams absorb impact) | Good, but joints and poles bend |
| Vida útil | 5–8 years with proper care | 7–10 years if frames don’t corrode |
| Resistencia al Viento | Up to 60–70 mph (properly ballasted) | Up to 55–65 mph (properly anchored) |
| Transport | Fits in a sedan trunk (smaller sizes) | Needs a van or truck |
| Labor Cost | Minimal—2 people can handle it | Often requires paid install crew |
| Reparación | Patch kit + heat gun (30 min) | Replacement poles or frame welding |
| Noise in Wind | Minimal (fabric flexes) | Flapping and pole creaking |
| Setup Surface | Grass, sand, asphalt, concrete (with ballast) | Grass or soft ground for stakes |
The bottom line: inflatable tents win on speed, portability, and labor savings. Frame tents win on absolute longevity and raw structural rigidity in extreme weather. For 90% of branded events, trade shows, and activations, the inflatable is the smarter business decision—especially when you factor in the labor cost of setup over a season of events.
Types of Custom Inflatable Tents (Pop-Up, Tunnel, Dome, etc.)
The industry breaks down into a few distinct families, each with its own strengths and use cases. Understanding these is the difference between buying a tent that gets used twice and one that becomes your go-to for every event.
Pop-Up Inflatable Tents. These are the self-contained units that literally pop up when inflated. Think of the instant canopy style but with air beams instead of X-frames. They’re typically 10×10 or 10×15, set up in under 5 minutes, and are ideal for farmers markets, pop-up shops, and quick brand activations. The trade-off is size—you won’t find many pop-ups larger than 20 feet wide.
Tiendas de campaña tipo túnel. These are elongated, arch-shaped structures that create a covered walkway or linear space. They’re built with multiple parallel air beams along the length, creating a continuous tunnel. Tunnel tents excel at entranceways, drive-through activations, and any event where you need a long, narrow covered space. Standard widths run 10–30 feet, with lengths from 20 to 100 feet or more.
Tiendas de campaña tipo cúpula. Geodesic-style structures that use intersecting air beams to create a self-supporting dome. These are the most wind-resistant of all inflatable shapes because the load distributes evenly across the curved surface. Domes are fantastic for lounges, viewing areas, and Instagram-worthy brand spaces. They’re also the most complex to manufacture, which means higher price points.
Pagoda Tents. A hybrid style that uses a peaked roof with open or semi-open sides. The pagoda shape is popular for events that need a more elegant, premium aesthetic—think VIP lounges, wedding receptions, and high-end product launches. They combine the quick setup of inflatables with a more refined profile than a standard square tent.
Formas personalizadas. Beyond the standards, you can get anything. I’ve seen inflatable car dealership facades, giant product replicas that double as shelters, and inflatable stages with built-in DJ booths. The limit is your designer’s imagination and the manufacturer’s pattern-making capability. If you want a tent shaped like a giant soda can, someone will build it.
Key Materials and Construction: PVC Coated Polyester, Air Beams, and Welding Quality
This is where the cheap tents separate from the professional-grade ones. You can’t see the difference in photos, but you’ll feel it in a 20 mph gust.
Fabric: The PVC Coated Polyester Standard. The industry workhorse is PVC-coated polyester, and the quality comes down to weight and coating density. Standard commercial-grade fabric is often described as 610 GSM (grams per square meter) Oxford polyester with a PVC coating on both sides. Budget tents are commonly in the 420–520 GSM range. Premium tents are often said to bump up to 650–900 GSM.
The waterproof rating, measured in millimeters of water column (mmWC), is what tells you how much rain the fabric can handle. Entry-level tents are often rated around 500–800 mmWC—fine for light drizzle. Professional event tents are typically rated higher, such as 1,500–3,000 mmWC. The best inflatable tents I’ve tested are rated at 3,500+ mmWC, which means they’ll handle a proper storm. For reference, a garden hose sprays at roughly 1,000 mmWC, so anything above that will shrug off rain.
Air Beams: The Skeleton. The air beams are the heart of the system. Quality beams use a two-layer construction: an inner TPU or PVC bladder that holds the air, wrapped in a high-tenacity polyester sleeve that takes the structural load. The sleeve’s denier (fabric weight) matters—for professional use, a higher denier is often recommended, such as 840D to 1,100D. The bladder should be at least 0.4mm thick; anything thinner risks pinholing after repeated folding.
Welding vs. Stitching. Here’s a critical distinction. Cheap tents are stitched at the seams—thread creates needle holes that can leak, and stitching degrades faster under UV exposure. Professional tents use high-frequency (HF) welding, where the PVC layers are fused together using radio waves and pressure. The weld is actually stronger than the fabric itself. When you’re inspecting a tent, look for smooth, continuous welded seams with no visible thread. If you see stitching on a load-bearing seam, walk away. The difference in lifespan is 2–3 years versus 5–8 years.
Safety Standards and Certifications: CE, EN 14960, and Wind Load Ratings
If your vendor can’t talk about certifications, that’s a red flag. The European market sets the gold standard for inflatable safety, and any serious manufacturer will comply.
CE Certification. This is the European Union’s mandatory conformity mark for products sold in the EEA. For inflatable tents, CE certification confirms the product meets the Essential Health and Safety Requirements of the applicable directives—primarily the General Product Safety Directive (2001/95/EC) and, where applicable, the Machinery Directive if the tent includes moving parts or electrical blowers. CE certification requires documented technical files, risk assessments, and testing from a notified body.
EN 14960-1:2019. This is the specific harmonized standard for inflatable play equipment and, by extension, the closest thing the industry has to a structural safety benchmark for inflatable structures. EN 14960 covers:
- Flammability resistance (the fabric must self-extinguish within 15 seconds after flame removal)
- Seam strength (minimum tear strength requirements)
- Anchoring requirements (minimum anchorage points based on size)
- Inflation system safety (blower output and pressure ratings)
- Labeling and instructions compliance
For air-filled buildings and tents specifically, look for compliance with EN 14960 as a baseline. Some manufacturers also test to the stricter German standard, DIN EN 14960, which adds impact attenuation requirements.
Wind Load Ratings. This is the number I always ask for first. Professional inflatable tents are rated to withstand specific wind speeds when properly anchored. The industry standard for commercial use is:
| Resistencia al Viento | Speed (mph) | Conditions |
|---|---|---|
| Estándar | up to 30 mph | Light breeze, general event use |
| Reinforced | up to 45 mph | Windy locations, coastal areas |
| Heavy-Duty | up to 60 mph | High-wind zones, must be fully ballasted |
| Extreme | 70+ mph | Specialized engineering, rare |
The key phrase is “properly anchored.” A tent rated for 60 mph will still fail at 25 mph if you only put four sandbags on it. Always cross-reference the wind rating with the anchoring requirements. Most manufacturers specify the exact number and weight of ballast bags needed to achieve each rating level.
Customization Options: Printing Techniques, Colors, Sizes, and Shapes
The whole point of a custom inflatable tent is branding, and the printing technology determines the visual quality.
Dye Sublimation (Heat Transfer). This is the premium standard for custom inflatable tents. The design is printed onto transfer paper using special sublimation inks, then heat-pressed onto the fabric. The ink turns to gas and bonds with the PVC coating at the molecular level. Result: vibrant, photo-quality graphics that won’t crack, peel, or fade for 3–5 years. This is what you want for photographic branding, gradients, and detailed logos.
UV Direct Printing. A newer technology where large-format UV printers print directly onto the fabric. It’s faster than sublimation and works well for flat surfaces with solid colors and simple graphics. The downside is durability—UV-printed graphics can crack when the fabric flexes repeatedly, which is a problem on inflatable tents that are constantly folded and unfolded. Best for one-off events, not long-term use.
Screen Printing. The old-school method. Ink is pushed through a mesh stencil onto the fabric. Excellent for solid colors, sharp text, and simple logos. The ink sits on top of the fabric surface, so it’s more susceptible to scratching. It’s the most cost-effective for large runs or when you only need one or two colors.
Color and Shape. Beyond printing, you can specify custom Pantone colors for the base fabric—not just the print. This is where “custom” really opens up. You can get the tent shell itself in your brand color, or even multiple color panels. Shapes? As I mentioned earlier, the sky’s the limit. A 10×10 square tent is the entry point; from there you can go to hexagons, octagons, arches, pyramids, or fully bespoke silhouettes. Just remember: every deviation from a standard shape adds pattern-making and engineering time, which adds 15–30% to your cost.
What’s Included in a Custom Inflatable Tent Package? (Anchors, Blowers, Repair Kits, etc.)
Here’s the truth about packages: the “package” is whatever the vendor decides to include. But a genuinely complete custom inflatable tent package should include these items—and you should verify each one before signing:
Core Structure:
- The tent shell with air beams (inflated, tested, and pressure-sealed)
- A high-speed blower (electric, typically 750W–1,500W, with the correct voltage for your country)
- Inflation hoses with quick-connect fittings
Anchoring System:
- Steel stakes (for grass and soft ground)—you need at least 8–12 for a 10×10
- Sandbag ballast bags (for hard surfaces)—typically 4–8 bags that hold 20–30 lbs each
- Rope/ratchet tie-downs to secure the ballast to the tent’s anchor loops
Accesorios:
- Side walls (either full or half walls, zippered)
- Flooring (optional, but I’d argue essential for anything longer than a day)
- Carry bag or transport duffels (heavy-duty, with wheels for larger sizes)
- Repair kit (PVC patches, adhesive, and a heat source—or at minimum the patches)
Documentation:
- Setup instructions (printed and laminated)
- Wind rating and anchoring specifications
- Warranty information (should be at least 1 year on the seams and welds)
The key question to ask: “What’s NOT included?” If the vendor hesitates or says “everything,” ask for the itemized list. A transparent vendor will send it in minutes. A vague one is hiding something.
Cómo elegir el tamaño y la forma adecuados para tu evento
I’ve seen more events derailed by undersized tents than anything else. Here’s a framework to size correctly.
Match the tent to the function, not the guest count. A 10×10 tent typically fits about 8–10 people standing, or 4–6 seated at a table. A 20×20 fits more, often 30–40 standing. For a product demo, you need room for the product, the presenter, and a crowd ring. For a lounge, you need the furniture footprint plus walking space. Don’t just count heads—lay out the actual floor plan.
Add 20% buffer. Every event has more stuff than you planned for. Extra chairs, a podium you didn’t expect, a cooler, a generator. Add 20% to your calculated size. It will save you from the “we’re all jammed in here” awkwardness.
Consider the environment. A tent on a windy beach needs a lower profile and more ballast. A tent in a parking lot needs to handle reflective heat. A tent in a cold climate needs side walls to trap warmth. Shape matters too—a dome handles wind better than a square, and a tunnel works well for high-traffic walkthroughs while a square works better for presentations.
Think about setup space. You get the tent to the site—but can you actually set it up there? Inflatable tents need roughly 10–15 feet of clearance around them for inflation. If you’re in a tight trade show booth, measure twice before ordering the 20×20.
Setup and Teardown: Step-by-Step Guide (Including Inflation Time)
I’ve timed this. With two people who’ve done it before, a 10×10 inflatable tent can go from bag to fully set up in under 15 minutes. Here’s the sequence:
Step 1: Site Prep (2 minutes). Clear the area of debris, sharp objects, and uneven ground. Lay down a ground tarp if you have one—it protects the floor and keeps the tent clean.
Step 2: Unpack and Lay Out (3 minutes). Remove the tent from the bag. Unfold it completely, spreading the fabric out flat. Make sure all beams are untwisted and the tent is oriented correctly (door where you want it, graphics facing the right direction).
Step 3: Connect the Blower (1 minute). Attach the inflation hose to the main air inlet valve. Make sure the valve is fully open and the connection is snug.
Step 4: Inflate (3–5 minutes). Turn on the blower. The tent will rise in stages—first the main beams, then the secondary beams, then the fabric will snap taut. Let it fully pressurize. You’ll know it’s done when the beams feel firm (you shouldn’t be able to compress them significantly with your hand) and the fabric has no wrinkles.
Step 5: Detach or Set to Maintain Mode (1 minute). If your tent is pressure-sealed, close the valve and detach the blower. If it needs continuous airflow, keep the blower running and secure the hose so no one trips on it.
Step 6: Anchoring (5 minutes). This is not optional. Stake down every anchor loop on grass. On hard surfaces, fill ballast bags and strap them to the loops. Distribute the anchoring evenly—don’t just anchor the corners.
Teardown is the reverse:
- Unanchor everything.
- Open the main valve to release air (don’t use the blower to “suck” air out—just let it deflate).
- As it collapses, fold the fabric in a zigzag pattern, keeping the beams flat and untwisted.
- Roll or fold into the carry bag. Never pack a wet tent—dry it first or unroll it as soon as you get back.
Maintenance and Repair: Extending the Life of Your Inflatable Tent
With proper care, a quality inflatable tent lasts 5–8 years. Without it, you’ll be lucky to get 2. Here’s what matters.
Limpieza. After every event, wipe down the fabric with a mild soap solution (dish soap works) and water. Rinse thoroughly. Never use solvents, acetone, or abrasive cleaners—they’ll break down the PVC coating. For stubborn stains, use a soft brush. Dry completely before packing.
Almacenamiento. Fold the tent loosely and store it in the carry bag. Keep it in a cool, dry place away from direct sunlight. UV is the #1 killer of PVC fabric—it makes it brittle and causes micro-cracks. If you’re storing long-term, keep it in a climate-controlled space. Extreme heat (over 120°F) can cause the PVC layers to separate.
Repairing Leaks and Punctures. It happens—a drop, a sharp edge, an unlucky gust. Here’s the fix:
- Inflate the tent and identify the leak (listen for hissing or use soapy water—leaks will bubble).
- Deflate and dry the area around the puncture.
- Cut a patch from the repair kit (or use spare fabric), rounding the corners to prevent peeling.
- Apply PVC adhesive or use a heat gun at low temperature to weld the patch on.
- Press firmly and let it cure for 24 hours before re-inflating.
Replacing Air Beams. Some manufacturers sell replacement beams. If your beam is damaged beyond patching, you can unzip the outer sleeve, remove the damaged bladder, and slide in a new one. This is a 30-minute job and costs a fraction of a new tent.
Spare Parts. Always order a spare blower with your tent. Blowers are the most failure-prone component, and a dead blower means a dead tent. The cost of a spare is $100–$300—cheap insurance when your event depends on it.
Shipping, Logistics, and HS Codes for International Buyers
If you’re buying from an overseas manufacturer—which most buyers do, since the best production is in China—logistics matter as much as the tent itself.
HS Code. The Harmonized System code for inflatable tents is 6306.22.00 (tents of synthetic fibers, including inflatable). This classifies them under “Tarpaulins, awnings and sunblinds; tents; sails for boats, sailboards or landcraft; camping goods.” Some shipments get classified under 9508.90.00 (fairground amusements) if they’re inflatable play structures, but for event tents, 6306.22.00 is the correct code.
Duties and Taxes. The import duty varies by country. The US typically charges a low single-digit percentage for this classification under normal trade relations. The EU charges a similar rate. However, the actual rate depends on your country’s trade agreements with the manufacturer’s country. Always confirm with a customs broker before you commit.
Shipping Methods. For smaller tents (10×10 to 15×15), air freight is viable but expensive—shipping costs can be significant for small orders. For larger orders, sea freight is the way to go. A 20-foot container can hold a large number of 10×10 tents, depending on packaging. For single tents, freight forwarding via LCL (less than container load) is the standard—your tent ships in shared container space.
Lead Times. Between production, sea freight, and customs clearance, you’re looking at a typical lead time of 8–12 weeks from order to delivery. Air freight cuts this to 3–4 weeks total but costs 3–5x more than sea freight. Plan accordingly—never order with less than 3 months of buffer for a major event.
Cost Factors and Pricing Tiers (Budget vs. Premium)
Let’s talk real numbers, because this is where most buyers get surprised.
Budget Tier ($500–$1,500). Entry-level 10×10 to 10×15 tents. Expect 420–520 GSM fabric, basic stitching (not fully welded), simple printing (screen or early-generation sublimation), and minimal accessories—usually tent, blower, and a thin carry bag. These tents work for occasional backyard use or single-season events. They will NOT hold up to weekly professional use.
Mid-Tier ($1,500–$4,000). The professional sweet spot. 610 GSM fabric, fully welded seams, quality sublimation printing, blower included, and a reasonable accessory package (stakes, basic repair kit). This tier handles 20–50 events per year. This is what most professional event rental companies buy.
Premium Tier ($4,000–$10,000+). Heavy-duty commercial construction. 650–900 GSM fabric, reinforced, double-welded seams, high-strength air beams, premium sublimation printing, complete accessory packages (walls, flooring, ballast, spare blower, professional carry cases). These tents are built for daily rental use, extreme conditions, and 5+ year lifespans.
Custom Shapes and Oversized Tents. Anything over 20 feet wide or in a non-standard shape adds 20–50% to the base price. A 30-foot custom tunnel tent with full branding can cost in the range of $8,000–$15,000. A 40-foot dome can cost $15,000–$25,000. The engineering, material, and pattern costs scale faster than the physical size.
Hidden Costs to Watch For:
- Side walls (additional $300–$800)
- Flooring ($200–$600)
- Heavy-duty ballast bags ($50–$150 each)
- Spare blower ($150–$400)
- Custom packaging/case ($100–$300)
- Shipping and customs (10–30% of the total)







