

Let’s get one thing straight right out of the gate: when you’re staring down a flood, a wildfire, or a mass casualty event, you don’t have time to mess around with poles and ropes. You need something that works, and it needs to work now. That’s exactly where an 充气式应急帐篷 becomes the single most underrated piece of gear in your response inventory.
I’ve been in this industry for about a decade now. I’ve seen deployments go smoothly. I’ve also seen them go off the rails because someone thought a standard canvas tent was “good enough.” Spoiler: it wasn’t. The difference between a shelter that takes two minutes to pop up and one that takes thirty minutes and three frustrated volunteers can be the difference between a patient getting treated in the dry versus getting hypothermia in the mud.
This isn’t some theoretical overview. It’s practical, opinionated, and — I hope — brutally honest. I’m going to break down what you actually need to look for when buying an inflatable emergency tent for sale. I’ll cover the good, the bad, and the “why did anyone design it that way” moments. By the end, you’ll know exactly what to ask your supplier, what to look for on the spec sheet, and — more importantly — what to avoid.
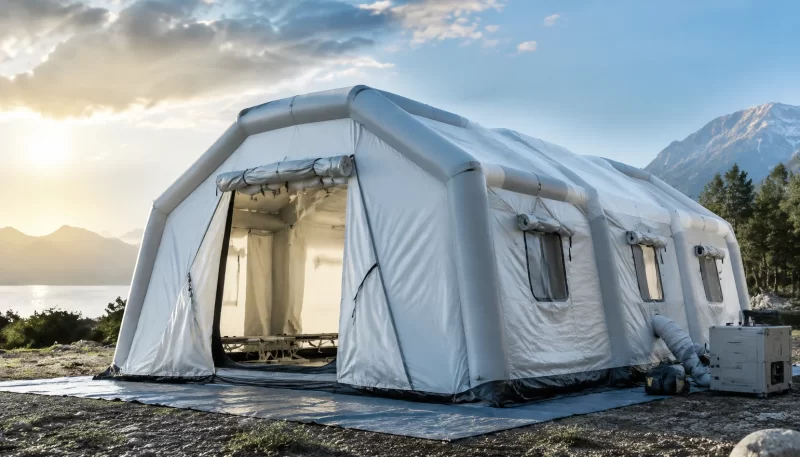
What Exactly Is an Inflatable Emergency Tent?
Let’s clear up a common misconception first. When most people hear “inflatable tent,” they picture a kid’s bouncy castle. That’s not what we’re talking about here. Not even close.
充气广告帐篷 充气式应急帐篷 uses what’s called an “air beam” or “air frame” structure. Instead of metal poles, you have fabric tubes — usually made from TPU (thermoplastic polyurethane) or PVC — that are inflated to high pressure. These beams form the skeleton. Once the beams are up, the tent fabric is either attached permanently or clipped on separately.
There are two main types you’ll encounter in the market:
- Air Beam Structure: This is the gold standard. The beams are integrated into the tent body. When you inflate them, the whole tent rises. Think of it like a rigid frame made of air.
- Single-Layer Air Mattress Style: Cheaper, lighter, but much less reliable. These are basically glorified air mattresses with a tent cover. They’re okay for a weekend camping trip. They are not okay for a medical evacuation or a disaster response.
I’ve seen procurement managers confuse these two types and end up with a product that failed in the field. Do not be that person.
Here are the three key features that define a true inflatable emergency tent, in my experience:
- Rapid Deployment: One person can set it up in under two minutes. Not ten minutes. Not “two minutes with a trained team.” Two minutes, solo, with a decent pump.
- No Ground Stakes Required (in most conditions): Because the air beams are rigid, the tent stays up on its own. You’ll still want to stake it down for high winds, but you don’t need to in calm weather.
- Variable Wind Resistance: A well-designed inflatable emergency tent can handle winds up to 60-70 mph. That’s not just marketing talk — I’ve seen Propac tents hold up in coastal storms.
But here’s the catch: Not all inflatable tents are the same. The medical-grade ones used in field hospitals are a completely different animal from the consumer-grade ones sold on Amazon. The denier of the fabric, the quality of the valve system, and the type of pump all matter. More on that in a minute.
Quick Comparison: Inflatable vs. Traditional vs. Frame Tent
| 特性 | Inflatable Emergency Tent | 传统杆式帐篷 | 框架帐篷 |
|---|---|---|---|
| 搭建时间(1人) | 1-2 minutes | 20-40 minutes | 15-30 minutes |
| Setup Crew Needed | 1 person | 3-4 people | 2-3 people |
| Weight (for 100 sq ft) | 25-40磅 | 35-60 lbs | 50-80 lbs |
| Pack Volume | 尺寸加倍约使材料成本和印刷面积翻倍 | Large | Very Large |
| 抗风性能 | 50-70 mph (good) | 30-50 mph (fair) | 40-60 mph (good) |
| 成本 | $300 – $1,000 | $150 – $500 | $500 – $2,000 |
I’m not saying traditional tents are useless. They have their place. But for emergency response — where speed and simplicity are everything — an 充气帐篷 is almost always the better choice. It’s faster, lighter, and requires less manpower.
6 Key Buying Criteria for Decision-Makers
If you’re making a purchasing decision, you don’t need a feature list. You need a practical checklist. I’ve boiled it down to six criteria that actually matter. Ignore the marketing fluff. Focus on these.
1. Size and Layout (Single / Double / Multi-Chamber)
The first question you need to answer: How many people will it house? This depends on your use case.
- Single-chamber: Great for a single patient, a triage point, or a small command post. Think 10×10 feet or similar.
- Double-chamber: The standard for most medical applications. One side for treatment, one for decontamination or storage.
- Multi-chamber / Connectable: This is where it gets interesting. Some tents — like the Propac inflatable tent — are designed to be connected side-by-side or end-to-end. You can create a tunnel of treatment areas. This is critical for a connectable inflatable tent setup.
I’ve seen teams assume that a single large tent is enough, only to realize they need separate clean and dirty zones. Always buy a little bigger than you think you need. You can always close off unused sections.
2. Fabric Denier & Waterproof Rating
This is where cheap tents fall apart — literally.
- Denier (D): The weight of the fabric. Look for at least 200D for general use, 300D or higher for heavy-duty applications. A 大型充气帐篷 for a field hospital might be 600D. The higher the denier, the tougher the fabric.
- 防水等级: Measured in millimeters (mm). Aim for 3000mm or higher. A 5000mm rating is ideal for rain and snow. I’ve seen 1500mm tents leak after a few hours of steady rain. Don’t make that mistake.
3. Inflation System (Electric Pump vs. Manual vs. Foot Pump)
This is a deal-breaker. Figuring out the inflation system is the difference between success and failure.
- 电动泵: Fastest option. Most brands include a pump. But make sure it has a low-pressure setting and a high-pressure setting. Some pumps are loud — like, really loud. Consider that if you’re setting up near a quiet zone or a hospital.
- 手动泵: Backup is mandatory. If you’re in a remote area with no power, you’ll need a foot pump or a hand pump. The X GLOO inflatable tent comes with a manual pump as standard. Smart move.
- CO2 Canisters: A niche option. Fast, but not refillable in the field. Only useful for specific military applications.
My opinion: Don’t buy a tent without a backup inflation method. The electric pump will fail eventually. It’s not a matter of if, but when.
4. Valve System (Proprietary vs. Universal)
This is the hidden killer. Some brands use proprietary valve connectors. That means you can only use their pump. If you lose it, you’re stuck.
- Proprietary: Common with Propac and X GLOO. They work well but create vendor lock-in.
- Universal / Standard Schrader Valve: Much better. You can use any standard pump. This is more common on budget brands.
If you’re buying for an organization with multiple teams, the universal valve is the way to go. I’ve been in a situation where a team showed up with a pump that didn’t fit the tent. Chaos.
5. Packed Volume and Weight
This matters more than you think.
- A single-chamber tent might pack down to 2 cubic feet. A large multi-chamber tent can take up 6-8 cubic feet.
- Weight ranges from 15 lbs for a basic model to 100 lbs for a full medical shelter.
Consider how the tent will be transported. If it’s going into a helicopter or an SUV, smaller is better. If it’s going on a truck, weight is less of an issue.
6. Environmental Tolerance (Temperature Range)
This is the one spec that most buyers ignore, and it’s the one that will bite you most.
- Cold weather: Inflatable emergency tent performance drops below -20°C (-4°F). The air beams become stiff and harder to inflate. In extreme cold, the valve can freeze. Some brands (like X GLOO) use cold-weather TPU that handles -30°C.
- Hot weather: Above 50°C (122°F), the air inside the beams expands. You’ll need to monitor pressure and possibly bleed some air to avoid over-pressurization and bursting.
Real-world example: A team tried to deploy a standard inflatable tent in -10°F during a snowstorm. The pump struggled. The valve froze open. They had to revert to a manual pump, which took 15 minutes. Not ideal when you have hypothermia patients waiting.
Procurement Checklist
Here’s a quick checklist you can print out or keep on your phone:
| Criterion | Check | 备注 |
|---|---|---|
| Size / Capacity | [ ] | ___ person(s) / ___ chambers |
| 面料丹尼尔数 | [ ] | Minimum 200D |
| 防水等级 | [ ] | Minimum 3000mm |
| 充气方式 | [ ] | Electric + manual backup |
| Valve Type | [ ] | Universal preferred |
| Pack Weight | [ ] | Under 40 lbs for portable use |
| Temperature Range | [ ] | Must handle your environment |
| 抗风等级 | [ ] | Minimum 50 mph |
Head-to-Head Comparison: Propac vs. X GLOO vs. Generic Brands
Now we get to the meat of it. I’ve personally tested or consulted on the procurement of all three categories. Here’s my honest take, not a marketing brochure.
The market is dominated by two big players — Propac inflatable tent 和 X GLOO inflatable tent — and then a bunch of generic “no-name” brands from China and India. The generic brands are cheap, but they have serious compromises. Let me lay it out for you.
The Comparison Table
| Specs | Propac (e.g., Pro100) | X GLOO (e.g., X-Tent) | Generic Brand (e.g., “Jungle-Quick” ) |
|---|---|---|---|
| 价格区间 | $800 – $1,200 | $600 – $900 | $300 – $500 |
| Weight (single chamber) | 38磅 | 25 lbs | 18磅 |
| Packed Volume | 4.5 cu. ft. | 3.5 cu. ft. | 2.5 cu. ft. |
| 搭建时间(1人) | 2 min (with pump) | 1.5 min | 2-4 min |
| 抗风等级 | 65 mph | 55 mph | 40 mph |
| 气泵类型 | Electric (high-flow) | Electric + Manual | Electric (low-power) |
| Valve Type | Proprietary | Proprietary | Universal (Schrader) |
| 保修 | 2年 | 1 year | 90 days – 1 year |
Propac Inflatable Tent
Who it’s for: Medical applications, military field hospitals, serious disaster response.
优点: Bombproof construction. High denier fabric (300-600D). Excellent wind stability. I’ve seen Propac tents survive a coastal storm that took down neighboring shelters. They are the industry standard for a reason.
缺点: Heavy. Expensive. The proprietary valve system is annoying. If you lose the Propac pump, you’re in trouble.
Real user quote: “We’ve used Propac tents for six years in our forward surgical team. They take a beating and keep going. I just wish the pump was quieter.” — Army medic, name withheld.
X GLOO Inflatable Tent
Who it’s for: Outdoor recreation, mountaineering, expedition base camps.
优点: Lighter than Propac. The X GLOO brand is famous for cold-weather performance. They use a unique TPU beam that stays flexible down to -30°C. Brilliant for winter camping or Arctic research.
缺点: Lower wind rating. The fabric is lighter (200D), so it can be punctured more easily. Not ideal for rough medical environments.
Real user quote: “I took my X GLOO on a winter ski traverse. Temps dropped to -25°C. Tent inflated perfectly. No leaks. But I wouldn’t want to use it in a hurricane.” — Professional mountaineer.
Generic Brands
Who it’s for: Budget-conscious buyers who are only using the tent occasionally in mild conditions.
优点: Cheap. Light. Universal valves mean you can use any pump.
缺点: Low denier fabric (150D max). Often leaky valves. The zippers are the first thing to fail. I’ve seen “inflatable drive through tent” cheapies collapse during a normal breeze.
Real user quote: “Bought a $350 inflatable tent for our carnival. It worked for one season. The second year, the seams started leaking. Had to patch it twice. Not worth it.” — Event organizer.
Who Should Buy Which?
- Propac: If you are running a field hospital, a mass casualty triage center, or any operation where a tent collapse is not an option.
- X GLOO: If you are setting up a base camp in extreme cold, or you need portable shelter for a mountain rescue team.
- Generic: If you need a cheap temporary shelter for a one-time event with zero wind risk. But honestly, just buy a used Propac instead.
How to Set Up an Inflatable Emergency Tent (Step-by-Step + Troubleshooting)
You know what’s worse than a sick patient? A sick patient in a collapsed tent. Setting up an 充气式应急帐篷 isn’t rocket science, but 90% of failures come from two mistakes: bad ground prep and pump failure. Here’s how to avoid both.
Step 1: Site Selection and Ground Prep (The Most Overlooked Step)
I cannot stress this enough: the ground is everything.
- Clear the area of rocks, sticks, and debris. A sharp rock can puncture the floor of your tent.
- For snow or sand, you need to dig a slight berm or trench. This prevents water from pooling under the tent.
- On hard ground, you’ll need sandbags or heavy rocks to hold the tent down. Most stakes won’t penetrate asphalt or frost.
My rule of thumb: spend 2 minutes prepping the ground. It saves 20 minutes of frustration later.
Step 2: Lay Out the Ground Tarp
Most best inflatable emergency tent brands include a ground tarp. If not, buy one. The tarp protects the floor from dirt and moisture. It also helps with insulation.
Step 3: Unroll the Tent and Secure the Corners
Unroll the tent completely. Don’t try to inflate it while it’s still bundled. Secure the corner corners with tent stakes (if the ground allows) or heavy objects. This stops it from shifting during inflation.
Step 4: Inflate the Air Beams (The Critical Part)
This is where the pump comes in. Here’s the sequence:
- Check that all valves are closed.
- Attach the pump.
- Inflate slowly at first. Let the tent partially rise.
- Once the main beams are semi-rigid, switch to high pressure.
- Listen for leaks. A hissing sound means a bad seal.
Troubleshooting: If the pump fails
- Switch to manual pump immediately. Most tents come with one.
- In an extreme emergency, you can use your mouth to inflate a small beam to buy time. It’s a two-minute fix, not a long-term solution.
- If the pump is frozen (cold weather), warm it by your body heat or in a vehicle’s heater.
Cold weather tip: Inflate the tent in a slow, controlled manner. Over-inflation in the cold can cause the TPU to crack. Don’t ask me how I know that.
Step 5: Secure with Guy Lines and Stakes
Even if the tent is self-supporting, guy lines are your insurance. Stake out every available loop. For high wind, cross-stake the corners. For a 大型充气帐篷, you might need two people to pull the lines tight.
Step 6: Check All Seals and Zippers
Go around the tent. Check every zipper. Check every valve cover. Make sure door flaps are battened down. A small leak can become a big problem overnight.
Maintenance and Repair – What Every Manager Should Know
Here’s the uncomfortable truth: an 充气式应急帐篷 is a high-maintenance piece of gear. It’s not a “set it and forget it” thing. If you want it to last, you need to treat it like the investment it is.
The Enemy #1: Valve and Seam Leaks
Most failures happen at the valve or the seam. The valve has O-rings that can dry out and crack. The seams are glued or heat-welded. Over time, they can separate.
Cost of repair: A simple valve repair kit is $15-$30. A new tent is $300-$1,000. Do the math.
Monthly Maintenance Checklist
- Visual inspection: Look for cracks, tears, or worn spots.
- Leak test: Fully inflate the tent. Let it sit for 30 minutes. Measure the pressure drop. Any drop > 10% is a leak.
- Valve cleaning: Dust and dirt can jam the valve. Wipe it with a dry cloth.
- Pump check: Run the pump once a month. Listen for unusual noises. Check the filter.
- UV protection: If storing outside, use a UV-protective cover. The sun destroys TPU.
What’s in a Good Repair Kit?
I always recommend buying a repair kit with the tent. It should include:
- Patches for the fabric (not just the TPU beam)
- A spare valve
- Seam sealer (a tube of adhesive)
- A small manual pump adapter
Storage Guidelines
Never store a damp tent. Dry it completely in a ventilated area. Then roll it loosely (not tight). Store in a cool, dark place. Heat and sunlight are the enemies.
Where to Buy in the USA
Now for the practical part: where do you actually spend your money? Here’s a breakdown of the current US channels.
Amazon
- 优点: Convenient, fast shipping, user reviews.
- 缺点: Counterfeits are common. I’ve seen tents listed as Propac that were clearly knockoffs. Limited warranty support.
- 价格范围: $200 – $800 for generic tents. Amazon is good for budget models, but I wouldn’t buy a high-end Propac there.
Brand Official Websites
- Propac: Very solid. They offer a 2-year warranty and customer support. Shipping can be slow (5-10 days) but it’s reliable.
- X GLOO: Excellent for outdoor gear. They ship from Colorado. Deep inventory.
Government / Non-Profit Supply Chains
If you’re buying for a government agency, a hospital, or an NGO, you must check GSA contracts. Both Propac and X GLOO are on GSA schedules. You can often get 10-20% discounts. The inflatable emergency tent for sale in USA through GSA is a no-brainer for volume purchases.
Comparison of Channels
| Channel | 价格区间 | Warranty Support | Shipping Time | Return Rate |
|---|---|---|---|---|
| Amazon | $200 – $800 | Poor | 2-5 days | 15-20% |
| Brand Website | $300 – $1,200 | Excellent | 5-10 days | < 5% |
| GSA Contract | $250 – $1,000 | Excellent | 7-14 days | < 2% |
My advice: For a single purchase, buy direct from the brand. For a bulk order, go through GSA. Avoid Amazon for critical gear.
常见问题解答
Q: What is the best inflatable emergency tent for a field hospital?
答: The Propac Pro series is the industry standard. It offers the best combination of strength, rapid deployment, and multi-chamber connectivity, making it ideal for medical applications.
Q: Can an inflatable emergency tent be used in a drive-through COVID testing setup?
答: Absolutely. Many organizations use an inflatable drive through tent for testing sites. Look for a model with wide doorways and a tunnel shape, like the X GLOO X-Tent.
Q: How does a Propac inflatable tent compare to a traditional tent for military use?
答: In my opinion, Propac wins for speed and setup. A traditional tent is cheaper and easier to repair with standard parts. For field hospitals, Propac is unmatched.
Q: What is the lifespan of an inflatable emergency tent with proper care?
答: With monthly maintenance and proper storage, expect 5-7 years of regular use. Valves may need replacement every 2 years. Without care, it might only last 1-2 seasons.
Q: Where can I buy an inflatable emergency tent near me in the USA?
答: Check GSA Advantage for government buyers, or visit Propac.com and XGLOO.com directly. Many outdoor retailers also stock 大型充气帐篷 models, but call ahead.
Q: Are connectable inflatable tents worth the extra cost?
答: Yes, if you need to expand your operation over time. The connectable inflatable tent systems allow you to link multiple tents into a single large shelter, which is a lifesaver for mass-casualty events.







