

You’ve got 15 minutes to set up your booth. Your competitor’s done in 5.
That’s the scene at nearly every trade show I’ve walked into for the past decade. One exhibitor’s sweating, wrestling with bent aluminum poles and tangled fabric. The other’s already handing out brochures, their booth looking like some sleek, glowing structure that materialized out of thin air.
The difference? More often than not, it’s inflatable trade show tents.
I’ve spent years in the event and exhibition industry, watching these air-filled structures go from novelty to mainstream. Honestly, the shift makes sense. But there’s a ton of confusion out there too—about costs, about wind ratings, about whether they’re actually worth the higher upfront price compared to a standard pop-up.
So let’s cut through the marketing noise. Here’s what inflatable trade show tents actually cost, how fast they really set up, and what those wind ratings mean in the real world. No sales pitch, just answers.
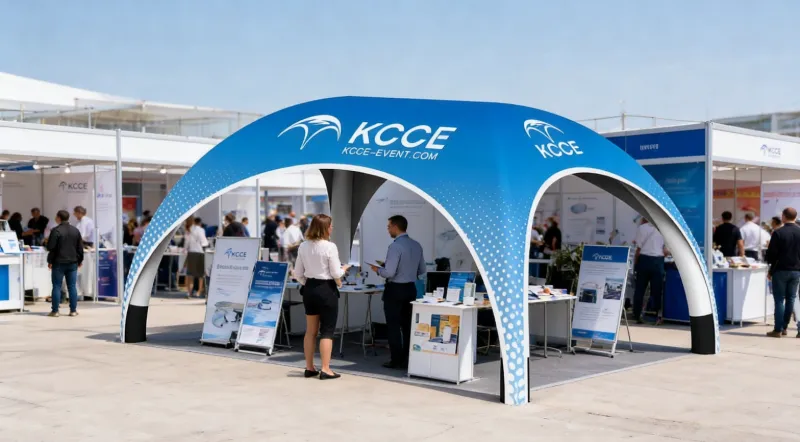
What Are Inflatable Trade Show Tents?
Before we dive into the numbers, let’s get the terminology straight. An inflatable trade show tent—sometimes called an inflatable canopy tent or air beam tent—uses air-filled structural beams instead of metal poles or a rigid frame. A continuous low-pressure blower keeps those beams rigid and standing.
According to the 2026 buyer’s guide from KCCE Event, these tents typically use welded PVC or TPU-coated fabric as the structural frame. The blower runs the entire time the tent is up, maintaining pressure so the structure doesn’t collapse.
You’ll see a few common sizes on the market:
- 10×10 — the standard booth size for most trade shows
- 10×20 — double-wide, popular for larger product displays
- 20×20 — essentially a small pavilion, often used for outdoor events and activations
The inflatable canopy 10×10 is by far the most popular configuration. It fits standard booth spaces, and setup takes anywhere from 5 to 8 minutes for a first-timer. Compare that to the 30 to 60 minutes you’ll spend wrestling with a traditional pop-up canopy and its frame, and you start to see the appeal.
Inflatable vs. Pop-Up Tents: Head-to-Head Comparison
The classic question: inflatable tent vs pop-up canopy. Which one should you buy?
Setup time. This is where inflatables win, hands down. A quality inflatable tent goes from bag to fully standing in 5-8 minutes. No tools, no loose parts, no training required. A traditional pop-up canopy with a metal frame? You’re looking at 30 to 60 minutes, especially if you’re doing it solo. And if you’ve ever tried to set up a pop-up in wind, you know the pain of fighting bent frame joints.
Cost. Here’s where pop-ups have the edge. A basic pop-up canopy runs $300 to $2,000 depending on quality. Inflatable trade show tents price points start around $1,500 and go up to $8,000 or more for premium custom builds. That’s a significant gap. But you’re paying for durability, visual impact, and that setup speed.
Khả năng chống gió. Pop-up tents fail in wind because their metal frame joints bend and snap. That’s not speculation—it’s a well-documented failure mode. Inflatable tents, on the other hand, flex with gusts. KCCE Event’s guide notes that a quality inflatable tent rated NFPA 701 and ASTM D751 can withstand winds up to 60 mph when properly anchored. That’s a massive difference.
Visual impact. Let’s be honest—an inflatable canopy tent just looks more impressive. The seamless curves, the vibrant printing, the sheer presence. Brands consistently report that inflatable structures draw more attention than standard pop-ups. TentCraft’s blog on branded inflatable designs highlights how these tents are especially good at matching the “vibe” of high-energy athletic events, motor sport activations, and music festivals.
How Much Do Inflatable Trade Show Tents Cost?
You might be wondering: how much does an inflatable canopy cost, really? Let’s break down the numbers honestly.
Budget range ($1,500–$3,000): Basic 10×10 inflatable tents with standard printing. These typically come with a blower, basic anchoring kit, and a carrying case. They’ll work fine for indoor shows and light outdoor use.
Mid-range ($3,000–$5,000): Better fabric quality (600D or higher), more detailed printing, sidewalls included, and a more powerful blower. This is what most serious exhibitors end up buying.
Premium custom ($5,000–$8,000+): Fully custom shapes, premium fabrics, enhanced wind ratings, LED lighting integration, and everything included. These are built for brands that use the tent repeatedly and need it to make a statement.
What drives the price? Four main factors:
- Kích Thước — a 20×20 costs substantially more than a 10×10
- Printing quality — full-color dye sublimation printing costs more than basic vinyl graphics
- Blower quality — continuous-duty motors cost more but last longer
- Sidewalls and accessories — adding printed sidewalls, doors, and windows adds up
One thing I’ll tell you straight: the cheap inflatable display tent options you see online for under $1,000 are usually a false economy. The fabric is thin, the blower burns out, and the stitching fails. You’ll end up replacing it within a season. Buy once, cry once.
Setup, Anchoring, and Wind Ratings Explained
Let’s walk through the actual setup process, because it’s simpler than you think.
Step 1: Unroll the tent and lay it flat in your booth space. Make sure the printed side is facing the direction you want.
Bước 2: Connect the blower to the air inlet. Most tents use a quick-connect system.
Step 3: Turn on the blower. The tent inflates on its own in about 60 to 90 seconds. You’ll see the beams stiffen and the fabric rise.
Step 4: Anchor the tent. This is the critical step people skip.
Anchoring methods:
- Sandbags — best for indoor use where you can’t stake into the ground. Typically 25-50 lbs per corner.
- Stakes — for outdoor use on grass or soft ground. Use 12-inch or longer stakes.
- Water barrels — heavy-duty option for high-wind situations.
Here’s the thing about wind ratings: that “60 mph” number only applies when the tent is properly anchored. An unanchored inflatable tent is a sail. I’ve seen it happen—a vendor skips the anchoring, a gust hits, and suddenly their $4,000 tent is tumbling across the parking lot.
The wind rating for inflatable tents is determined by testing standards like NFPA 701 (flame resistance) and ASTM D751 (fabric strength). When you’re shopping, look for these certifications. A tent that’s been tested to these standards has actual data behind its claims.
For outdoor shows, check the forecast. Most manufacturers recommend deflating the tent if sustained winds exceed 30-40 mph, even if the tent is rated higher. The rating is about structural survival, not comfort.
What to Look For When Buying: Key Features Checklist
When you’re comparing inflatable tents for trade shows, here’s what actually matters:
Blower specs. Look for a continuous-duty motor, not an intermittent one. The blower runs the entire time the tent is up—sometimes 8 to 12 hours a day at a trade show. A cheap blower will overheat and shut down. Check the CFM (cubic feet per minute) rating; higher CFM means better air pressure and a stiffer structure.
Fabric quality. You’ll see 420D and 600D polyester, plus PVC-coated options. The higher the denier, the thicker the fabric. For trade show use where the tent goes up and down frequently, 600D or PVC-coated is worth the extra cost. The PVC coating also improves water resistance for outdoor events.
Sidewalls. Do you need them? For indoor shows, sidewalls help define your space and block sightlines. For outdoor events, they provide shade and wind protection. Make sure they’re included or available as an option.
Carrying case. Sounds basic, but a good wheeled case makes a huge difference when you’re hauling the tent through a convention center. Look for a case with reinforced handles and wheels.
Repair kit. You will get a small tear or puncture eventually. It’s the nature of the beast. Make sure the tent comes with a repair kit, or buy one separately. Inflatable tent repair kits are inexpensive and can save you from a ruined show.
Warranty. Most reputable manufacturers offer at least a one-year warranty on fabric and seams. Some offer longer. Read the fine print on what’s covered.
Real-World Use: Trade Show Logistics and Best Practices
Here’s where a lot of first-time inflatable tent buyers get surprised: the logistics.
Convention center rules. Not all venues allow inflatable structures. Some convention centers have restrictions on air-supported structures, and some require union labor for setup if the tent exceeds certain dimensions. Check with the venue before you buy. This is a real issue, not a hypothetical one.
Union labor concerns. At larger convention centers, union rules may require their workers to handle the setup, even if it’s a simple inflation process. This can add unexpected costs. Ask about this when you book your booth space.
Storage and transport. An inflatable tent folds down to a surprisingly compact size—usually a bag that fits in the back of an SUV. But the blower and accessories add bulk. Make sure you have space in your vehicle or shipping plan.
Overnight use. If you’re leaving the tent up overnight, turn off the blower and deflate the tent, then re-inflate in the morning. Running a blower unattended overnight is a fire risk and unnecessary wear on the motor. Deflation takes about 5 minutes; re-inflation is equally quick.
Maintenance between shows. After each event, inspect the seams and fabric for damage. Wipe down the tent with a damp cloth to remove dirt and grime. Store it completely dry to prevent mildew. A well-maintained inflatable tent should last 3-5 years of regular show use.
Recommended Inflatable Trade Show Tents: Criteria-Based Shortlist
I’m not going to give you a fake model-by-model comparison table with made-up specs—that would be dishonest. Instead, here’s how to evaluate options based on your needs.
For first-time buyers (budget-conscious): Look for a basic 10×10 inflatable canopy 10×10 with standard printing, a continuous-duty blower, and a carrying case. Expect to pay in the $1,500-$2,500 range. Brands like TentCraft and Lush Banners offer entry-level options that don’t cut corners on fabric quality.
For regular exhibitors (best value): Spend a bit more on a mid-range inflatable tent with 600D fabric, full-color printing on both sides, and sidewalls included. The $3,000-$4,500 range gets you a tent that will survive years of show use. Look for options that include the repair kit and a more powerful blower.
For premium brand activations: This is where custom inflatable booths shine. You’re paying $5,000-$8,000 for a fully custom structure that matches your brand identity perfectly. TentCraft’s portfolio shows how brands use custom inflatable structures for high-energy activations at athletic events, motor sport sponsorships, and music festivals. If your booth IS your brand statement, this is the way to go.
A note on the OakPedion Inflatable Canopy: I’ve seen this brand come up in searches for inflatable canopy tents. Their specifications are worth reviewing if you’re comparing options—they offer a range of sizes and configurations that work for trade show applications. Just make sure you’re comparing apples to apples on fabric quality, blower specs, and included accessories.
Các câu hỏi thường gặp
问:市面上最好的充气帐篷是哪款?
A: The “best” depends on your specific needs, but for trade show use, look for tents from established manufacturers like TentCraft or Lush Banners that meet NFPA 701 and ASTM D751 standards. A quality 10×10 inflatable tent with 600D fabric and a continuous-duty blower is a solid choice for most exhibitors. Read reviews and ask for references before committing.
Q: How much are those inflatable tents?
A: Inflatable trade show tents price ranges from about $1,500 for basic 10×10 models to $8,000 or more for premium custom builds. Mid-range options with better fabric and full-color printing typically fall in the $3,000-$5,000 range. Remember that the blower, carrying case, and repair kit are usually included in the price.
Q: What are the disadvantages of inflatable tents?
A: The main drawbacks are the higher upfront cost compared to pop-up canopies, the need for continuous blower power (you need an electrical outlet or generator), and the low center height—around 7 feet—which can make the space feel smaller and darker. They also require proper anchoring in windy conditions, and some venues have restrictions on inflatable structures.
Q: What are those event tents called?
A: They go by several names: inflatable trade show tents, inflatable canopy tents, air beam tents, inflatable display tents, and inflatable event tents. The terms are often used interchangeably, though “air beam” specifically refers to the air-filled structural tubes that replace metal poles. All of them work on the same principle of air pressure maintaining structural rigidity.
Q: Are inflatable tents good for trade shows?
A: Yes, for most exhibitors. The setup speed (5-8 minutes vs. 30-60 for pop-ups), visual impact, and wind resistance make them attractive options. They’re particularly good for outdoor shows and brand activations where you want maximum visibility. The main considerations are the higher cost and the need for electrical power for the blower.
Q: How do you anchor an inflatable tent outdoors?
A: Use a combination of stakes (12-inch or longer) for grass or soft ground, sandbags (25-50 lbs per corner) for hard surfaces, and water barrels for high-wind situations. Always anchor all corners and any additional tie-down points. Proper anchoring is essential—an unanchored inflatable tent is a sail that can be carried away by gusts.
Tham Khảo
1. Outdoor Trade Show Inflatable Tent: 2026 Buyer’s Guide – KCCE Event
2. 9 Branded Inflatable Tent Designs That Will Inspire Your Next Outdoor Event Activation – TentCraft
3. Custom Inflatable Buying Guide – Lush Banners
4. 充气活动帐篷 – Creative Structures Worldwide
How to Choose the Right Inflatable Tent Size and Shape
Let me walk you through how I help clients pick the right size, because honestly, most people get this wrong on the first try. They either buy the smallest thing that fits their booth space, or they overspend on a massive structure they don’t need.
Start with your booth dimensions, not your ego. Standard trade show booth spaces are 10×10, 10×20, and 20×20. But here’s the thing—I’ve seen too many exhibitors buy a 10×10 inflatable and then realize they have no room for a demo table, a lead capture station, and a small meeting area. If you need any of that, go 10×20. It’s that simple.
Think about height and layout. Most inflatable tents have a peak height between 10 and 12 feet. That’s fine for standard banner hanging and ceiling lighting rigs. But if you’re in the automotive or heavy equipment space, you might want a higher peak—some custom structures go up to 16 feet. Also consider the footprint: do you need a single open room, or would a partitioned layout—say, a front demo area with a back meeting room—serve you better? Several manufacturers, including companies like Inflatable Images and Airquee, offer modular designs with removable interior walls.
Custom shapes are a real option. I’ve seen custom inflatable tents designed to look like shipping containers, soda cans, and even giant product replicas. If you’re launching a new product and want the tent itself to be the centerpiece, a custom shape is worth exploring. Lead times are typically 4 to 6 weeks, and you’ll pay a 30-50% premium over a standard rectangular tent of similar size. But for a flagship launch or a major annual show, that investment can pay for itself in foot traffic alone.
My advice: if you’re between sizes, go up. The extra space costs less than you think compared to the cost of a cramped, uninviting booth. And always confirm your show’s maximum booth height and size restrictions before you order—I’ve seen exhibitors get turned away at the door because their structure exceeded the venue’s limits.
Customization Options: Printing, Lighting, Flooring, and Accessories
This is where inflatable tents really shine. A standard pop-up gives you a printed header and maybe some side walls. An inflatable gives you a full 3D brand experience.
Full-surface dye-sublimation printing is the standard for quality inflatables. Unlike vinyl stickers that peel and fade, dye-sublimation infuses the ink into the fabric itself. The result: colors that stay vibrant for years, even with regular use. You can print edge-to-edge on the entire tent, including the roof. Pricing for full printing on a 10×10 runs about $500 to $1,500 depending on complexity and the number of colors.
LED lighting packages are worth every penny. I recommend battery-operated LED rope lights that run along the interior beams—they cost $200 to $600 and dramatically improve the ambiance. If you need brighter, even illumination for product displays, consider LED strip lighting on the ceiling. Just remember: some venues have strict electrical requirements, so check your show’s exhibitor kit before you invest in a high-wattage system.
Flooring matters more than you think. Concrete floors are hard on your feet and look unprofessional. Interlocking foam floor tiles run about $1.50 per square foot. Carpet tiles are pricier at $3 to $6 per square foot but look more premium. Some exhibitors go with custom-printed vinyl flooring that continues their brand design onto the floor—that’s a $10 to $20 per square foot investment that really wows visitors.
Accessories that make a difference: inflatable side walls with clear vinyl windows, back walls printed with your brand story, table covers that match your tent’s design, and custom inflatable arches at the entrance. Handheld blowers for quick inflation and repair patch kits are must-haves. I also always recommend ordering a spare blower—they’re around $150 to $300, and a blower failure mid-show is a nightmare you don’t want to experience.
Step-by-Step Setup and Takedown Guide
Let me give you the exact process I use, with real time benchmarks. For a 10×10 inflatable tent, plan on 10 minutes with two people your first time. Once you’ve done it a few times, you’ll get it down to 5 to 7 minutes.
Setup (10-12 minutes, 2 people):
- Unpack and lay flat (1-2 minutes). Remove the tent, blower, and ground stakes from their bags. Lay the tent flat on the ground where it will stand, making sure the printed side is facing up and the air inlet is accessible.
- Connect the blower (1 minute). Attach the blower duct to the tent’s inlet valve. Make sure the connection is tight—most systems have a locking collar or strap. Ensure the blower is on solid, level ground.
- Inflate (2-3 minutes). Turn on the blower. The tent will start to rise. Guide the beams gently as they fill to make sure they don’t catch on each other. Do not force anything—if a beam looks misaligned, just reposition it as it fills.
- Anchor the tent (3-4 minutes). Once fully inflated, immediately stake down all corners. Use the included ground stakes for outdoor shows, or sandbags (40 lbs per corner is my minimum) for indoor shows where staking isn’t allowed. I’ve seen too many tents tip over because someone skipped this step.
- Add accessories (2-3 minutes). Attach side walls, back walls, and table covers. Set up any interior furniture. Run your electrical connections. Done.
Takedown (8-10 minutes, 2 people):
- Remove accessories (1-2 minutes). Take off side walls, table covers, and any loose items.
- Deflate (2-3 minutes). Turn off the blower and open the deflation zippers or valves. Do not force the air out by pushing down on the tent—let it deflate naturally to avoid stressing the seams.
- Fold properly (3-4 minutes). Fold the tent in a systematic accordion pattern, following the manufacturer’s guidelines. Proper folding prevents creases and extends the life of your print. Never just stuff it into the bag.
- Pack and store (1-2 minutes). Place the folded tent, blower, stakes, and accessories into their designated bags. Store in a dry, climate-controlled space.
Troubleshooting common issues:
- Tent won’t fully inflate: Check for a kinked air duct or a leak in the beam. Listen for hissing sounds and feel along the seams. Use your patch kit for small punctures.
- Tent leans to one side: One beam is likely under-inflated. Check the blower connection and make sure the inlet isn’t blocked.
- Blower overheats: Ensure the blower has adequate airflow around it. Clean the intake vent regularly.
Maintenance, Storage, and Repair Tips
I’ve seen inflatable tents that look brand new after five years of heavy use, and I’ve seen tents that look like they survived a war after two shows. The difference is almost always maintenance.
Vệ sinh. After every show, wipe down the tent with a mild soap solution and a soft cloth or sponge. Don’t use harsh chemicals or pressure washers—they’ll degrade the PVC coating and fade your print. For stubborn dirt, use a soft-bristle brush. Always let the tent dry completely before packing it away. I can’t stress this enough: storing a damp tent is the fastest way to get mold and mildew, which will ruin the fabric and void your warranty.
Blower care. Your blower is the heart of your system. Keep the intake vents clean—a blocked vent causes overheating and premature motor failure. Check the power cord for frays before every show. Most blowers are rated for continuous operation for 8 hours, but I still recommend giving it a break during lunch breaks if you can. Keep a spare blower in your kit.
Bộ sửa chữa. Every inflatable tent should ship with a patch kit. Make sure you know how to use it before you’re on-site. The process is simple: clean the area around the puncture, apply the adhesive, place the patch, and apply pressure for 60 seconds. For larger tears, you’ll need to send the tent to a professional repair service. Most manufacturers offer this, and it’s much cheaper than buying a new tent.
Extending lifespan. Store your tent in its bag in a climate-controlled environment. Extreme heat and cold will degrade the PVC over time. When you’re setting up, make sure the ground is clear of sharp objects. Use a ground tarp if you’re on rough surfaces. And always follow the manufacturer’s inflation pressure guidelines—over-inflating stresses the seams.
With proper care, a quality inflatable tent should last 5 to 7 years with regular trade show use. That’s a significant ROI when you spread it over the tent’s lifetime.
Cost Analysis: Buying vs Renting Inflatable Tents
Should you buy or rent? I’ve done both, and here’s the honest answer: it depends on how often you exhibit and how long you plan to use the same design.
Chi phí thuê for a 10×10 inflatable tent run $300 to $800 per show, depending on whether you need custom printing and accessories. For a 10×20, expect $600 to $1,500. If you exhibit 2 to 3 times per year, renting makes sense in the short term—you don’t tie up capital, and you can change your design for each show.
Buying costs start around $1,500 for a basic 10×10 and go up to $8,000+ for a fully customized 20×20. Add another $500 to $2,000 for printing, lighting, flooring, and accessories. If you exhibit 4 or more times per year, buying pays for itself within 1 to 2 years.
Hidden costs of buying: shipping to each show (typically $100 to $300 per event via freight), storage between shows, maintenance and repair supplies, and the risk of design obsolescence. Hidden costs of renting: rental fees add up, you’re limited to the rental company’s design options, and you have no equity at the end.
Here’s my general rule: if you’re going to exhibit at the same show or a similar circuit more than 3 times in the next 2 years, buy. If you’re doing a one-off event or testing a new market, rent.
| Loại lều | Initial Cost | Annual Maintenance | 5-Year Total Cost | Thời gian lắp đặt | Tuổi thọ |
|---|---|---|---|---|---|
| Lều bơm hơi | $2,500-$5,000 | $200-$400 | $3,500-$7,000 | 5-10 min | 5-7 năm |
| Frame (metal) | $1,500-$4,000 | $300-$500 | $3,000-$6,500 | 30-45 min | 3-5年 |
| Pop-up | $300-$1,500 | $200-$300 | $1,500-$3,000 | 15-30 min | 2-3 years |
5-year lifecycle cost includes purchase/rental, maintenance, and replacement costs. Based on 4 shows per year.
Where to Buy and What to Avoid
I’ve had good experiences and bad experiences with inflatable tent suppliers. Here’s what I’ve learned.
Red flags to watch for:
- Unbelievably low prices. If a 10×10 inflatable is listed at $500, it’s probably a cheap import with thin PVC, weak seams, and poor print quality. You’ll end up replacing it within a year. Quality costs money.
- No wind rating or fire certification listed. Legitimate manufacturers will proudly display their NFPA 701 fire certification and ASTM D751 fabric strength ratings. If they don’t, ask. If they can’t provide documentation, walk away.
- No warranty. A quality inflatable tent should come with at least a 1-year manufacturer’s warranty covering seams, zippers, and blower. Some premium brands offer 2 to 3 years. No warranty is a huge red flag.
- Poor communication. If the supplier takes days to respond to your pre-sale questions, imagine how they’ll handle a warranty claim mid-show season.
Quality guarantees to look for:
- NFPA 701 fire certification (required by most venues)
- ASTM D751 for fabric strength and tear resistance
- UV-resistant and waterproof PVC or TPU-coated fabric
- Double-stitched, heat-welded seams
- Industrial-grade blower with a continuous-duty motor
Shipping considerations. Most inflatable tents ship in a rolling bag that’s about 3 feet long and 18 inches in diameter. Shipping a 10×10 tent via ground freight typically costs $100 to $200. For international shows, be aware of customs and duties. Inflatable tents fall under HS code 6306.22, which covers “tents of synthetic fibres.” The duty rate varies by country—typically 5-12% of the declared value. Always confirm the HS code with your supplier and freight forwarder, as misclassification can cause delays and penalties.
我的推荐: stick with established manufacturers like KCCE Event, TentCraft, Inflatable Images, or Airquee. They’ve been in the industry for years, have verifiable certifications, and stand behind their products. It’s worth paying a little more for that peace of mind.
Rental vs Purchase Decision Matrix
To make the buy-vs-rent decision even clearer, here’s a simple matrix I use with clients:
| Yếu tố | Rent | Buy |
|---|---|---|
| Shows per year | 1-2 | 4+ |
| Budget for upfront costs | Thấp | Trung Cao |
| Need for custom design | Every show different | Consistent brand |
| Storage space available | N/A | Có |
| Design changes frequently | Có | Không |
| ROI timeline | Ngay lập tức | 1-2 years |
| Maintenance responsibility | Rental company | You |
| Tax implications | Deductible expense | Depreciable asset |
Case studies from specific industries:
- Medical device company at a national conference. They exhibited at 6 shows per year with the same booth design. Bought a custom 10×20 inflatable for $6,500. At an average rental cost of $1,200 per show, they broke even in 5 shows. Plus, their branded inflatable with integrated lighting drew noticeably more traffic than their previous frame tent.
- Tech startup at regional events. They exhibited at 8 regional shows in their first year but with different messaging for each market. Rented a 10×10 with custom printing at $400-$600 per show. Total rental costs were under $5,000—much less than the $8,000+ they would have spent on a custom inflatable they’d have to reprint anyway.
- Automotive parts manufacturer at international trade shows. They bought a 20×20 inflatable for $12,000 including full printing and LED lighting. They exhibit at 5 international shows per year. Even with shipping costs of $400-$600 per show and customs fees (HS code 6306.22, duty rates varying by country), the tent paid for itself in 2 years. The structure’s visual impact at overseas shows—where their competitors were using standard pop-ups—was a major factor in their lead generation.
Accessibility and ADA compliance. One thing many exhibitors overlook is accessibility. The Americans with Disabilities Act (ADA) requires that your booth be accessible to all attendees. For inflatable tents, this means:
- Doorways and entrances must be at least 32 inches wide for wheelchair access. Most inflatable tents have entrances that meet this, but check the spec before ordering.
- Aisle widths inside the booth should be at least 36 inches, ideally 42-48 inches for comfortable navigation.
- Flooring should be firm and level. Inflatable tents on hard ground are fine, but if you’re on grass or uneven surfaces, use a rigid flooring system to create a stable, level surface.
- Lighting and signage should not create glare or obstruction for visually impaired visitors. Keep signage at eye level and ensure pathways are clear.
Failing to comply with ADA can result in fines and negative publicity. It’s not just a legal requirement—it’s good business. An accessible booth welcomes more visitors and sends a positive message about your brand.







