

You’ve seen them at trade shows, music festivals, and highway-adjacent car dealerships—those massive, air-filled structures that seem to defy gravity while shouting a brand name across three lanes of traffic. Now you’re pricing one for your own business, and you’ve probably hit the same wall I hit when I first started sourcing these things: every supplier hides pricing and specs behind a “Request a Quote” form, and the few that do publish numbers give you ranges so wide they’re useless. I’ve been in the inflatable and event marketing industry for years, and I’ve watched buyers—smart, experienced marketing directors—get burned by cheap imports and overpriced middlemen. That’s exactly why I put together this neutral, spec-by-spec guide to buying a custom inflatable advertising tent, so you can walk into negotiations with confidence, not guesswork.
Quick Answer
A custom inflatable advertising tent is an air-supported, pole-free branded shelter that uses a continuous low-pressure blower to stay upright, offering tall printing real estate and a setup time often cited as 5–10 minutes, with typical costs varying by size, material, and complexity.
Why Choose a Custom Inflatable Advertising Tent Over a Frame Canopy
Let’s get one thing out of the way first: the inflatable canopy vs frame tent debate isn’t as one-sided as the marketing brochures make it seem. I’ve sold both, used both, and watched both fail spectacularly in the field. Here’s the real breakdown.
Frame canopies—the classic pop-up with aluminum poles and a fabric top—have been the industry workhorse for decades. They’re cheap, familiar, and every event staffer knows how to set one up. But they have a fundamental problem that no amount of engineering can fix: poles. Those metal frames are exactly what snaps in high winds, and more importantly, they’re a safety hazard in high-traffic areas. I’ve seen a gust of wind catch a 10×10 frame tent and send the whole thing—poles and all—cartwheeling through a crowded festival. Nobody got seriously hurt that day, but it was a lawsuit waiting to happen.
A custom inflatable advertising tent eliminates that risk entirely because there are no rigid poles. The structure is held up by air pressure, which means when wind hits it, the tent flexes and absorbs the force rather than fighting it. That’s not just my opinion—it’s the core structural difference that makes inflatables the safer choice for events with heavy foot traffic. Think about it: if someone trips and falls into the side of an inflatable tent, they bounce off a cushioned fabric wall. If they trip into a frame tent, they hit an aluminum pole. The safety argument alone justifies the switch for family-oriented events.
Then there’s setup time. A frame canopy takes two people and about 20-30 minutes to assemble properly, with all those fiddly truss connectors and tension adjustments. An inflatable canopy tent takes one person and a blower. You unroll it, attach the blower hose, flip the switch, and walk away. In the time it takes your competitor to fight with their frame tent’s bent pole, you’re already handing out free samples under your fully-branded inflatable shelter. The setup speed difference isn’t just convenient—it translates directly to labor costs. If you’re paying event staff by the hour, cutting setup time by 75% is real money.
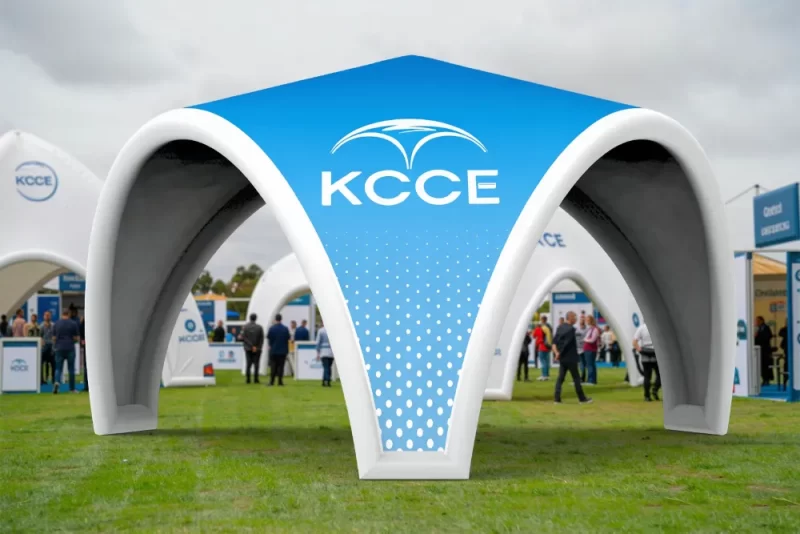
But here’s where inflatables really pull ahead: branding real estate. A standard 10×10 frame canopy gives you a printed top and maybe three sidewalls. An inflatable tent of the same footprint gives you massive, curved, unbroken print surfaces that rise 10 feet or more into the air. That’s not just a tent—that’s a billboard. According to TentCraft, a leader in branded inflatable structures, the style and silhouette of inflatable tents make them particularly effective at matching the “vibe” of high-energy athletic events, motorsport activations, active-lifestyle sponsorships, and music festivals. Frame canopies look like a vendor booth; inflatable tents look like an activation. There’s a difference, and audiences feel it.
One more thing: portability. I know that sounds counterintuitive—inflatable tents look bulky—but modern inflatable canopy tents pack down into a rolling duffel bag that fits in the back of a standard SUV. TentCraft even markets a model that fits in a backpack. Try that with a 10×10 frame tent and its bag of poles.
Key Materials: PVC, Nylon, and Vinyl Explained
Now we’re getting into the weeds, and this is where most buyers make their first mistake. They see “inflatable tent material” listed on a spec sheet and glaze over. Don’t. The fabric is the single biggest determinant of whether your tent lasts one season or five.
The three materials you’ll encounter are PVC, nylon, and vinyl, and they’re not interchangeable. Here’s what I’ve learned from years of sourcing and testing.
PVC (Polyvinyl Chloride) is the heavyweight champion of the inflatable world. It’s thick, durable, and has excellent resistance to punctures and abrasion. The downside is weight—PVC tents are heavy, and they require more powerful blowers to keep inflated. But for outdoor events where wind, sun, and rough handling are the norm, PVC is the safest bet. It also takes printing exceptionally well, especially with dye-sublimation, which we’ll get to in a minute. If you’re buying a tent for repeated outdoor use—think festival season, weekly farmers markets, or a summer-long sports sponsorship—PVC is your material.
Náilon is the lightweight alternative. It’s a woven fabric that’s strong for its weight, and it packs down smaller than PVC. The trade-off is durability. Nylon is more susceptible to UV degradation over time, and it’s less resistant to punctures. I’ve seen nylon inflatable tents look great out of the box, then start fading and weakening after a single season of intense summer sun. Nylon makes sense if you’re doing indoor events, one-off activations, or if weight is a critical factor for shipping and transport. For long-term outdoor use, I’d steer you away.
Vinyl is the middle ground, and honestly, the term gets thrown around loosely in this industry. True vinyl-coated polyester is what many mid-range inflatable tents use. It offers better UV resistance than nylon and better weight characteristics than heavy PVC. The print quality on vinyl is good, though not quite as vivid as dye-sub on PVC. In my experience, vinyl is the “good enough” option that works for most businesses—it balances cost, durability, and print quality without excelling at any single one.
Whichever material you choose, there are two coatings you should insist on. First, fire-retardant treatment. This isn’t optional—most venues require it, and reputable manufacturers treat it as standard. Second, UV-resistant coating. I can’t stress this enough. I’ve seen beautiful, expensive tents turn into faded, chalky shells after one summer because the buyer skimped on UV protection. The sun is brutal on inflatable fabrics, and UV-resistant coating is the difference between a tent that looks sharp for years and one that looks like it survived a war after six months.
Here’s a practical tip from the field: when you’re comparing quotes from suppliers, don’t just compare prices. Ask for the exact material specification, including the denier (fabric weight) and coating type. A supplier who can’t tell you whether their tent is 300D polyester or 610D PVC is a supplier who doesn’t know their own product. That’s a red flag.
Sizes, Shapes, and Custom Inflatable Advertising Tent Configurations
Size matters, and I don’t just mean in the obvious “bigger is better” way. The right size for your custom inflatable advertising tent depends on what you’re actually doing with it, and there’s a huge range of options between the standard sizes and fully custom dimensions.
Let’s start with the standards, because those are what most suppliers stock and what you’ll get the best price on. The 10×10 inflatable canopy is the industry baseline—it’s the same footprint as a standard frame pop-up, which makes it ideal for trade shows, vendor fairs, and events where you’re allocated a standard booth space. If you’ve been searching for an “inflatable canopy 10×10 for sale,” you’re looking at the most common configuration on the market. It’s a good starting point, but don’t assume it’s right for you just because it’s what everyone buys.
The 10×20 inflatable canopy is the next step up, and it’s where you start getting real branding impact. That extra 10 feet of length gives you room for a demo area, a seating zone, or a more generous product display, and it doubles your printing real estate on the sidewalls. For a 10×20, you’re looking at a setup that still fits one blower and can be handled by one or two people, but it’s noticeably more tent.
If you’re planning a 20×20 inflatable canopy, you’re in serious event territory. That’s a 400-square-foot structure that can host a substantial activation, a large product display, or a hospitality area. At this size, you’re likely looking at multiple blowers and a longer setup time, but the visual impact is undeniable. A 20×20 branded inflatable structure is a destination, not just a shelter.
Beyond the standard rectangles, there’s a whole world of custom inflatable canopy sizes and shapes. One of the most popular and versatile options is the inflatable arch. These are perfect for grand openings, race finish lines, and entrance statements. A 20-foot inflatable arch with your brand printed across the top creates a “you have arrived” moment that a flat banner simply can’t match. I’ve seen these used to spectacular effect at sports events, where they frame the athletes’ entrance and end up in every photo and broadcast shot.
Dome shapes are another popular configuration. An air dome tent offers a more enclosed, immersive environment, which makes it ideal for product launches, private lounges, or VR demonstrations where you want to control the lighting and atmosphere. Domes have a distinctive, modern silhouette that photographs well and creates social media buzz.
Tunnel shapes are the workhorses of the inflatable world. A tunnel can serve as a walkway, a product showcase, or a guided path through an activation. They’re also remarkably effective for advertising because they force people to walk through your branding. Think about it—when someone walks through a 30-foot branded tunnel, they’re immersed in your message for the entire walk. That’s engagement you can’t get from a flat banner.
For businesses that need something truly unique, fully custom inflatable decorations and shapes are available. I’ve seen brands create custom inflatable versions of their products—giant soda cans, enormous sneakers, oversized mascots. These aren’t tents in the traditional sense, but they serve the same advertising purpose and then some. A giant inflatable product is a photo magnet. It’s the kind of thing that gets people to stop, take pictures, and post them on social media, which is free advertising that money can’t buy. If you’re exploring this route, check out KCCE’s inflatable shapes for inspiration on how far you can push the concept.
Here’s my advice on sizing: don’t buy the biggest tent you can afford; buy the biggest tent your event schedule and storage space can handle. A 20×20 tent is impressive, but it’s a beast to store, transport, and set up. If you’re doing primarily 10×10 trade shows, a 20×20 tent is going to sit in your warehouse 90% of the year. Consider your actual event calendar before you commit to a size.
Printing Quality: How to Ensure Your Logo Looks Sharp
You could buy the best-made inflatable tent on the market, with the most durable PVC and the most powerful blower, and it would all be wasted if your logo looks like it was printed by a drunk pirate. Print quality is the difference between a professional brand activation and a yard sale. Let me walk you through how it actually works.
The industry standard for printing on inflatable tents is sublimação. Here’s the short version of how it works: your artwork is printed onto transfer paper using special sublimation inks, then heat and pressure are applied to transfer the design directly into the fabric’s fibers. The key word there is “into”—the ink becomes part of the fabric, not a layer on top of it. That means the print won’t crack, peel, or fade as easily as surface printing. Dye-sublimation produces vivid, full-color, photographic-quality prints that hold up remarkably well outdoors. If you want your logo to look sharp and your brand colors to pop, dye-sublimation is what you want.
The alternative is screen printing, which is an older technique where ink is pushed through a mesh stencil onto the fabric surface. Screen printing has its uses—it’s great for simple designs with limited colors, and it can be cost-effective for large runs. But for a custom inflatable advertising tent, where your brand is the whole point, screen printing usually falls short. It doesn’t handle gradients or photographic images well, and because the ink sits on the surface, it’s more prone to cracking and fading over time. I’d only recommend screen printing for the simplest, most text-heavy designs, and even then, dye-sub is usually the better choice.
Now, here’s the part that most buyers don’t think about until it’s too late: artwork requirements. Your logo might look fantastic on your website, but that doesn’t mean it’s ready for a 10-foot-tall inflatable wall. When a supplier asks for your artwork, they need a high-resolution vector file (usually AI, EPS, or PDF) or a very high-resolution raster file. If you send them a JPEG you downloaded from your own website—which is probably 72 DPI and a thousand pixels wide—they’re going to have to blow it up, and it’s going to look pixelated and blurry. I’ve had clients send me logos that were literally 200 pixels wide and expect them to look good on a 10-foot print. They didn’t.
Here’s the rule of thumb I give everyone: if your logo file is smaller than 1MB or less than 3000 pixels on its longest side, it’s probably not high-resolution enough for large-format printing. If you don’t have a vector version of your logo, get one made before you start shopping for a tent. A good graphic designer can recreate your logo as a vector file, and it’s worth every penny because it’s a one-time investment that you’ll use for everything—signage, banners, vehicle wraps, and yes, your inflatable tent.
When you’re comparing suppliers, ask about their printing process and their artwork requirements upfront. A reputable supplier will have a clear spec sheet for artwork files and a process for reviewing your design before production. They should also provide a digital proof—a mockup of what your tent will look like—for your approval before they start printing. If a supplier doesn’t offer a proof, or if they don’t ask about your artwork quality, that’s a red flag. They’re either going to print whatever you send them (and blame you when it looks bad) or they’re cutting corners.
One more printing tip: be careful with small text and fine details. A logo that looks sharp on a business card might be unreadable when scaled up to 10 feet, and conversely, text that’s too small will be illegible from a distance. The general rule is that text on an inflatable tent should be large enough to read from at least 50 feet away. If you’re cramming a lot of text onto the tent, you’re wasting your money—nobody’s going to walk up and read a paragraph on your tent’s sidewall. Keep it simple, keep it bold, and let the visual impact do the work.
Blowers, Anchoring, and Setup Time
Here’s a question I get all the time: “How long does it take to set up an inflatable canopy tent?” And the honest answer is: it depends entirely on the blower and your anchoring strategy. Get these two things right, and setup is genuinely 5-10 minutes. Get them wrong, and you’ll be wrestling with a deflated mess while your event starts without you.
The blower is the heart of your inflatable tent. Without it, you just have a very large, very colorful pile of fabric. Most inflatable tents use a low-pressure, high-volume blower that runs continuously to keep the structural beams inflated. The key spec to look at is wattage. A typical blower for a 10×10 inflatable canopy is often around 500-600 watts. Larger tents may need more powerful blowers—a 10×20 might need 900 watts or more, and a 20×20 could require two blowers running simultaneously. Don’t skimp on blower power. If your blower is underpowered, the tent will sag, look deflated, and be more susceptible to wind damage. It’s false economy to save $50 on a weaker blower and then watch your $3,000 tent flop around pathetically.
Now, about continuous vs. intermittent operation. Here’s the thing: your blower is designed to run continuously for hours, but that doesn’t mean it should run forever without a break. Most quality blowers have a duty cycle, and you should follow the manufacturer’s recommendations. In practice, for a full-day event, the blower runs the entire time. That’s normal. The blower is also the noisiest part of your setup, so if you’re doing an indoor event or a quiet activation, you’ll want to position the blower strategically or consider a model with sound dampening.
Setup time is where inflatables shine, and I’ve timed this more times than I can count. For a 10×10 inflatable canopy tent, here’s the actual sequence: unroll the tent from its carrying case (1-2 minutes), lay it out in the correct orientation (1 minute), attach the blower hose to the inflation valve (30 seconds), turn on the blower (5 seconds), stake down the corners (2-3 minutes), and you’re done. Total: 5-7 minutes with one person. For a larger tent, add a few minutes and maybe a second person. Compare that to a frame canopy, which I’ve seen take 20-30 minutes with two people, and the time savings are obvious.
But here’s the catch: setup speed doesn’t matter if the tent isn’t secure. Anchoring is the most overlooked aspect of inflatable tent ownership, and it’s the difference between a successful event and a disaster. Let me tell you, there’s nothing quite like watching a beautiful inflatable tent lift off and tumble across a parking lot because someone decided the stakes included with the tent were “good enough.”
The standard anchoring method is stakes driven through the tent’s anchor loops into the ground. This works well on grass or soft soil. But here’s the thing—most event venues in the summer have hard, dry ground, and standard stakes won’t penetrate. You’ll need heavy-duty stakes, and you’ll need a mallet, and you’ll be sweating before the event even starts. For hard surfaces like concrete or asphalt, you’ll need sandbags or water barrels attached to the anchor points. Some suppliers offer weighted base plates that the tent’s legs or anchor loops attach to. These are more expensive, but they’re the most reliable option for hard surfaces.
Now, about wind ratings. This is a spec that gets thrown around a lot, and I want you to be skeptical of any supplier that promises their tent will withstand a hurricane. The honest truth is that inflatable tents are wind-resistant, not wind-proof. A well-anchored inflatable canopy can typically handle moderate winds, and some heavy-duty models claim higher ratings. But here’s the professional’s rule: if the forecast calls for sustained winds over 25 mph, you should have a plan to take the tent down. Inflatable tents flex in the wind, which is their strength, but they’re not indestructible. I’ve seen tents that were rated for 40 mph winds get shredded in a sudden gust because the anchoring wasn’t sufficient. The tent’s wind rating is only as good as its anchoring.
Here’s a practical anchoring tip: always carry extra stakes and sandbags, even if you think you won’t need them. Event venues change, and you might end up on a surface you didn’t expect. And always, always check the weather forecast before you leave for an event. If high winds are predicted, bring extra anchoring gear, or consider whether the event is worth the risk to your tent.
How Much Does a Custom Inflatable Advertising Tent Cost?
Let’s talk money, because this is the question everyone really wants to ask but is afraid to. I’ve seen custom inflatable tent prices range from under a thousand dollars to over ten thousand, and the spread can feel like a scam if you don’t understand what you’re paying for.
Let’s start with the baseline. According to the smart buying guide from KCCE, a printed basic inflatable tent—standard 10×10 or 10×20 shape, 300D polyester fabric, and single-color or simple logo printing—typically costs in a range that depends on the supplier and options. That’s your entry point, and honestly, for many small businesses, that’s the sweet spot. You get a branded, air-supported shelter that delivers about 80% of the visual impact of a fully custom inflatable structure at 40-60% less cost.
Now, what makes the price go up? The same factors that affect any custom product: size, material, and complexity. A 10×10 inflatable canopy in basic polyester with simple printing is at the low end of that range. A 20×20 inflatable canopy in heavy-duty PVC with full-color, edge-to-edge dye-sublimation printing is likely to be significantly more expensive than basic models, with costs varying widely by manufacturer. And if you’re getting a fully custom shape—an inflatable arch, a dome, a giant product replica—you’re in a completely different price category. Custom inflatable decorations and shapes can be quite expensive, depending on size and complexity.
Here’s the thing about custom inflatable cost that most buyers don’t realize: the quoted price is never the final price. There are hidden costs that you need to account for in your budget, and I’ve seen too many marketing managers get blindsided by them.
First, the blower. Some suppliers include a blower in the quoted price; many don’t. A quality blower costs varies depending on wattage and quality. Always ask whether the price includes a blower, because if it doesn’t, that’s a significant added cost.
Second, the carrying case. You’d think a carrying case would be included with a $2,000 tent, but you’d be wrong. A proper rolling duffel bag for an inflatable tent can cost a variable amount depending on size and quality. It’s not a huge cost, but it adds up.
Third, the repair kit. Inflatable tents get punctured. It’s not a matter of if, but when. A basic repair kit with patches and adhesive costs a modest amount, varying by brand and contents. and you should absolutely have one on hand at every event. Some suppliers throw one in; most don’t.
Fourth, shipping. This is the big one that nobody thinks about. Inflatable tents are bulky and heavy, and shipping costs can be substantial, especially for larger tents or international orders. Shipping quotes can be a significant percentage of the tent’s price, depending on the carrier and distance. Always ask for a delivered price, not just an FOB (freight on board) price.
Fifth, custom artwork preparation. If your logo isn’t already a high-resolution vector file, you’ll need to pay a designer to create one. This can cost a variable amount depending on the complexity of your logo.
So, when you’re budgeting for a custom inflatable tent, add 20-30% to the quoted price to cover these extras. A tent quoted at $2,000 may end up costing more by the time you have it in hand, fully equipped and ready to use, depending on shipping, taxes, and accessories.
Here’s my honest take on pricing: don’t buy the cheapest tent you can find, and don’t buy the most expensive. The cheapest tents are cheap for a reason—thin materials, weak blowers, poor printing, and no customer support. The most expensive tents are often overpriced for what they are, trading on a brand name rather than superior quality. The sweet spot is the middle: a well-made tent from a reputable manufacturer with good material specs and strong print quality. That’s where you get the best value for your money.
Top 5 Custom Inflatable Advertising Tent Suppliers Compared
I’ve been in this industry long enough to have worked with, or at least researched, most of the major players in the custom inflatable tent space. Here’s my honest, no-holds-barred comparison of five suppliers that consistently come up in conversations and searches. I’m going to score each on price transparency, material quality, and print accuracy—the three things that matter most to buyers.
Dossel Extremo is one of the biggest names in the canopy and tent space, and they’ve expanded into inflatables aggressively. Their strength is their scale—they have massive production capacity, which means they can handle large orders and offer competitive pricing. Their website is reasonably transparent about pricing, with product pages that show starting prices rather than just “Request a Quote.” Material quality is solid, though they tend to use more standard fabrics rather than offering premium options. Print quality is good, especially for the price point. My main criticism: their customer service can be slow during peak season, and they’re less willing to do truly custom shapes. For standard 10×10 and 10×20 inflatable canopies, they’re a solid choice.
Deluxe is another big player, and they’ve been around long enough to have a strong reputation. Their inflatable tents are known for durability, and they use quality materials that hold up well over time. Pricing is mid-range—not the cheapest, but not the most expensive either. They’re reasonably transparent about pricing, though you’ll still need to request a quote for custom work. Print quality is excellent, with vivid colors and sharp detail. Their weakness is lead time—they can be slow, especially for custom orders. If you’re planning an event and need a tent in a hurry, Deluxe might not be your best bet.
Impact is the a real brand from current market see most often at trade shows and events, which tells you something about their market penetration. They offer a wide range of inflatable products, from basic canopies to fully custom shapes. Pricing is competitive, and they’re more transparent than most—their website has a decent amount of pricing information. Material quality is good, though not exceptional. Print quality is solid, with good color accuracy. Their main selling point is their product range and their willingness to do custom work. If you need something beyond a standard canopy—an arch, a dome, a custom shape—Impact is worth talking to.
Instant Promotion is a smaller player, but they’ve carved out a niche in the promotional products space. Their inflatable tents are well-made, and they offer good customization options. Pricing is competitive, though their website is less transparent about costs than the bigger players. Material quality is good, and their print quality is above average. Their strength is their focus on promotional products—they understand branding and marketing, and it shows in their work. Their weakness is scale; they can’t handle the volume that the bigger players can, so lead times can be longer for large orders.
OakPedion is the niche vendor on this list, and I’m including them because they keep showing up in searches for inflatable canopies. They offer a range of inflatable products, including the increasingly popular OakPedion inflatable canopy, and they have a reputation for good quality at reasonable prices. Their website is more transparent about pricing than most, which I appreciate. Material quality is good for the price point, and print quality is solid. They’re a good option if you’re looking for a reliable mid-range supplier and don’t need the absolute highest-end materials.
Now, here’s my honest advice about supplier selection: don’t rely solely on my list or any other list. The best way to evaluate a supplier is to order samples. Most reputable suppliers will send you material swatches and print samples for a nominal fee, and that’s money well spent. Feel the fabric, look at the print quality up close, and test the durability. A supplier’s website can tell you a lot, but nothing beats holding the actual material in your hands.
Also, do your homework on the supplier’s track record. Look for reviews from other customers, ask for references, and check how long they’ve been in business. The inflatable tent industry has a lot of fly-by-night operations, especially from overseas, and you don’t want to be left holding the bag—or the deflated tent—when a supplier disappears.
One more thing: beware of sponsored reviews and influencer recommendations. I’ve seen a lot of “honest reviews” of inflatable tents that are clearly paid promotions. The social media space is full of people shilling for whoever pays them. Take any review with a grain of salt, and look for independent, detailed reviews from people who actually bought and used the product. The best reviews are the ones that mention specific flaws and problems, not just glowing praise.
Maintenance, Repair, and Lifespan
You’ve made the investment, you’ve used your custom inflatable advertising tent at a dozen events, and now you’re wondering: how long is this thing going to last? The honest answer is 3-5 years with proper care, and I’ve seen well-maintained tents go even longer. But “proper care” is doing a lot of work in that sentence. Here’s what you actually need to do.
Limpeza is the most important thing you can do to extend the life of your inflatable tent. Every time you use it, it picks up dirt, dust, grass, pollen, and whatever else is floating around the event. If you pack it away dirty, that dirt acts like sandpaper, grinding against the fabric fibers and wearing them down over time. It also provides a breeding ground for mold and mildew, which can ruin a tent in a single season.
Here’s my cleaning routine: after every event, before you deflate and pack the tent, wipe down the exterior with a soft cloth or sponge and a mild soap solution. Pay special attention to the areas where dirt accumulates—the bottom edges, the corners, and any areas that touched the ground. Rinse thoroughly with clean water and let the tent dry completely before packing it away. I can’t stress the drying part enough. Packing a damp inflatable tent is a guaranteed way to get mold, and mold is a death sentence for inflatable fabrics.
For tougher stains, you can use a soft-bristle brush and a stronger cleaning solution, but avoid harsh chemicals and solvents. They can damage the fabric’s protective coatings. And never, ever use a pressure washer on an inflatable tent. The high-pressure spray can force water through the fabric’s seams and weaken the material.
Armazenamento is the second most important factor in tent longevity. Inflatable tents should be stored in a cool, dry place, away from direct sunlight and extreme temperatures. UV radiation is the enemy of inflatable fabrics—it breaks down the material over time, causing fading and weakening. If you’re storing your tent in a garage or shed, make sure it’s in its carrying case and off the floor, preferably on a shelf or pallet. And don’t store it compressed under heavy objects. The fabric needs to breathe.
Reparos are inevitable. You will get a puncture. It might be a stray nail at a construction site, a sharp rock at a festival, or a clumsy vendor with a box cutter. When it happens, don’t panic. Inflatable tent repair is straightforward if you catch it early. Most suppliers include a repair kit with your tent, and if they don’t, buy one. A basic kit includes adhesive and patches of matching fabric.
Here’s the repair process: clean the area around the puncture thoroughly, apply the adhesive to both the patch and the tent surface, press the patch firmly into place, and let it cure for the recommended time (usually 24 hours). For larger tears, you might need to patch both sides of the fabric, and for holes near seams, you might need professional repair. The key is to catch punctures early—a small hole that you ignore can become a large tear when the tent flexes in the wind.
One thing I always tell my clients: check your tent for damage before every event, not just after. Do a quick visual inspection of the fabric, seams, and inflation valves. Look for any signs of wear, loose threads, or small holes. It takes five minutes, and it can save you from a catastrophic failure in the middle of an event.
The lifespan of your tent also depends on how often you use it. A tent that’s used once a month will last much longer than a tent that’s used every weekend. If you’re running a high-volume event schedule, expect to replace your tent every 2-3 years. If you’re using it occasionally, 5 years is realistic. And here’s a pro tip: if you’re using your tent heavily, consider buying a second blower as a backup. Blowers are the most likely component to fail, and a spare blower costs a fraction of a new tent. It’s insurance against a ruined event.
Perguntas Frequentes
Q: How much does it cost to get a custom inflatable?
R: Basic printed inflatable tents typically range from $900 to $2,500, according to industry pricing guides. This covers standard 10×10 or 10×20 shapes in polyester with simple logo printing. Fully custom shapes, larger sizes, and premium materials like heavy PVC can push costs to $5,000-$20,000 or more. Always factor in hidden costs like blowers, carrying cases, and shipping.
P: Onde posso encontrar tendas infláveis personalizadas?
R: Reputable suppliers include Extreme Canopy, Deluxe, Impact, Instant Promotion, and OakPedion, each offering different strengths in pricing, materials, and customization. You can also search for “custom inflatable tent near me” or “custom inflatable tent manufacturer” to find local options. For a broader selection, check wholesale suppliers and manufacturers that specialize in event marketing structures. If you’re researching options, you might also want to look at KCCE’s inflatable tents lineup to see what configurations are available.
Q: How much does a custom pop-up tent cost?
R: Standard custom pop-up frame tents typically cost less than inflatable models, with prices varying by size and printing. However, inflatable tents offer more branding real estate and faster setup, which justifies the higher price for many businesses. The exact cost depends on size, material quality, and printing complexity.
P: Quais são as desvantagens das barracas infláveis?
R: The main drawbacks are reliance on a continuous blower (which requires power and makes noise), vulnerability to punctures, and wind sensitivity. Inflatable tents also require more storage space than frame canopies when packed, and the blower adds to setup and teardown time. However, for most users, the branding impact and safety benefits outweigh these drawbacks.
Q: How long does an inflatable tent last?
R: With proper care, a quality inflatable tent can last several years, though the exact lifespan depends on usage and conditions. Regular cleaning, proper storage away from UV light, and prompt repair of punctures are the key factors in extending lifespan. Heavy usage—such as every weekend events—may shorten the lifespan, while occasional use can extend it.
Q: Can inflatable tents withstand wind?
R: Inflatable tents are wind-resistant, not wind-proof. Well-anchored models typically handle winds up to 25-30 mph, with some heavy-duty models claiming higher ratings. Proper anchoring with stakes, sandbags, or weighted base plates is critical. Always have a plan to take the tent down if sustained winds exceed 25 mph.
Q: What material is best for an inflatable advertising tent?
R: For outdoor events and long-term use, PVC is the best material due to its durability and puncture resistance. Nylon is lighter and more portable but less durable, making it better for indoor or occasional use. Vinyl offers a middle ground between the two. Always insist on fire-retardant and UV-resistant coatings regardless of material.
Q: How long does it take to set up an inflatable tent?
R: A standard 10×10 inflatable canopy tent sets up in 5-10 minutes with one person—unroll, attach the blower, inflate, and stake down. Larger tents like 10×20 or 20×20 take longer and may require two people and multiple blowers. This is significantly faster than frame canopies, which typically take 20-30 minutes.







