

You’ve seen them at festivals—those giant inflatable soda cans, towering arches, and cartoon mascots that seem to defy physics. They’re fun, they’re flashy, and they draw crowds. But here’s the thing nobody tells you when you’re standing in the crowd: buying a custom shape inflatable tent for your brand is a completely different beast. It’s not like picking up a pop-up canopy from the big-box store on your way to a weekend market. It’s a manufactured product, built to spec, with lead times, material specs, and a price tag that can make you blink twice.
I’ve been in the event and inflatable manufacturing space for years, and I’ve seen decision-makers make the same mistakes over and over. They see a cool shape at a trade show, get a quote that seems reasonable, and then get blindsided by freight costs, wind ratings they didn’t ask about, and a blower that burns out halfway through day two of a three-day activation. This guide is my attempt to fix that. I’m going to break down what custom shape inflatable tents actually cost, what you’re paying for, how long manufacturing really takes, and the pitfalls that vendors conveniently forget to mention. No fluff, no marketing speak—just the stuff I wish someone had told me before I signed my first PO.
Snel antwoord
A custom shape inflatable tent is a brand-specific, air-supported structure manufactured to your exact dimensions and graphics, typically costing anywhere from about $1,699 to over $4,499 depending on size and complexity, with a standard manufacturing turnaround of 15–40 days and wind resistance ratings often tested at 30–50 mph.
What Are Custom Shape Inflatable Tents?
Let’s get the definitions straight first, because “inflatable tent” gets thrown around loosely, and you don’t want to be the person who orders a dome when you needed a tunnel.
A custom shape inflatable tent is any air-supported structure that isn’t a standard, off-the-shelf geometric configuration. Think of the difference between a standard dome—which is basically a half-sphere—and something like a giant inflatable product replica of your company’s flagship energy drink can. The dome is standard. The can is custom. The tent part matters too: these aren’t just inflatables for decoration. They’re functional spaces with floors, walls, and roofs that people can walk into, stand under, and use for hours at a time.
The broader category splits into a few distinct types, and knowing the difference affects everything from price to setup time:
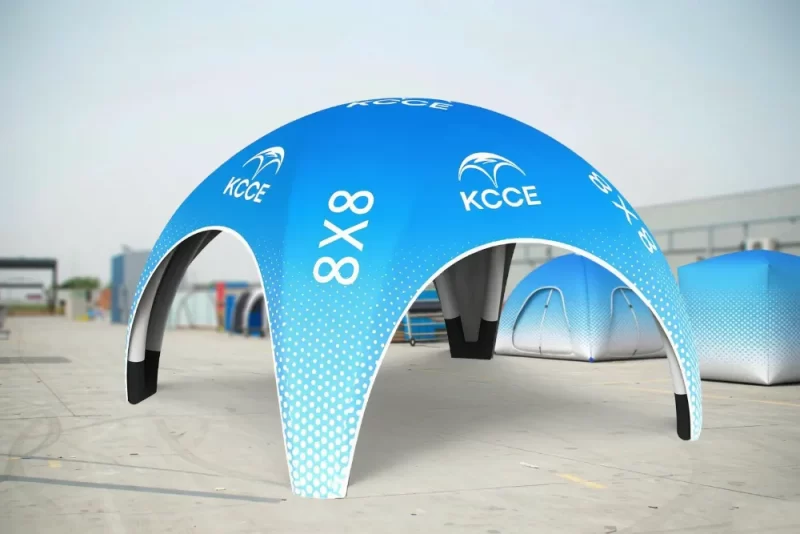
Airframe tents. These use inflatable beams—essentially large tubes of PVC-coated fabric—that form a rigid frame when pressurized. The fabric skin then drapes over or attaches to this frame. These are the workhorses of the event world. They handle wind better than most people expect, and they can span large areas without center poles, which is a huge advantage over traditional frame tents.
Inflatable arches and tunnels. These are the entry points, the race finishers, the product-launch reveals. They’re not really “tents” in the living-space sense, but they’re part of the same product family and often come from the same manufacturers. If you’re thinking about a custom inflatable canopy for an event entrance, this is the category you’re looking at.
Inflatable shade tents and gazebos. These are the more consumer-facing cousins—the inflatable canopy 10×10 setups you see at soccer sidelines and beach gatherings. They’re simpler, cheaper, and often less durable, but they serve a purpose for lighter-duty use.
The market for these structures is growing, and I don’t just mean anecdotally. According to a market analysis report from Future Market Report, the frame inflatable tent market is projected to reach a value of 455.80 million by 2033, with applications spanning events and exhibitions, recreational activities, emergency and medical use, military and defense, and sports and entertainment. That’s a lot of inflatable volume, and the custom shape segment is a meaningful slice of it.
The use cases for custom shapes specifically are where the magic happens. Brand activations are the most common—imagine a beverage company building a giant inflatable version of its bottle that people can walk through. Expos and trade shows use them to stand out in a sea of identical pipe-and-drape booths. Product launches use them for the “wow” factor that gets social media attention. And festivals use them because they’re portable, relatively quick to set up, and can be branded with full-bleed graphics that are visible from across the field.
Here’s a comparison worth holding onto. Traditional tents—pole tents, frame tents, the ones your rental company drops off—are structural. They’re built from metal and fabric, and they require trucks, labor, and time to assemble. An inflatable tent replaces the metal frame with air. That’s the fundamental shift. No poles to trip over, no center support columns blocking sightlines, and a setup time that drops from hours to minutes. The trade-off is that you’re relying on a blower running continuously, which is a different kind of risk than a bent pole.
Pricing: What Custom Shapes Actually Cost
Okay, let’s talk money. This is the part that frustrates everyone, because most vendors hide their pricing behind a “Get A Quote” button, and honestly, that might be the single most annoying thing about this whole industry. You’re the decision-maker. You’ve got a budget meeting Thursday. You need a number, not a sales pitch.
So here’s the realistic picture based on what’s actually being charged in the market right now, and I’m pulling this from a detailed cost analysis published by KCCE Event that breaks down real prices across common sizes.
For a 10×10 custom inflatable tent, you’re looking at a starting price around $1,699. This is the entry-level workhorse. It’s enough space for a small booth, a registration desk, or a product display. It fits on a standard 10×10 event space, which is the most common booth size at trade shows, so this is the size most first-time buyers start with.
Step up to 20×20, and the price jumps significantly. You’re now in the $2,500 to $3,500 range, depending on shape complexity and printing requirements. This size gives you room for a lounge area, a few tables, or a demo space. It’s a substantial presence on a show floor.
At 30×30, you’re in serious money territory. Expect to pay $4,000 to $4,499 and up. This is a structure that can host a crowd, with room for multiple zones, seating areas, and significant branding real estate. This is where the “inflatable tent cost” conversation gets real, because you’re not just buying a tent anymore—you’re buying a centerpiece.
Now, these are starting prices. The actual number on your quote depends on several factors:
Shape complexity. A square or rectangle is the cheapest shape. It’s all straight seams and simple panels. The moment you add curves, angles, or a shape that needs to look like something recognizable—a bottle, a can, a character—the engineering cost goes up. Each unique shape requires a custom pattern, which is essentially a 2D blueprint that gets cut from fabric and sewn together. More complex shapes mean more pattern pieces, more seams, and more labor.
Printing. Full-bleed, edge-to-edge graphics cost more than simple logos. The printing method matters too. Dye-sublimation printing is the industry standard for inflatable tents because the ink bonds with the fabric at a molecular level, which means it flexes with the material without cracking. Airbrushing is used for more artistic, gradient-heavy designs but is slower and more expensive. If you want your logo on all four sides plus the roof, expect to pay a premium.
Materials. This is where you can’t cheap out. The fabric weight, measured in ounces per square yard, directly affects durability and wind resistance. Heavier fabric costs more but lasts longer and handles wind better. I’ll get into the specifics in the materials section, but know that this is a line item where vendors sometimes try to quietly downgrade you.
The blower. Every inflatable tent needs a continuous-duty blower to stay standing. These aren’t the cheap inflatable mattress pumps from the camping aisle. A proper blower runs continuously for hours, and the CFM (cubic feet per minute) rating has to match the volume of your tent. Bigger tents need bigger blowers, and that’s a cost that’s easy to overlook.
Then there are the hidden costs that nobody puts on the first quote. Shipping is the big one. These tents are bulky, and freight can easily exceed $500 depending on the size and your location. Anchoring is another—you’ll need stakes, sandbags, or water barrels depending on the surface, and if your vendor doesn’t include those in the package, that’s an extra line item. Setup labor is worth budgeting for too. While the tent itself inflates in minutes, the anchoring and any interior setup (tables, chairs, flooring) takes time and people. And please, for the love of your event budget, don’t skip the repair kit and spare blower. I’ve seen a $3,000 tent rendered useless because a $40 patch kit wasn’t on hand when a seam split.
Manufacturing Timelines & Process
Here’s the thing about inflatable tent manufacturing that surprises most first-time buyers: it’s not like ordering a banner. You can’t get a custom shape in 48 hours. Well, you can, but you’ll pay rush fees that will make your finance department wince.
The standard turnaround for a custom shape inflatable tent is 15 to 40 days. That’s the honest range, and it depends on the vendor’s workload, the complexity of your shape, and whether you’ve locked down your design files. Let me walk you through the process so you understand where that time goes.
Step 1: Concept and 3D mockup. This is where a good vendor earns their keep. You provide your shape idea and your logo/graphics files, and they produce a 3D rendering of what the tent will look like. This is your chance to catch problems before any fabric gets cut. A vendor that doesn’t offer a free 3D mockup is a red flag—this is standard practice in the industry, and you should expect it. According to KCCE Event’s vendor comparison, several major vendors include this as a free service, and it’s a critical step for aligning on shape, proportions, and graphic placement.
Step 2: Approval and pattern making. Once you approve the mockup, the vendor’s pattern maker creates the 2D templates for every panel of the tent. This is technical work—each panel has to be cut to exact dimensions, with allowances for seams and the air chambers that give the tent its structure. For complex shapes, this can take several days.
Step 3: Material cutting and sewing. The fabric panels are cut, then sewn together. This is where the tent’s structure comes together. The seams are critical—they have to be strong enough to hold air pressure and withstand wind loads. Quality vendors use heat-sealed or welded seams for the main structural joints, not just stitching. Stitching alone can leak air at the needle holes.
Step 4: Printing. The graphics are applied to the fabric. For dye-sublimation, the design is printed onto a transfer paper, then heat-pressed onto the fabric. The ink becomes part of the fabric, so it flexes and bends without cracking. This is different from screen printing or vinyl application, which can peel or crack over time.
Step 5: Quality control. A good vendor tests every tent before it ships. This means inflating it to full pressure and checking for leaks, verifying that the blower is properly matched to the tent’s volume, and inspecting the printing for defects. Some vendors do this as a matter of course; others skip it to save time. You want the ones who don’t skip it.
Step 6: Shipping. The tent is deflated, folded, and packed into a carry bag. Depending on the size, it ships via freight carrier or parcel service. This is where the timeline can stretch—international shipments, customs clearance, and last-mile delivery all add days.
Red flags in this process are easy to spot once you know what to look for. A vendor with no mockup process is a no-go. A vendor who quotes a 7-day turnaround for a fully custom shape is either lying or cutting corners. A vendor who can’t tell you the fabric weight or blower CFM rating doesn’t know their own product.
One more thing on timelines: plan for the worst case. If your event is in six weeks and the vendor quotes 15-40 days, you’re cutting it close. Add a buffer. Order earlier than you think you need to. The cost of rushing is never worth the stress.
Materials & Build Quality Specs
Let’s get into the weeds on materials, because this is where the difference between a tent that lasts five years and one that falls apart after two events gets decided. And it’s also where vendors can quietly cut corners if you’re not paying attention.
The dominant material in the inflatable tent industry is PVC-coated fabric. You’ll also see polyester and nylon in lighter-duty products, but for commercial custom shape inflatable tents, PVC is the standard. The key spec is the fabric weight, measured in ounces per square yard (oz/yd²). Common weights range from 18 oz/yd² up to 24 oz/yd² or more for heavy-duty applications.
Here’s the thing: heavier isn’t always better, but it’s usually more durable. A 24 oz/yd² fabric is going to resist punctures and abrasion better than an 18 oz/yd² fabric, but it’s also heavier and harder to handle during setup. For a tent that’s going to be set up and torn down frequently, you want the heavier fabric. For a semi-permanent installation, you can go lighter.
The PVC coating is what gives the fabric its airtightness and weather resistance. It’s applied to a polyester or nylon base fabric, and the quality of that coating matters. Cheap PVC can become brittle over time, especially in cold weather or direct sunlight. Good PVC stays flexible and resists UV degradation.
Seam construction is the other critical spec. There are two main approaches: sewing and welding. Sewn seams are faster and cheaper, but the needle holes can leak air. Welded seams—where the fabric is fused together using heat or high-frequency radio waves—are airtight and stronger. For structural seams that hold the air chambers, you want welded construction. For non-structural seams like where the floor meets the wall, sewing is acceptable.
Now, the blower. This is the heart of the tent, and it’s the component most likely to fail if you cheap out. A continuous-duty blower is designed to run for hours on end without overheating. The CFM rating has to be matched to the tent’s internal volume—too low, and the tent will sag and struggle in wind; too high, and you’re wasting energy and putting unnecessary stress on the fabric.
For a 10×10 tent, you’re looking at a blower in the range of 400-600 CFM. For larger tents, you might need 800-1000 CFM or more. Here’s a pro tip: ask about dual-blower redundancy. Some commercial setups use two blowers, so if one fails, the tent stays standing. It’s an extra cost, but for a critical event where a tent collapse would be a disaster, it’s worth every penny.
One more thing on materials: the floor. Some custom inflatable tents come with an integrated inflatable floor, which creates a cushioned, insulated surface. Others have a simple fabric floor that lies flat. For events where people will be standing for hours, the inflatable floor is a nice touch. For trade shows where you’re setting up tables and displays, a flat floor is easier to work with.
Wind Resistance & Anchoring Requirements
This is the question I get more than any other: “Are inflatable canopies wind resistant?” And the answer is nuanced, because it depends on the tent, the anchoring, and the specific wind conditions.
Let’s be honest about the physics here. An inflatable tent is a big fabric balloon. It’s held up by air pressure, not by a rigid frame. That means wind exerts force on the entire surface area, and if that force exceeds the structural integrity of the tent or the anchoring system, something’s going to give.
That said, inflatable tents are more wind-resistant than most people expect. The air pressure inside creates a semi-rigid structure that can flex and absorb wind loads without permanent damage. A well-designed and properly anchored inflatable tent can handle sustained winds of 30-50 mph. That’s the real-world range, and it’s based on manufacturer testing and field experience.
But here’s the critical point: that wind rating is meaningless without proper anchoring. I’ve seen a $4,000 inflatable tent become a $4,000 kite because someone thought the blower alone would hold it down. It won’t.
The anchoring requirements depend on the surface:
Grass or soft ground: Stakes are your primary anchor. You’ll want heavy-duty stakes driven at an angle through the anchor loops on the tent’s base. The number of stakes depends on the tent size—a 10×10 might need 8-12 stakes, while a 30×30 could need 20 or more.
Paved or hard surfaces: Stakes won’t work, so you’ll need ballast. Sandbags are the standard option, typically 25-50 pounds each, placed on the base of the tent at regular intervals. Water barrels are a heavier-duty alternative. Some vendors offer anchoring systems specifically designed for their tents, and it’s worth asking about those.
Tie-downs: For larger tents or higher wind conditions, additional tie-down straps running from the tent’s structure to ground anchors can add stability. These are especially important for tall or oddly shaped tents that present more surface area to the wind.
Here’s the uncomfortable truth about wind ratings: they’re tested in controlled conditions, and real-world conditions are rarely controlled. Gusts, turbulence from nearby structures, and sudden direction changes can all stress a tent in ways that a steady-state test doesn’t capture. The industry standard is to rate tents conservatively, but you should still exercise judgment. If the forecast calls for winds above 30 mph, you should be thinking about whether the event should proceed with the tent up at all.
Before you buy, ask the vendor for their wind test data. A reputable manufacturer will have documentation of how their tents performed in testing. If they can’t provide it, or if they give you a vague answer, that’s a red flag. In the KCCE Event vendor comparison, several major vendors provide this data transparently, and it’s a differentiator worth paying attention to.
Customization Options Beyond Shape
The shape is the headline, but it’s not the whole story. A custom shape inflatable tent is a blank canvas, and the customization options go far beyond just the silhouette. Let me walk you through what’s actually available and what’s worth spending on.
Printing and graphics. This is where your brand comes alive. Dye-sublimation is the gold standard—the ink is heat-transferred into the fabric, so it becomes part of the material itself. It won’t crack, peel, or fade as quickly as surface-applied graphics. Full-bleed printing covers the entire surface with your design, which is the best way to maximize brand visibility. If you want a more dimensional look, airbrushing can add shading and depth that flat printing can’t achieve, though it’s slower and pricier.
Windows and doors. You can add clear PVC windows to let natural light in or allow people to see inside. Doors can be zippered flaps, roll-up panels, or even inflatable door frames that match the tent’s shape. Think about the flow of traffic for your event—where should the entrance be? Do you need a second exit for fire safety? These decisions affect the pattern and construction.
Flooring. Some tents come with an integrated floor, which can be inflatable or just a flat fabric layer. Inflatable floors add cushioning and insulation but also add weight and setup complexity. Flat floors are simpler and work fine on most surfaces.
Lighting and HVAC. You can spec the tent with internal mounting points for lights, and some larger tents have ports for HVAC ducting. If you’re planning an event in summer heat or winter cold, this is worth planning for from the start rather than retrofitting later.
Mosquito netting. For outdoor events in bug-prone areas, an inflatable gazebo tent with mosquito netting is a game-changer. The netting can be integrated into the walls or added as a removable layer.
Now, let’s talk about shape limits, because this is where marketing hype meets engineering reality. Not every shape you can imagine is actually buildable. The constraints are:
Air chamber geometry. The inflatable beams that give the tent its structure have to follow certain rules. They can’t make sharp 90-degree turns without significant engineering work. They need a certain minimum radius to maintain structural integrity. This means your shape has to accommodate the air chambers, not the other way around.
Fabric panel complexity. Every curve and angle in your shape translates to more pattern pieces, more seams, and more labor. A shape that’s mostly flat surfaces with gentle curves is much cheaper to build than one with complex compound curves.
Structural stability. A shape that’s tall and narrow will have more wind exposure and require more anchoring. A shape with a large unsupported span will need internal air beams for support. The engineers have to balance aesthetics with structural reality.
The practical takeaway: work with your vendor’s design team early. Send them your concept, and let them tell you what’s buildable and what will need adjustment. A good vendor will help you find the sweet spot between your vision and what the physics will allow. If you’re looking for a starting point, many manufacturers offer a range of custom inflatable canopy options that balance buildability with visual impact.
Top Vendors Compared
Let’s get into the vendor landscape, because the differences between manufacturers matter as much as the tent specs themselves. I’m going to walk through what I’ve seen in the market, based on the detailed vendor comparison published by KCCE Event, which evaluated seven major players on price transparency, turnaround, materials, and process.
West Shade. This vendor is notable for their transparent approach to custom inflatable tents for events, advertising, and branding. They offer free shipping on orders over $299, which is a small but meaningful cost saving. They have a clear catalog organized by use, shape, and size, which makes it easy to find what you’re looking for. Their custom inflatable tent series covers the full range from basic shapes to complex brand-specific designs.
KCCE Event. This is a manufacturer based in Dongguan, China, with a focus on inflatable solutions for events and branding. What sets them apart is their willingness to publish real pricing data and honest vendor comparisons—in an industry where most manufacturers hide pricing behind quote requests, that transparency is valuable. They offer a full range of opblaasbare producten, from tents to furniture to custom shapes, and their manufacturing process includes the 3D mockup step that I consider essential.
MVP Visuals. This vendor has been in the custom displays space for over 20 years, which is a meaningful track record. They specialize in custom inflatables, logo canopy tents, and event displays. Their product range includes inflatable arches, tunnels, and product replicas, which gives them versatility for brands that need more than just a tent.
Beyond these three, the market includes several other manufacturers that I’ve seen in various comparisons and industry discussions. The key differentiators to look for are:
Price transparency. Does the vendor publish pricing on their website, or do you have to request a quote? Transparent pricing is a sign of confidence and saves you time in the evaluation process.
Free mockup services. The 3D mockup is the most important step in the customization process. Vendors who offer this for free are investing in getting the design right before any money changes hands on manufacturing.
Turnaround time. The 15-40 day range is standard, but some vendors can do faster if you’re willing to pay rush fees. Know your timeline before you start shopping.
Material transparency. Can the vendor tell you the exact fabric weight, blower CFM, and seam construction? If they’re vague on these specs, they’re probably not using premium materials.
Wind test data. As I mentioned earlier, ask for the test data. Vendors who have it will share it readily.
My recommendation: get at least three quotes before you commit. The custom inflatable tent vendors in this space vary widely on price and quality, and the lowest quote isn’t always the best deal once you factor in shipping, durability, and the cost of a failed event. If you’re just starting your research, the inflatable tent options from KCCE are a good baseline for understanding what’s available at various price points.
Red Flags & Buyer Mistakes to Avoid
I’ve been in this industry long enough to have seen every mistake in the book, and I’ve made a few of them myself. Let me save you the tuition by walking through the most common red flags and buyer errors.
Red flag: No wind test data. If a vendor can’t show you documentation of how their tents perform in wind, walk away. This is a safety issue, not just a quality issue. A tent that fails in a 25 mph gust can injure people and damage property.
Red flag: Vague material specs. If you ask about fabric weight and the vendor says “high-quality material” without giving you a number, they’re hiding something. You should be able to get the oz/yd² rating, the PVC coating spec, and the seam construction method.
Red flag: No mockup process. The 3D mockup is non-negotiable in my book. If a vendor is willing to start cutting fabric without showing you a rendering first, they don’t care about getting the design right.
Red flag: Unrealistic rush options. A vendor who promises a fully custom shape in 5 days is either going to cut corners or disappoint you. The 15-40 day standard exists for a reason.
Mistake: Ignoring shipping costs. I mentioned this earlier, but it bears repeating. Freight on a bulky inflatable tent can easily exceed $500, and if you’re shipping internationally, customs and duties add more. Get the delivered cost, not the FOB price.
Mistake: Skipping the spare blower. Blowers are mechanical devices, and mechanical devices fail. If your only blower dies during an event, your tent is down. A spare blower is a few hundred dollars—cheap insurance compared to the cost of a failed activation.
Mistake: Not budgeting for repair kits. Inflatable tents get punctures. It’s a fact of life. A repair kit with patches and adhesive is cheap, and it can save an event. Don’t leave it out of the budget.
Mistake: Underestimating setup labor. Yes, the tent inflates in minutes. But anchoring, interior setup, and takedown take time and people. If you’re planning a three-day event, you need to account for setup and teardown labor for each day.
Mistake: Choosing the cheapest option. I’m not saying you should overspend, but the cheapest tent is usually cheap for a reason. Lower fabric weight, weaker seams, a less reliable blower—these savings show up in performance and longevity. The total cost of ownership matters more than the purchase price.
Mistake: Not asking about anchoring requirements. The anchoring system—stakes, sandbags, water barrels—is an additional cost that some vendors don’t include in the base price. Ask upfront what’s included and what’s not.
Mistake: Forgetting about the inflatable canopy vs pop up canopy question. If you’re comparing an inflatable to a traditional pop-up canopy, make sure you’re comparing apples to apples. Inflatables cost more but offer better branding potential and no center poles. Pop-ups are cheaper and simpler but less impressive. Know which trade-offs matter for your event.
Onderhoud, reparatie en levensduur
Let’s talk about what happens after you take delivery, because the relationship with your tent doesn’t end at the unboxing. In fact, how you maintain it will determine whether it lasts five years or five events.
Schoonmaken. This is the most overlooked aspect of tent ownership. An inflatable tent is a big fabric surface that collects dirt, dust, and grime, especially if it’s used outdoors. The good news is that cleaning is straightforward. Use mild soap and water with a soft brush or sponge. Avoid harsh chemicals, which can degrade the PVC coating. Rinse thoroughly and let it dry completely before packing it away. Storing a damp tent is the fastest way to get mildew, which is nearly impossible to remove.
Leak repair. Punctures happen. A dropped tent stake, a sharp corner on a display, a gust of wind that drags the tent across gravel—any of these can create a hole. The repair process is simple if you catch it early. Deflate the tent, clean the area around the puncture, apply the patch from your repair kit, and let it cure. The key is to find the leak in the first place. Inflate the tent and listen for hissing, or use a soapy water solution and look for bubbles. I’ve seen people struggle with this for hours when a simple soap test would have found the hole in minutes.
Blower maintenance. The blower is a mechanical device, and it needs periodic attention. Check the air filter regularly and clean or replace it as needed. Keep the intake vents clear. And if the blower starts making unusual noises or running hot, don’t ignore it—a failing blower is a tent collapse waiting to happen.
Opslag. When the event is over, the tent needs to be stored properly. Deflate it completely, fold it according to the manufacturer’s instructions, and pack it in its carry bag. Store it in a cool, dry place away from direct sunlight and rodents. A tent that’s stored properly will last significantly longer than one that’s shoved into a corner of a warehouse.
Longevity expectations. With proper care, a commercial-grade custom inflatable tent could last 3-5 years of regular use. That’s the honest expectation. Heavy use—weekly events, frequent setup and teardown—will shorten that. Light use—a few events per year—can extend it. The fabric will eventually degrade from UV exposure and flexing, and the seams will eventually weaken. There’s no way around that. But good materials and good maintenance will get you to the upper end of that range.
This is also where the inflatable tent vs pop-up tent comparison gets interesting. A pop-up canopy might be cheaper upfront, but it’s also less durable and less repairable. When a pop-up frame bends, it’s usually done. When an inflatable tent gets a leak, you patch it and move on. Over a 5-year lifespan, the total cost of ownership can be surprisingly close.
Inflatable Tents for Specific Use Cases
The beauty of custom shape inflatable tents is their versatility, but different use cases demand different considerations. Let me walk through the most common scenarios and what you should prioritize for each.
Brand activations and product launches. This is where custom shapes shine. A giant inflatable product replica or a branded inflatable gazebo tent creates the kind of visual impact that stops foot traffic and generates social media content. For this use case, prioritize printing quality and shape complexity. The whole point is to be memorable, so don’t skimp on the graphics.
Trade shows and expos. The 10×10 inflatable canopy is the workhorse here. You need something that sets up quickly, fits in the standard booth space, and presents your brand clearly. Prioritize setup speed, durability for repeated use, and ease of transport. A tent that takes 30 minutes to set up and tear down is worth more than one that saves $200 but takes two hours.
Outdoor events and festivals. These are the most demanding environments. You’re dealing with weather, crowds, and long hours of operation. Prioritize wind resistance, anchoring systems, and blower reliability. A dual-blower setup is worth considering for critical events.
Sporting events and sidelines. An inflatable shade tent for soccer sidelines or an inflatable canopy for tailgating needs to be portable and quick to set up. These are often smaller tents, and the focus is on shade and visibility rather than branding. Prioritize ease of setup and packability.
Pool parties and backyard events. An inflatable canopy pool setup with sidewalls can create a shaded lounge area that’s both functional and fun. These are lighter-duty applications, so you can get away with less expensive materials. Prioritize aesthetics and ease of cleaning.
Emergency and medical use. This is a growing application for inflatable tents, according to the Future Market Report analysis. Inflatable structures can be deployed quickly for medical stations, temporary shelters, or command centers. For this use case, prioritize durability, rapid deployment, and the ability to withstand extended use.
One note on the “inflatable gazebo tent near me” search: if you’re looking for a vendor, don’t limit yourself to local options. The manufacturing quality is more important than the vendor’s proximity, and most vendors ship nationwide or even internationally. A good vendor with transparent pricing and a solid mockup process is worth more than one that happens to be in the same city.
Veelgestelde Vragen
V: Waar kan ik op maat gemaakte opblaasbare tenten vinden?
A: You can find custom inflatable tents through specialized manufacturers like West Shade, KCCE Event, and MVP Visuals. These vendors offer 3D mockup services, custom printing, and a range of sizes from 10×10 to 30×30 and beyond. Search for “custom inflatable tent vendors” and compare at least three options before committing.
Q: What are the downsides of inflatable tents?
A: The main downsides are reliance on a continuously running blower, which can fail, and the need for proper anchoring in windy conditions. They’re also bulkier to transport than pop-up canopies, and the initial cost is higher than traditional tents. However, for branding impact and setup speed, they often win out.
Q: Can you make a custom inflatable?
A: Yes, that’s the whole point of custom shape inflatable tents. You provide the shape concept and graphics, and the manufacturer creates a 3D mockup for approval before production. The process takes 15-40 days and includes pattern making, sewing, printing, and quality control.
Q: How much does it cost to make a custom 10×10 tent?
A: A custom 10×10 inflatable tent typically starts around $1,699. The final price depends on shape complexity, printing requirements, and material quality. Larger sizes scale up significantly—20×20 runs $2,500-$3,500, and 30×30 can reach $4,499 or more.
Q: How do you anchor an inflatable canopy?
A: On grass, use heavy-duty stakes driven at an angle through the anchor loops. On hard surfaces, use sandbags (25-50 pounds each) or water barrels placed on the tent base. Larger tents may need additional tie-down straps for stability in higher winds.
Q: Are inflatable canopies wind resistant?
A: Yes, when properly anchored, inflatable canopies can handle sustained winds of 30-50 mph. The air pressure creates a semi-rigid structure that flexes with wind loads. Always ask the vendor for wind test data, and exercise judgment when forecasts call for strong winds.
Q: How do you repair an inflatable tent leak?
A: Inflate the tent and locate the leak using a soapy water solution (look for bubbles) or by listening for hissing. Deflate, clean the area, apply a patch from your repair kit, and let it cure completely. Regular inspection and prompt repair will extend your tent’s lifespan significantly.
Q: How do you clean an inflatable gazebo?
A: Use mild soap and water with a soft brush or sponge. Avoid harsh chemicals that can degrade the PVC coating. Rinse thoroughly and dry completely before packing away—storing a damp tent leads to mildew, which is nearly impossible to remove.
Referenties
1. Custom Inflatable Tents with Logo for Events & Branding – westshade.com
2. Inflatable Tent Custom Package: Real Prices & Honest Vendor … – kcce-event.com
3. Frame Inflatable Tent Market: 455.80 million by 2033 – futuremarketreport.com
4. How to Customize an Inflatable Dome Tent: A Budget … – mvpvisuals.com







