

I’ve been in this industry for over a decade, and honestly, I’ve seen it all—from 5K fun runs with arches that looked like an afterthought to corporate launches where the entrance arch stole the entire show. The difference wasn’t budget. It was design intent.
Here’s the uncomfortable truth: if your event arch doesn’t make someone pull out their phone, you’ve wasted your money. Generic arches fail to drive brand recall. Period. People walk through them, grab their race bib, and forget your logo before they reach the water station.
Creative designs for inflatable event arches aren’t just about looking pretty. They’re about creating a moment worth photographing, a backdrop worth sharing, and a structure that makes sponsors feel like their investment was justified.
I’m going to walk you through seven design approaches that actually work, the material science you need to understand before you order, and the engineering details that separate a one-event wonder from a five-year workhorse. I’ll also give you the buyer’s knowledge that most event planners learn the hard way—after the arch arrives damaged, blows over mid-race, or fades after two outings.
Let’s get into it.
빠른 답변
Creative inflatable arch designs go beyond simple branding—they integrate structural novelty, audience interaction, and sponsor value. The seven most effective approaches are finish-line gantries with integrated clocks, themed portals, sponsor showcase panels, immersive tunnel entries, LED-lit night arches, QR code lead capture, and modular multi-configuration systems. Each serves a different event goal, and the right choice depends on your audience, venue, and budget.
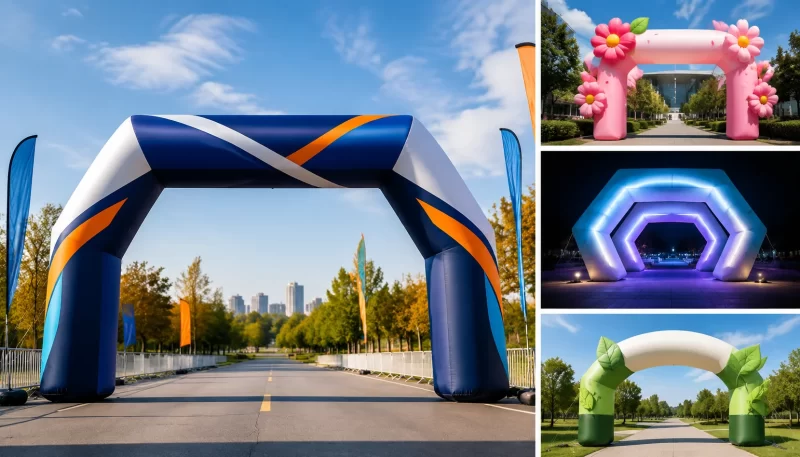
What Makes an Inflatable Arch Design “Creative”?
Before we dive into specific ideas, let’s establish what “creative” actually means in this context. Because I’ve seen plenty of arches that were technically custom but creatively bankrupt—just a logo slapped on a standard curve.
In my experience, three criteria separate a truly creative design from a branded tube of air:
Brand fit. The arch should feel like it belongs to your event, not like it was rented from a generic party supply catalog. A tech conference arch should look different from a kids’ charity run arch. Sounds obvious, but you’d be surprised how many organizers order the same stock design regardless of their audience.
Structural novelty. This is where creative designs for inflatable event arches really shine. Instead of the standard rainbow curve, you can have a gantry with integrated side towers, a tunnel that envelops participants, or a shape that mimics your product. The structure itself becomes the conversation starter.
Audience interaction. The best arches don’t just mark a threshold—they invite participation. Photo opportunities, LED displays that change color, QR codes that lead to exclusive content. When people interact with your arch, they remember it. And when they photograph it, your brand gets free distribution across social platforms.
Now, here’s why this matters beyond aesthetics. Sponsors care about visibility. A creative arch that generates photo-sharing and social media buzz gives you a stronger pitch when you’re selling sponsorship packages for your next event. I’ve seen events where the arch itself became the primary sponsorship asset—because it was the most photographed element of the entire day.
The ROI calculation is simple: a generic arch gets you a threshold marker. A creative arch gets you a marketing asset that works before, during, and after the event.
7 Creative Designs for Inflatable Event Arches
Let me walk you through seven approaches I’ve seen work well in the field, each with its own strengths and ideal use cases.
Idea 1: Finish Line Gantry with Integrated Clock
This is the classic race arch, but elevated. Instead of just a curved tube marking the finish, you get a full gantry structure with side support towers and an integrated digital clock.
The clock is the key feature here. Runners want to see their finish time, and spectators want to see the leaders’ times. When the clock is built into the arch itself, it becomes the focal point of the finish area. Every photo taken at the finish line includes your branding and the time—which means every photo shared on social media reinforces your event’s identity.
I’ve seen these used effectively at various sporting events. The gantry design also gives you more surface area for sponsor logos, which is always a win when you’re trying to justify sponsorship fees.
Idea 2: Themed Portal
Want to make a statement? Go beyond the arch shape entirely. A custom inflatable arch can be manufactured to look like a castle gate, a giant product replica, a bottle you’re launching, or any shape that connects to your event’s theme.
For product launches, this is particularly effective. Imagine a beverage company launching a new drink—the entrance to the event is a giant inflatable version of the bottle. Attendees walk through the product itself. That’s memorable. That’s shareable.
The production cost is higher than a standard arch, but the impact justifies it for flagship events. If you’re organizing an annual event, a themed portal can become your signature visual—the thing people associate with your brand year after year.
Idea 3: Sponsor Showcase Arch
This design addresses the eternal challenge of sponsor branding: how to give every sponsor meaningful visibility without turning your arch into a cluttered mess.
The solution is side panels. The main arch carries your event branding, while detachable side panels feature individual sponsors. Each sponsor gets their own dedicated space, which they can customize with their own colors and messaging.
This approach works particularly well for cause-based racing events, where you might have multiple community sponsors at different contribution levels. It also makes the arch modular—you can swap sponsor panels between events without reprinting the entire structure.
Idea 4: Tunnel Arch for Immersive Entry
Instead of a single arch you walk through in one step, imagine a tunnel—a series of connected arches that create a passageway. This entrance arch design transforms the simple act of entering an event into an experience.
I’ve seen this used at music festivals and trade shows to great effect. The tunnel creates anticipation. It separates the outside world from the event world. And it gives you a much larger canvas for branding, messaging, and visual effects.
The trade-off is cost and setup complexity. A tunnel requires more material and more blower capacity. But for flagship events where first impressions matter, the investment pays off in attendee engagement and photo opportunities.
Idea 5: LED-Lit Arch for Night Events
If your event runs into the evening, a standard arch becomes invisible. An LED inflatable arch solves this by integrating lighting directly into the structure.
The LED options range from simple internal illumination that makes the arch glow, to programmable external LED strips that can display colors, patterns, and even text. For night races, charity galas, or evening festivals, this transforms your arch from a functional marker into a visual centerpiece.
One thing to consider: LED integration adds cost and complexity. You’ll need power for both the blower and the lights, and you’ll want to verify the LED system’s durability before committing to an outdoor event. But the visual payoff is substantial—a glowing arch is hard to ignore, and it photographs beautifully against a night sky.
Idea 6: QR Code Arch for Lead Capture
Here’s an interactive arch that does double duty: it marks your event entrance and captures leads at the same time.
The concept is simple. A large QR code is printed on the arch’s surface, positioned at eye level where attendees naturally look as they pass through. Scan the code, and they land on a landing page—event information, a discount offer, a contest entry, or a newsletter signup.
For trade shows and corporate events, this is a game-changer. You’re converting foot traffic into digital leads without requiring a single staff member to man a booth. The arch becomes a passive lead generation tool.
The design consideration here is the QR code size and placement. It needs to be large enough to scan from a distance, and positioned where people naturally pause. I’d recommend testing the scan distance before finalizing the design.
Idea 7: Modular Arch System
This is the smart investment for organizations that host multiple events throughout the year. A modular inflatable arch consists of interchangeable sections that can be configured in different ways.
One configuration might be a standard arch for a 5K run. Another configuration adds side towers for a larger event. A third configuration creates a wider span for vehicle access. The same base components serve multiple purposes.
The upfront cost is higher than a single-purpose arch, but the long-term value is significant. You’re not buying a new arch for every event—you’re buying a system that adapts to your needs. For event management companies and organizations with busy calendars, this is the most cost-effective approach.
Vinyl vs. Polyester: Material Science Made Simple
Now let’s talk about what your arch is actually made of. Because this is where a lot of buyers get confused, and where cheap options can cost you dearly.
The two primary materials in inflatable arch manufacturing are PVC vinyl and polyester fabric. Each has distinct characteristics that affect durability, print quality, and cost.
PVC 비닐 is the traditional material for inflatable advertising. It’s thick, heavy, and highly durable—typically measured in ounces per square yard, with 18oz vinyl being a common standard for outdoor arches. The material handles wind well, resists punctures, and holds vibrant colors through quality printing.
폴리에스터 원단, particularly 500D or similar weights, is lighter and more flexible than vinyl. It’s often used for continuous air blow arches that need to be portable and quick to set up. The trade-off is durability—polyester is more susceptible to abrasion and UV degradation over time.
Here’s how material choice affects your two biggest concerns: print quality and lifespan.
For print quality, vinyl generally accepts dye-sublimation printing better, resulting in sharper images and more vibrant colors. The material’s smooth surface allows for detailed graphics without distortion. Polyester can also be printed with good results, but the texture may slightly reduce sharpness on very detailed designs.
For lifespan, vinyl wins in most outdoor scenarios. It resists moisture, UV radiation, and physical stress better than polyester. In my experience, a well-maintained vinyl arch can last several years with regular use, while polyester may show signs of wear sooner.
The decision point is often inflatable arch material cost. Vinyl is more expensive, but it’s an investment in longevity. Polyester is budget-friendly and lighter, making it easier to transport and set up. For one-time events, polyester might make sense. For recurring events, vinyl is the smarter purchase.
One more consideration: fire-retardant PVC. If your event involves open flames, pyrotechnics, or takes place in venues with strict fire codes, you’ll want to pay the premium for fire-retardant material. It’s not a luxury—it’s a compliance requirement in many jurisdictions. Always check the fire safety regulations for your venue before ordering.
Printing That Survives Weather and Scrutiny
Your arch’s graphics are its face. And like any face, they need to hold up under scrutiny—including direct sunlight, rain, and close-up photography by attendees.
The two main arch printing methods are dye-sublimation and adhesive vinyl application.
염료 승화 involves printing your design onto transfer paper, then using heat to bond the ink directly into the fabric or vinyl surface. The result is graphics that are part of the material itself—they can’t peel, crack, or separate from the surface. Colors are vibrant, gradients are smooth, and the print is durable enough to withstand repeated use and washing.
Adhesive vinyl involves cutting your design from colored vinyl sheets and applying them to the arch surface. This method is often cheaper and faster, but it has significant drawbacks. The vinyl edges can lift over time, especially in cold weather or when the arch is repeatedly inflated and deflated. And the color matching is limited by the vinyl colors available, whereas dye-sublimation can reproduce any color you can specify.
For color vibrancy and fade resistance, dye-sublimation is the clear winner. The ink bonds with the material, so it doesn’t sit on the surface where UV rays can damage it. With quality inks and materials, a dye-sublimated arch should maintain its colors for years with minimal fading.
How do you verify print quality before ordering? Ask for a physical sample. Reputable manufacturers will provide a printed sample of your design on the actual material they’ll use. Examine it for color accuracy, sharpness, and overall quality. If they can’t provide a sample, that’s a red flag.
Also, ask about their color management process. A good manufacturer will calibrate their printers regularly and use color profiling to ensure the printed result matches your digital proof. Without this, you might receive an arch where your brand red looks more like orange.
Engineering for Wind: Why Anchoring Matters
This is the section I wish every event organizer would read twice. Because I’ve seen what happens when an arch isn’t properly anchored—and it’s not pretty.
The internal design of your arch plays a significant role in wind stability. Modern inflatable arches use internal baffles—walls of material inside the arch that control airflow and maintain the structure’s shape. Without baffles, the air flows freely through the arch, which can cause it to deform or flutter in windy conditions.
Different manufacturers use different baffle configurations. Some use a continuous airflow design where the blower maintains constant pressure throughout the structure. Others use segmented chambers that isolate air in specific sections. Both approaches can work, but the quality of the baffles matters. Poorly designed baffles can create weak points where the arch is more susceptible to wind damage.
Now, let’s talk anchoring. This is where events go wrong.
The three most common anchor types are:
Sandbags. Simple and effective. The arch’s base straps are secured to sandbags placed on the ground. The weight of the sandbags holds the arch in place. For most events, sandbags are sufficient—provided you use enough of them and position them correctly.
Water barrels. These are large plastic barrels filled with water, typically 30-55 gallons each. They provide more weight than sandbags and are easier to position. The downside is that they require a water source and time to fill.
Stakes. For soft ground—grass, dirt, or gravel—stakes can be driven through the arch’s anchor points directly into the ground. This is the most secure option, but it’s only viable where the ground allows it. You can’t stake into asphalt or concrete.
The wind rating standards for inflatable arches vary by manufacturer and region. In general, quality arches are designed to withstand moderate winds when properly anchored. Beyond that, you’re taking risks regardless of the anchor system.
My advice: always check the weather forecast before your event, and have a plan for high winds. If winds exceed the arch’s rating, take it down. It’s not worth the risk of injury or property damage.
And here’s a tip from experience: always use more anchors than you think you need. The cost of extra sandbags is minimal compared to the cost of an arch that blows over mid-event.
The Real Cost of Custom Inflatable Arches
Let’s talk money. Because the price range for inflatable arch cost is wider than most buyers expect, and understanding where the costs come from will help you make a smarter purchase.
The primary cost driver is size. A small arch suitable for a school event or small race might cost a few hundred dollars, while a large arch for a major marathon or festival can cost several thousand, depending on size and features. The material, printing, and manufacturing labor all scale with size.
But here’s the thing about cheap arches: they cost more in the long run.
I’ve seen organizers buy a budget arch to save money, only to discover that the material is too thin to handle outdoor conditions, the printing fades after a few months, or the seams fail after a handful of uses. They end up replacing the arch within a year—spending more than they would have on a quality arch from the start.
The hidden costs go beyond the arch itself:
Shipping. Large arches are bulky, even when deflated. Freight shipping can add significantly to your total cost, especially for international orders. Some manufacturers offer free shipping on larger orders, but it’s worth asking about.
보관. A 30-foot arch doesn’t fold into a shoebox. You’ll need dedicated storage space between events, and that space has a cost. If you’re renting storage, factor that into your budget.
Blower power consumption. Your arch needs a continuous air supply. The blower runs for the entire duration of your event, consuming electricity. For a multi-day event, this can add up. High-efficiency blowers cost more upfront but save money over time.
Maintenance and repairs. Even quality arches need occasional repairs—patching small punctures, replacing worn straps, servicing the blower. Budget for these costs, or you’ll be caught off guard.
When you’re comparing quotes from different manufacturers, don’t just look at the arch price. Ask about the total cost of ownership, including shipping, accessories, and expected lifespan. A slightly more expensive arch that lasts twice as long is the better investment.
Your Design Process: From Logo to Delivery
So you’ve decided to order a custom arch. Here’s what the arch design process typically looks like.
First, you’ll need to provide your artwork in the right format. Most manufacturers require vector files—AI, EPS, or PDF—rather than raster images like JPEG or PNG. Vector files scale to any size without losing quality, which is essential for large-format printing. If you don’t have vector files, your designer can create them, but that’s an additional cost.
The manufacturer will create a digital proof showing how your design will look on the arch. This is your opportunity to review colors, layout, and text placement. Make sure everything is correct—changes after production are expensive or impossible.
Most manufacturers include a certain number of revisions in their quote. Typically, you’ll get two to three rounds of revisions before the design is approved. Additional revisions may incur fees.
Once you approve the proof, production begins. Production lead times for custom inflatable arches typically range from a few weeks to over a month., depending on the complexity of the design and the manufacturer’s workload. If you have a tight deadline, ask about rush options—but expect to pay a premium.
During production, the manufacturer will print your design onto the material, cut and sew the pieces together, install the baffles and anchor points, and quality-check the finished arch. Some manufacturers will send you photos or video of the finished product before shipping.
When the arch arrives, inspect it immediately. Check for any defects in printing, sewing, or hardware. Report any issues to the manufacturer right away—most will address problems within a warranty period, but only if you notify them promptly.
One more thing: keep your digital design files organized. You’ll need them if you want to reorder the arch or produce additional branded items.
Setup, Storage, and Logistics: What Nobody Tells You
Let me share some practical knowledge that rarely makes it into the marketing materials.
Setup time. A standard inflatable arch can typically be set up by two people in a short time. That includes unpacking, positioning, connecting the blower, and anchoring. Larger or more complex designs—like tunnels or gantries—take longer. Plan your setup schedule accordingly.
Blower specifications. The blower is the heart of your arch. It needs to provide continuous airflow at the right pressure to keep the arch fully inflated. Most arches come with a blower matched to their size, but you should verify the specifications before purchase. Also, check the noise level. Some blowers are surprisingly loud, which can be an issue for events where speeches or performances are happening nearby.
Storage between events. Always store your arch clean and dry. Moisture trapped inside can lead to mold and mildew, which will ruin the material and create an unpleasant odor. Deflate the arch completely, wipe down any moisture, and store it in its carry bag in a dry, temperature-controlled space.
Shipping logistics. Depending on the size of your arch, it may ship via parcel service or freight. Freight shipping requires more planning—you’ll need to be available for delivery, and you may need to coordinate with a loading dock or forklift. Ask your manufacturer about shipping options and what to expect.
Comparison to rigid frame alternatives. Before you commit to inflatable, consider the alternatives. Rigid frame arches—made of metal or wood—are more durable but significantly heavier and more expensive to transport and store. They also lack the visual impact of a large inflatable structure. For most events, inflatable arches offer the best balance of impact, portability, and cost.
자주 묻는 질문
Q: What are some creative ways to decorate archways?
A: Beyond standard branding, consider LED lighting integration for night visibility, themed shapes that connect to your event concept, interactive elements like QR codes for lead capture, and modular designs that allow different configurations. Side panels for sponsor showcases and tunnel-style constructions for immersive entries are also effective approaches that elevate a standard arch into a memorable experience.
Q: How to make an inflatable arch?
A: Manufacturing an inflatable arch requires industrial sewing equipment and materials. The process involves cutting fabric or vinyl to pattern, sewing panels together with internal baffles for structure, installing anchor points and blower connections, and printing graphics via dye-sublimation. This is not a DIY project—working with an established manufacturer ensures proper engineering, material quality, and safety standards.
Q: Can you make custom inflatables?
A: Yes, virtually any shape can be manufactured as a custom inflatable, including arches, product replicas, mascots, and architectural elements. The design process starts with your artwork and specifications, followed by a digital proof, then production typically takes 2-6 weeks. Custom inflatables are widely used for branding, events, and promotional campaigns.
Q: How to tie down an inflatable arch?
A: Inflatable arches come with anchor straps at the base. Secure these to sandbags, water barrels, or stakes driven into the ground, depending on your surface. Always use more anchors than the minimum recommended, distribute weight evenly on both sides, and monitor weather conditions—if winds exceed the arch’s rating, take it down for safety.
참고 문헌
1. Your Comprehensive Guide to Inflatable Arches for Events – MVP Visuals
2. Inflatable Arch: Something Special for Your Next Event – Promo Bears USA
3. Comparison of the Environmental Friendliness of Inflatable Arches with Traditional Props – YOLLOY Blog
4. The Role of Inflatable Arches in Sports Events: Start/Finish Lines – Morning Tents







