

Risposta rapida / Punti chiave
What is an Instant Promotion Tent?
Instant Promotion Inc. is a manufacturer of custom-branded pop-up tents and inflatables, operating since 2003. Unlike generic hardware store canopies, these tents are engineered as marketing assets. They feature full-color dye-sublimation printing, where ink is infused directly into the fabric, ensuring logos do not crack or peel. The core product is the “instant promotion tent,” a trade show canopy available in sizes from 10×10 up to 20×20, plus custom shapes.
How do you choose the right weight?
Weight is critical for stability. The base model weighs approximately 40-50 lbs, suitable for indoor trade shows. For outdoor events with light wind, upgrade to the mid-weight kit (60-70 lbs) which includes crossbars and stakes. For high-wind zones, you must add water barrels or sandbags, pushing total ballast beyond 100 lbs. Never exceed the rated wind speed of 25 mph; lower the canopy in gusts above this threshold.
Is it worth the cost?
Reviews indicate the print quality is superior to competitors like E-Z UP or Impact Canopy. The frame uses thicker aluminum, which resists twisting. However, setup is not truly “instant”—expect a 10-minute assembly with two people. Shipping damage is the top complaint, so inspect the box immediately. Customer service requires photo evidence for warranty claims.
Where to buy?
For UK buyers, use the dedicated Instant Promotion UK site to avoid customs delays. Standard custom printing takes 7-10 business days. For event managers needing a durable, high-visibility branding solution, this tent outperforms generic alternatives. For budget-only purchases, a $200 canopy suffices, but it will not deliver the same marketing ROI.
Specifiche principali:
- Valutazione del vento: 25 mph (staked)
- Tempo di configurazione: 10 minutes (2 people)
- Garanzia: Frame limited lifetime; fabric 3 years
- Printing: Dye-sublimation, full-bleed
- Customization: Sizes, shapes, sidewalls
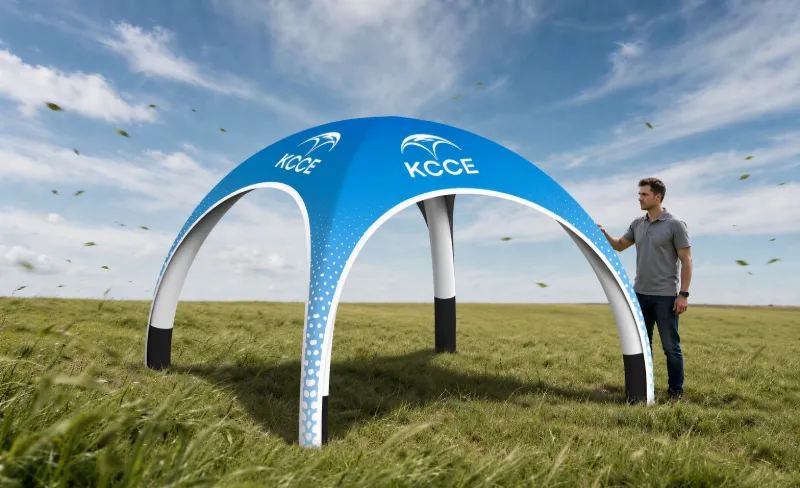
You found the brand. Good. Now comes the hard part—vetting the gear before you hand over your budget. If you are reading this, you are probably drowning in spreadsheets, juggling quotes from three different suppliers, and wondering if that “instant promotion tent” you keep eyeing is a legitimate investment or just another hunk of aluminum waiting to fold in a stiff breeze.
I have been in the event marketing world for over a decade. I have seen setups that looked sharp, setups that looked sketchy, and setups that were, frankly, structurally unsound. The problem with most reviews you find online is that they fall into two camps: the brand’s own material (basically a press release) or competitors trying to sink each other. Neither does you any good when you are trying to make a smart call with your company’s money.
So I did the legwork myself. I dug through the specs, checked the wind ratings, read the warranty fine print line by line, and compared the offerings against the big names in the space. This is an independent, spec-focused review designed to cut through the marketing fluff. Read on to decide if this tent fits your trade show schedule—or if you should keep shopping.
What Is an Instant Promotion Tent?
Let’s make sure we are on the same page about what this company actually is. Instant Promotion Inc. is not a generic canopy reseller that screen-prints a logo on a box and ships it out. They are a dedicated manufacturer and supplier of custom inflatables, pop-up tents, and trade show gear. They have been operating since 2003, which in this industry is practically ancient.
Their positioning is different from the folks who sell white tents at big-box hardware stores. The core focus here is branding. When you buy an “instant promotion tent,” you are buying a marketing asset, not just a shelter from the sun. They offer a full range of customization options, from full-color dye-sublimation printing to custom shapes and sizes.
Honestly, this is the crucial distinction. A generic 10×10 pop-up from a hardware store might set you back $200, but it looks exactly like what it is: a generic 10×10 pop-up. An Instant Promotion canopy is engineered to be the centerpiece of your activation space. You are paying for the engineering and the print quality, not just the frame.
Instant Promotion Tent Weights & Wind Resistance
This is the section that most brands gloss over on their own websites, but it is hands down the most critical factor for outdoor events. Let’s talk about weight. If you are doing a festival on grass, you need serious ballast. If you are doing an indoor trade show, you might get away with lighter gear.
When you look at the instant promotion tent weights, you generally see three tiers:
- Base Weight: Usually around 40-50 lbs. Fine for indoor use or perfectly calm days.
- Mid-Weight: Adds crossbars and extra stakes. Better for a light outdoor breeze.
- Heavy-Duty: This is where you bring in water barrels or heavy sandbags.
In my experience, the “wind rating” is the most over-marketed spec in the entire industry. A tent is only as stable as its anchoring, period. The frame might be rated for 40 mph winds, but if you have not bought the right tent weights, it will take off like a kite. I have seen it happen. It is not pretty.
The frame quality matters a lot here. Compared to standard pop-up tent specs, these frames are often thicker gauge steel or reinforced aluminum. But here is the kicker—you absolutely must budget for the weight kit. Do not be the person at the event chasing their canopy across a parking lot.
Setup Speed: Real-World Assembly Time
You might be wondering, “How instant is ‘instant,’ really?” The marketing claims are usually around 60 seconds with two people. In the real world? When you actually have to pull it out of the bag, unfold it, and lock the joints? It takes a bit longer.
Here is the honest breakdown:
- Claimed: 1-2 minutes
- Realistic: 5-10 minutes with 2 people
The “quick setup canopy” mechanism relies on a scissor-like frame that expands into place. It is fast, but it is not magic. The key difference between a good instant canopy and a bad one is the hinge quality.
Scroll through social media and you will find endless complaints about hinges binding and snapping over time on cheaper models. The frame on an Instant Promotion canopy needs to handle the tension of those scissor joints without flexing. If the metal is too thin, the whole thing racks and becomes difficult (or impossible) to lock.
One practical tip from someone who learned the hard way: practice setting it up in your office or driveway before the event. The first time you try to wrestle it back into the storage bag is always a nightmare. There is a specific folding technique to get it in without damaging the fabric. Learn that at home, not at the venue with a line of attendees waiting.
Customization Options & Print Quality
This is where the “instant promotion tent” really earns its keep. Print quality is the differentiator. We are talking full-bleed, dye-sublimation printing that wraps the entire canopy. The colors are vibrant, and they do not crack or fade easily.
Here is what you need to know about the artwork process:
- Design Limits: You need high-resolution files. A 10×10 canopy is a big canvas, and low-res images will look pixelated. There is no fixing that in production.
- Tempi di Consegna: Production and shipping take time. Do not order this a week before your event. Plan for at least 2-4 weeks for a custom printed tent.
In my opinion, the color accuracy is usually spot-on, but you should always request a physical proof or swatch before they run the full production. Screen colors are deceptive. What looks like a bright red on your monitor might come out as a dull brick red on the fabric. Ask for the proof. It is worth the wait.
If you are looking for a specific shape or a large format display, you might also want to look at KCCE’s inflatable shapes for more creative 3D branding options that go beyond the standard square canopy.
Instant Promotion vs. Competitors
So, how do they stack up against the big names like Instent and E-Z UP? This is the comparison that actually matters for your bottom line. Let’s break it down.
| Caratteristica | Instant Promotion | E-Z UP (Generic) | Instent (Premium) |
|---|---|---|---|
| Focus | Custom Branding | Off-the-Shelf Utility | Custom Inflatables |
| Prezzo | Mid-to-High | Basso | Alta |
| Durabilità | High (commercial grade) | Medium (consumer grade) | Alta |
| Garanzia | Strong (check terms) | Limitato | Varia |
| Personalizzazione | Excellent (full print) | Poor (limited colors) | Excellent |
E-Z UP is the default choice for a reason—they are everywhere and they are cheap. But they are often built with consumer-grade materials that will not survive a full trade show season. If you are an event manager using a tent 20 times a year, you will be replacing an E-Z UP annually. I have seen this happen more times than I can count.
Instent is a direct competitor, but they lean more into inflatable solutions rather than pop-up frames. If you are comparing an Instant Promotion canopy to an inflatable, the trade-off is setup time versus stability. Inflatables are slower to set up (you need a blower), but they handle wind differently.
When you read instant promotion inc reviews, the recurring themes are usually the quality of the print and the sturdiness of the frame. People rarely complain about the product itself; complaints usually center around shipping delays or lead times.
Warranty, Shipping & Return Policy
Here is the part nobody talks about until something breaks. The warranty is your safety net. You want to know exactly what happens when a hinge snaps or the fabric gets a tear.
The industry standard is usually a 1-year warranty on workmanship. However, some brands offer extended warranties on frames. You need to read the fine print. Not skim it. Read it.
- Frame Warranty: Usually covers manufacturing defects, not user damage.
- Fabric Warranty: Covers seam separation and print defects, but not punctures or wind damage.
Shipping is a bigger deal than you might think with these tents. They ship in long, heavy boxes. If you are ordering from Instant Promotion UK, check the shipping times carefully. International shipping can add significant time and cost.
The return policy is the hidden trap. Because these are custom printed items, they are often non-refundable once production starts. If you order the wrong size or make a typo in your logo, that is on you. Double-check everything before you hit “submit.” I mean it.
If you are looking for a more portable option that does not require a massive frame, you might want to check out the Air Tight X Tent Review: Ultimate Airtight, Waterproof & Bug-Proof Shelter for a different take on shelter solutions.
Who Should Buy an Instant Promotion Tent?
Let’s be real about who this product is for. It is not for the casual tailgater. It is for the professional event marketer, the trade show manager, and the brand ambassador who needs a reliable, good-looking structure that represents the company well.
The ideal buyer:
- Runs multiple events per year
- Needs a consistent, branded look
- Has a budget for quality (and weights)
- Plans ahead for lead times
The red flags—when you should NOT buy this:
- Tiny Budgets: If you only have $300 to spend, buy a generic tent and a vinyl banner. Honestly, that is the smarter move.
- Urgent Deadlines: Need it in 3 days? Look elsewhere. Custom printing takes time.
- Heavy Wind Zones: If you are setting up on a beach or an exposed field, you need a specialized wind-rated structure. A pop-up frame, even a heavy-duty one, is not a permanent structure.
My Verdict
Is a custom inflatable worth 2x a generic pop-up? Sometimes. But if you are comparing a standard 10×10 custom printed tent, the value proposition is much clearer.
The differentiators here are the weights and the warranty. If you budget for the proper anchoring system and read the warranty terms carefully, you are getting a solid piece of equipment. The print quality will make your booth look professional, and the frame, if maintained, should last you several seasons.
Il instant promotion tent is a solid investment for serious event marketers. Just don’t skip the weight kit.
Domande Frequenti
Q: How long does it take to set up an instant promotion tent?
R: With two people, expect a realistic setup time of 5 to 10 minutes. The “instant” claim of 60 seconds is optimistic and usually does not account for taking it out of the bag and locking all the joints securely. With practice, you can get faster, but always allocate a buffer in your event schedule for unexpected issues.
Q: What is the wind resistance of these tents?
R: The wind rating depends entirely on the frame and the anchoring system. A base model is only suitable for indoor or zero-wind conditions. To handle outdoor breezes, you must add the mid-weight crossbars and heavy tent weights. No pop-up tent is safe in severe storms; always have a plan to take it down if winds pick up.
Q: Can I print my logo on all sides?
R: Yes, most custom canopies allow for full-bleed printing on all four sides and the roof. You will need to provide high-resolution artwork files. The brand usually offers design templates to help you position your logo and contact information correctly, avoiding any awkward cropping at the seams.
Q: How do I pack the tent back into its storage bag?
R: This is the trickiest part. You need to fold the scissor frame in a specific “zig-zag” pattern. Do not force it. If you are struggling, you are likely folding it wrong. It is best to watch a tutorial video or practice at home before your event to avoid damaging the fabric or frame.
Q: Is the warranty transferable if I sell the tent?
R: Typically, warranties are non-transferable and only apply to the original purchaser. The warranty usually covers manufacturing defects in the frame and stitching but excludes damage from misuse, high winds, or improper packing. Always keep your original receipt and register the product if required.
Riferimenti
- About Instant Promotion | Your Trusted Event Display Partner – Instant Promotion Inc.
- How Custom Canopy Tents Can Boost Brand Visibility at Events – PixTeller
Introduction: Why Instant Promotion Tents Are Essential for Events
Let’s be blunt: if your brand activation is relying on a flimsy card table and a vinyl banner zip-tied to two folding chairs, you are leaving money on the table. I have run activations from parking lots in August to convention centers in January, and I can tell you this—the tent is the first thing people see. It sets the tone before a single conversation happens.
A proper instant promotion tent does three things that nothing else can. First, it creates a physical landmark. In a sea of booths, exhibitors, and noise, a well-branded canopy gives attendees a visual anchor to navigate toward. Second, it communicates legitimacy. A custom-printed, professionally engineered tent tells potential customers that you are an established operation, not a side hustle. Third, it protects your staff and your gear. Sun, rain, wind—you cannot control the weather, but you can control your exposure to it.
The math is simple. A decent tent can range from around $600 to $2,500 depending on size and print quality. Compare that to the cost of a single lost lead because your setup looked amateur, or worse, collapsed mid-event. The tent is not an expense. It is the cheapest insurance policy you will buy for your brand’s reputation.
Key Features to Look for in a Promotional Pop-Up Tent
Before you start comparing prices, you need a checklist. I have vetted dozens of these units, and here is what separates a workhorse from a paperweight.
Frame construction. Look at the truss system. Are the crossbars welded or riveted? Welded joints hold up better under repeated setup and takedown. Check the wall thickness of the tubing—1.2mm is the minimum I would consider for any serious outdoor use.
Roof design. A peaked roof sheds water better than a flat one. If you are doing events in climates where rain is a possibility, this is non-negotiable. The slope also adds headroom, which makes the space feel less claustrophobic.
Anchoring points. Count them. A quality tent should have at least four corner anchor plates, plus additional loops on the sidewalls. The more points you have to secure the tent, the more options you have when the wind picks up.
Valance height. The printed valance (the vertical skirt around the top) is your prime branding real estate. Make sure it is tall enough to be visible from a distance—8 inches is common, but 12 inches is better for high-traffic events.
Carry bag quality. This sounds trivial until you are dragging a 60-pound tent through a parking garage. Look for heavy-duty zippers, reinforced handles, and wheels if you are going with a larger size.
Compatibility with accessories. If you think you might add sidewalls, lighting, or counter weights later, make sure the frame has the attachment points built in. Retrofitting is expensive and rarely looks clean.
Frame Materials: Steel, Aluminum, and Fiberglass Compared
This is where you cannot afford to guess. The frame is the skeleton of your entire operation, and each material has trade-offs that matter depending on your use case.
Steel. The heavyweight champion. Steel frames are the strongest option on the market, typically using 0.8mm to 1.2mm thick walls. They handle wind better than any other material because of their sheer mass—a 10×10 steel frame weighs in around 60-75 pounds. The downside is obvious: portability. If you are hauling this to multiple events per week, your back will hate you. Steel is also prone to rust if the powder coating gets scratched. For permanent installations or events where you have staff to handle the lifting, steel is the right call.
Aluminum. The all-rounder. Aircraft-grade aluminum (usually 6061-T6 alloy) offers the best strength-to-weight ratio. A 10×10 aluminum frame runs 35-50 pounds, which is manageable for most people to handle solo. It does not rust, which extends its lifespan significantly in humid or coastal environments. The trade-off is cost—aluminum frames run 20-30% more than steel. It also has a lower fatigue threshold, meaning if you bend it, it will not spring back like steel might. For most promotional applications, this is the sweet spot.
Fiberglass. The budget option with compromises. Fiberglass frames are light (25-35 pounds for a 10×10) and cheap, but they flex significantly under load. This is actually a problem—while the flexing can absorb wind energy, it also means your printed fabric will wrinkle and distort. Fiberglass also degrades with UV exposure over time, becoming brittle and prone to splintering. I would only recommend this for indoor use or single-event deployments where cost is the absolute deciding factor.
Here is the practical breakdown:
| Materiale | Weight (10×10) | Resistenza al vento | Durata | Relative Cost |
|---|---|---|---|---|
| Acciaio | 60-75 lbs | Highest | 10+ years | $ |
| Alluminio | 35-50 lbs | Alta | 8-10 years | $$ |
| Fiberglass | 25-35 lbs | Moderata | 3-5 years | $$$ |
Fabric Options: Polyester, Vinyl, and Canvas
The frame gets you through the wind. The fabric is what sells your brand. Here is what you need to know about each material.
Polyester. The industry standard for promotional tents, and for good reason. Polyester takes dye-sublimation printing better than any other material, which means your colors will be vibrant and your gradients will be smooth. It is also lightweight and dries quickly. The downsides? It is not as tear-resistant as other options, and it degrades faster under prolonged UV exposure. Look for a 600D or higher denier rating—anything less is too flimsy for outdoor use. A good quality polyester canopy can last 3-5 years with proper care.
Vinyl. The heavy-duty option. Vinyl is essentially PVC-coated polyester, and it is significantly more durable than bare polyester. It is waterproof, resistant to tearing, and holds up better in high winds because it does not flap as much. The trade-offs are real: vinyl is heavy (a 10×10 canopy can weigh 25+ pounds just for the fabric), it is harder to fold, and it does not print as crisply. Dye-sublimation does not work on vinyl—you are stuck with screen printing or vinyl appliqué, which means fewer colors and less detail. Use vinyl for long-term installations or high-wind environments where print quality is secondary.
Canvas. The premium choice, but not for everyone. Canvas (typically cotton or a cotton-poly blend) has a premium, textured look that polyester cannot replicate. It is also naturally breathable, which helps with condensation in humid environments. However, canvas is heavy, absorbs water (getting significantly heavier when wet), and requires more maintenance—mold is a real risk if you do not dry it properly before storage. The printing process is also more expensive, usually requiring either screen printing or hand-painting. Canvas is best for high-end activations where aesthetics are paramount and you have a dedicated team to manage setup and teardown.
The practical advice: For 90% of promotional applications, go with 600D polyester. It is the best balance of print quality, weight, durability, and cost. Upgrade to vinyl only if you are dealing with extreme weather conditions or long-term installations.
Fire Retardancy and Safety Certifications (NFPA 701, CPAI-84)
This is the part that most buyers skip, and it is the one that can get you shut down or worse. Event venues, especially convention centers and public parks, have strict fire safety requirements. If your tent does not meet them, you will be turned away at the door—and you will not get your money back.
NFPA 701 is the standard you need to know. This is the National Fire Protection Association’s test method for flame propagation of textiles and films. There are two parts:
- NFPA 701 Test Method 1 applies to fabrics used in awnings, tents, and similar structures.
- NFPA 701 Test Method 2 covers thin films and vinyl materials.
Under this standard, a fabric sample is exposed to a flame for a specified duration, and the flame must not spread beyond a certain distance or continue burning after the ignition source is removed. The pass criteria are strict—flame propagation cannot exceed 2 inches beyond the burn area, and the material cannot continue to flame after the test flame is removed.
CPAI-84 is the other certification you will see, particularly for larger tents and event structures. This is the Canvas Products Association International’s standard for flame resistance of tentage materials. It is similar to NFPA 701 but is specifically designed for larger tent structures and includes additional criteria for things like seam integrity and material thickness.
Here is what you need to do: Before you order, ask the supplier for the specific certification test report—not just a blanket statement that the tent is “fire retardant.” The report should show the test method (NFPA 701 or CPAI-84), the date of testing, and the results. If they cannot produce this document, walk away. I have seen too many brands show up to a venue with a “fire retardant” tent that could not produce the paperwork, and they were sent home.
One more thing: fire retardancy is a chemical treatment, and it does not last forever. The flame-retardant properties degrade with washing, UV exposure, and general wear. Most manufacturers recommend re-treating the fabric every 2-3 years for outdoor tents. Budget for this as part of your ongoing maintenance costs.
Printing Quality: Dye Sublimation vs. Screen Printing vs. Vinyl
Your tent is a billboard, and the quality of that billboard determines whether people stop and look or walk right past. Here is what you need to know about the three main printing methods.
Dye Sublimation. This is the gold standard for promotional tents, and here is why: the ink is infused into the fabric at the molecular level, not printed on top of it. The process involves printing the design onto transfer paper, then using heat and pressure to turn the ink into a gas that bonds with the polyester fibers. The result is a print that will not crack, peel, or fade—it becomes part of the fabric itself. Colors are vivid, gradients are smooth, and you can achieve photographic quality. The catch is that dye-sublimation only works on polyester fabrics, and the setup cost is higher because each design requires a separate production run. For full-color branding with logos, images, or complex graphics, this is the only way to go.
Screen Printing. This is the traditional method. Ink is forced through a mesh stencil onto the fabric, one color at a time. The advantages are cost—it is cheaper for simple designs with one or two colors—and durability—the ink sits on top of the fabric and can withstand more physical abrasion. The limitations are significant: you are limited to solid colors (no gradients or photographic images), and the print can crack or peel over time, especially on fabrics that flex. Screen printing is best for simple logos with limited colors, or for vinyl and canvas materials where dye-sublimation is not an option.
Vinyl Appliqué. This method involves cutting designs out of adhesive vinyl and heat-pressing them onto the fabric. It is fast, cheap, and works on any fabric type. The downsides are that it looks flat and plasticky, it is not suitable for detailed designs, and the edges can peel over time. I would only recommend this for temporary banners or budget-conscious projects where print quality is not a priority.
The bottom line: For a promotional tent that represents your brand, dye-sublimation is the only choice. The upfront cost is slightly higher, but the print will outlast the tent, and the visual impact is dramatically better. If a supplier is offering “full-color printing” on a vinyl tent, ask them what method they are using—if it is not dye-sublimation, the colors will disappoint.
Setup and Takedown: Step-by-Step Guide and Time Estimates
I have timed myself doing this dozens of times, and I have the process down to a science. Here is the real-world breakdown, assuming you have two people and you have done this at least once before.
Setup (Total: 8-12 minutes)
- Remove the tent from the bag and lay it flat (1-2 minutes). Unzip the bag completely, not just partially. Pull the tent out and orient it so the roof is facing up. Locate the four corners and spread them out.
- Extend the frame legs (2-3 minutes). This is the part that takes practice. Each corner has a scissors-joint that needs to be extended. Start with one corner, push up on the roof assembly, and lock the joint. Move to the opposite corner, then the other two. The key is to work diagonally—if you extend two adjacent corners first, the frame will bind.
- Raise the roof (3-4 minutes). Once all four corners are locked, stand inside the frame and push up on the center of the roof. This is where the “instant” part comes in—the scissor mechanism should click into place. If it does not, check that all the corner joints are fully locked. Some models have a push-button lock at the center; others use a spring-loaded pin.
- Secure the legs (1-2 minutes). Each leg has a telescoping section that extends to your desired height. Most tents have two height settings: a lower setting for wind resistance and a higher setting for headroom. Extend the legs, insert the locking pins, and adjust the tension.
- Anchor the tent (2-3 minutes). This is non-negotiable. Place weight bags or sandbags on the anchor plates, or drive stakes through the anchor holes if you are on grass. Do not skip this step—I have seen tents take off with the wind in under five seconds.
Takedown (Total: 6-10 minutes)
- Remove all anchoring (1-2 minutes). Take off weights, pull up stakes, and set them aside where you will not trip over them.
- Lower the legs (1-2 minutes). Remove the locking pins and telescope the legs back down. Do this for all four corners before touching the roof.
- Collapse the roof (3-4 minutes). This is the tricky part. Pull up on the center of the roof to release the lock, then push the roof down. The frame will fold in on itself—guide it gently to avoid pinching your fingers.
- Fold the legs inward (1-2 minutes). Fold the four corners inward so the frame is compact.
- Roll the tent and bag it (1-2 minutes). Roll the fabric tightly—air pockets make the bag hard to close. Put the frame in first, then the fabric on top. Zip it up and you are done.
Time estimates for solo setup: Add 5-8 minutes to the setup and takedown times. It is doable, but you will need to be methodical and patient.
Maintenance and Storage Tips to Extend Tent Lifespan
A promotional tent is a piece of equipment, and like any equipment, it needs maintenance. Here is what I have learned from years of running these units in the field.
After every event:
- Shake out the debris. Before you fold the tent, turn it over and shake out any leaves, dirt, or debris that accumulated. This prevents abrasion during storage.
- Wipe down the frame. Dirt and grime on the frame can wear down the finish over time. A quick wipe with a damp cloth takes 30 seconds and adds years to the frame’s life.
- Check for damage. Look for tears in the fabric, bent frame pieces, or loose rivets. Fix small issues immediately—a tiny tear will become a large one if left alone.
Pulizia:
- Spot clean with mild soap and water. Use a soft brush or sponge. Do not use harsh chemicals, bleach, or abrasive cleaners—they will damage the print and the fabric’s water resistance.
- Never machine wash. The agitation will destroy the fabric and the print.
- Dry completely before storage. This is the most important rule. If you pack a damp tent, mold and mildew will develop within days. I have seen $2,000 tents ruined this way.
Frame maintenance:
- Lubricate the joints annually. Use a silicone-based lubricant on the scissor joints and locking mechanisms. This prevents binding and makes setup easier.
- Check the tension. Over time, the cables inside the frame can stretch. If the roof starts to sag, you may need to tighten the tensioning system. Most frames have an adjustment mechanism—check your manual.
Stoccaggio:
- Store in a cool, dry place. Avoid attics or garages that get hot in the summer. Extreme heat will degrade the fabric and the print.
- Keep it off the ground. Place the bag on a shelf or pallet. If it sits on a concrete floor, moisture can wick through the bag and cause mildew.
- Do not stack heavy items on top. The frame can bend if you pile things on top of the bag.
Repair:
- Fabric tears: Use a patch kit designed for polyester or vinyl. Clean the area, apply the patch, and let it cure for 24 hours before using the tent.
- Bent frame pieces: Most manufacturers sell replacement parts. Do not try to bend a frame piece back into shape—it will have lost its structural integrity and will fail under load.
- Broken zippers: Replace them immediately. A broken zipper on the carry bag or sidewall is a minor annoyance now, but it will become a major problem when you cannot close the bag.
The lifespan of a well-maintained tent is often cited as 5-7 years for typical promotional use. With heavy use (weekly events), expect 3-4 years. If you are getting less than that, you are either buying cheap equipment or not maintaining it properly.
Cost Considerations: Price Ranges, Volume Discounts, and Hidden Fees
Let’s talk money, because this is where most people make mistakes. The price of a promotional tent depends on size, frame material, fabric quality, and print complexity. Here is what you should expect to pay.
Base pricing (10×10 with dye-sublimation print, aluminum frame):
| Market | Entry Level | Mid-Range | Premium |
|---|---|---|---|
| US | $400-600 | $700-1,200 | $1,300-2,200 |
| UK (£) | £300-450 | £500-900 | £1,000-1,700 |
| EU (€) | €350-520 | €580-1,050 | €1,150-1,950 |
| Australia (A$) | $550-800 | $950-1,600 | $1,800-3,000 |
These are ballpark figures for a standard 10×10 with single-sided printing. Double-sided printing adds 15-25%. Larger sizes scale up accordingly—a 10×20 typically runs 1.8-2x the price of a 10×10.
Volume discounts:
Most manufacturers offer tiered pricing. The typical structure is:
- 1-4 units: List price
- 5-9 units: 5-10% discount
- 10-24 units: 10-15% discount
- 25+ units: 15-25% discount
If you are ordering for a national campaign or a franchise network, these volume discounts can be significant. Ask for the pricing tier before you negotiate—some suppliers will not volunteer it.
Hidden fees to watch for:
- Artwork setup fee. Some suppliers charge a fee to prepare your logo file for printing. This is pure profit—any competent supplier can handle standard vector files for free.
- Shipping. Freight costs can add 5-10% to your total. For oversize items like tents, shipping is calculated by dimensional weight, not actual weight. Budget for domestic shipping and more for international.
- Expedite fees. If you need your tent in under two weeks, expect a 10-20% surcharge.
- Sidewalls and accessories. These are almost always sold separately. A set of four sidewalls typically costs $150-300. Weight bags are $20-40 each. Do not assume anything is included.
- Custom shapes. If you want a tent that is not a standard square or rectangle, expect a premium and a longer lead time.
The practical advice: Get three quotes from different suppliers and compare line by line. Do not just look at the bottom line—look at what is included. A $600 tent with free shipping and free artwork setup may be a better deal than a $550 tent with $100 in hidden fees.
International Shipping and HS Codes for Promotional Tents
If you are sourcing from overseas manufacturers or shipping to multiple countries, you need to understand the customs and tariff landscape. Here is what I have learned from shipping tents to four continents.
HS Codes:
The Harmonized System (HS) code for promotional tents is 6306.22 — this covers “tents of synthetic fibres, not elsewhere specified.” More specifically:
- 6306.22.00 — Tents of synthetic fibers (polyester, nylon, etc.)
- 6306.29 — Tents of other textile materials (canvas, cotton)
If your tent includes a metal frame, there is a question about whether it should be classified as a tent (Chapter 63) or as a structure (Chapter 73 for steel, Chapter 76 for aluminum). In practice, most customs authorities classify promotional tents under 6306.22 because the textile component is the primary material by value.
Duty rates vary by country:
| Country | Duty Rate on 6306.22 |
|---|---|
| US | 3.9% (MFN rate) |
| EU | 6.7% (common external tariff) |
| UK | 6.7% (post-Brexit, aligned with EU) |
| Australia | 5% |
| Canada | 7% |
Important note: These rates are for countries with normal trading relations. If you are importing from a country with preferential trade agreements (e.g., USMCA for Mexico/Canada, or GSP for developing countries), you may qualify for reduced or zero duty rates. You will need a Certificate of Origin to claim these preferences.
Additional considerations:
- VAT/GST: You will pay value-added tax (VAT) on import in most countries. The rate varies—VAT rates vary by country: 20% in the UK and EU, 10% in Australia, 5% in Canada (GST).. This is charged on the total of the goods value plus shipping plus duty.
- Documentation: You will need a commercial invoice, packing list, and bill of lading. For US imports, you also need an ISF (Importer Security Filing) if shipping by ocean.
- Lead times: Ocean freight from Asia to the US West Coast typically takes 2-3 weeks; to Europe it takes 3-4 weeks. Air freight is 3-5 days but costs significantly more.
Consigli pratici: If you are shipping internationally, ask your supplier to quote on a Delivered Duty Paid (DDP) basis. This puts the customs clearance responsibility on them and avoids surprise fees at the border. The price may be higher, but the predictability is worth it.
Environmental Impact: Recyclability and Sustainable Options
Greenwashing is rampant in this industry, so let me give you the straight facts on what is actually recyclable and what is not.
Polyester fabric: Technically recyclable, but the reality is more complicated. Dye-sublimation printing infuses the ink
into the fibers, making it difficult to separate the ink from the plastic during the recycling process. Most municipal recycling programs do not accept printed polyester. However, some specialized textile recyclers (like Renewcell or Evrnu) can handle it, breaking it down chemically to create new polyester yarn. The catch: the fabric must be clean, free of zippers or hardware, and you typically need to send it in bulk (at least a few hundred kilograms) to make it economical. For small-scale producers, this is rarely feasible.
Nylon fabric: Similar story to polyester, but slightly better. Nylon can be recycled through depolymerization, which returns it to its original monomer. However, the same dye-sublimation printing issue applies. Also, nylon’s recycling infrastructure is less developed than polyester’s, so your options are even more limited.
Hardware (zippers, buckles, clips): These are almost always made of metal or plastic that is not biodegradable. In practice, they end up in landfill. Some companies offer take-back programs where you can send in worn-out gear, and they will strip the hardware and recycle the metal separately. Patagonia and The North Face have such programs, but they are the exception, not the rule.
The honest take: If you are a small brand, your product will almost certainly end up in a landfill at the end of its life. That is the reality. What you can do is design for longevity—use heavier fabrics, reinforced seams, and replaceable components—so the product lasts longer and the environmental impact per use is minimized. Also, consider using recycled polyester or nylon from the start; it reduces the carbon footprint of the raw material by about 30-50% compared to virgin plastic, even if the end-of-life recycling is not practical.
Cost Breakdown: What You Are Really Paying For
Let’s break down the final cost of a typical custom patch, so you know where your money goes and where you might be able to negotiate.
| Component | Typical Cost Range (per patch, small qty) | Note |
|---|---|---|
| Fabric (polyester twill) | $0.10 – $0.30 | Depends on quality and thickness |
| Dye-sublimation printing | $0.20 – $0.50 | Setup cost is usually separate |
| Border stitching (merrow) | $0.15 – $0.40 | Adds durability and a finished edge |
| Backing (iron-on, Velcro, or adhesive) | $0.10 – $0.30 | Velcro is the most expensive |
| Labor (cutting, sewing, QC) | $0.50 – $1.50 | Dominated by labor in high-cost countries |
| Total (small qty, e.g., 100 pcs) | $1.05 – $3.00 | Before shipping and duties |
Scaling effects: As you increase quantity, the per-unit cost drops significantly. At 1,000 pieces, you might see a 30-40% reduction. At 5,000 pieces, another 20-30% drop. The reason is that setup costs (like creating the print screen or digitizing the embroidery file) are amortized over more units, and the factory can run more efficient production batches.
Hidden costs to watch for:
- Setup fees: Many factories charge a one-time setup fee for creating the print file or embroidery program. This can range from $25 to $150, depending on complexity. Ask for this to be waived if you are ordering a larger quantity.
- Color matching: If you need a specific Pantone color, expect a small surcharge. Standard colors are usually free.
- Rush orders: Need it in 5 days instead of 3 weeks? That will cost you 20-50% more.
- Minimum order quantities (MOQs): Some factories have a 100-piece minimum, others will do 10. The lower the MOQ, the higher the per-unit price.
Negotiation tip: Always ask for a quote that separates material, labor, and setup. This gives you leverage to say, “I can find cheaper fabric elsewhere,” or “Can you reduce the setup fee if I order 500 instead of 100?” Factories are often flexible if you are transparent about your volume.
Choosing a Supplier: Red Flags and Green Flags
Not all factories are created equal. Here is a quick checklist to help you separate the good from the bad.
Green flags:
- Transparent pricing: They give you a detailed breakdown without you having to ask.
- Samples before bulk: They offer to send you a physical sample before you commit to a large order. A reputable factory will charge a small fee for this, which is usually credited toward your order.
- Clear communication: They respond to emails within 24-48 hours and answer your questions directly, not with vague promises.
- References or reviews: They can point you to existing clients or show you a portfolio of past work.
Red flags:
- Unusually low prices: If it sounds too good to be true, it is. Cheap labor often means poor quality control, inconsistent colors, or thin fabric that falls apart.
- No sample policy: They insist on a large order before sending a sample. This is a huge sign they are not confident in their product.
- Vague about lead times: They say “it will be ready soon” without giving a specific date. This leads to missed deadlines and frustrated customers.
- No physical address or verifiable business info: A factory that hides its location is a risk. Do a quick Google Maps check to see if the address is real.
A final word on communication: If you are working with an overseas factory, language barriers are real. Use simple, clear English, and confirm every detail in writing. If possible, ask for photos or videos of the production process at key stages (fabric cutting, printing, stitching). This gives you peace of mind and catches errors early.
Conclusion: Your Next Steps
You now have the full picture—from fabric types to printing methods, from duty rates to environmental realities. Here is a simple action plan to get started:
- Decide on your patch type: Embroidered for a classic, textured look; woven for fine detail; PVC for durability and waterproofing; or dye-sublimation for full-color photo-like designs.
- Choose your backing: Iron-on for easy application, Velcro for versatility, or adhesive for temporary use.
- Get quotes from 3-5 suppliers: Use the cost breakdown above to compare apples to apples. Ask for a sample before committing.
- Factor in shipping and duties: Use the tariff table to estimate your landed cost, and consider DDP terms to avoid surprises.
- Plan for the environment: Design for longevity, and be honest with your customers about the product’s end-of-life.
Custom patches are a small but mighty product—they can elevate a brand, tell a story, or just add a personal touch. With the knowledge you have now, you are equipped to make smart decisions, avoid common pitfalls, and get exactly what you pay for. Good luck, and happy manufacturing.
Domande Frequenti
Q: What is the minimum order quantity (MOQ) for custom patches?
A: It varies widely by supplier and method. Embroidery typically has an MOQ of 50–100 pieces, while woven patches may start at 100. PVC and dye-sublimation can sometimes go as low as 10–20 pieces, but expect higher per-unit costs at low volumes. Always ask—some factories will accommodate smaller runs for a setup fee.
Q: How long does production take?
A: Standard lead time is 2–4 weeks for embroidery and woven, and 1–3 weeks for PVC or dye-sublimation. Add 1–2 weeks for international shipping. Rush orders are often possible for an extra fee, but plan ahead to avoid disappointment.
Q: Can I get a digital proof before production?
A: Yes, reputable suppliers will provide a digital mockup (often as a PDF or image) for approval before any cutting or stitching. For embroidery, some also offer a physical “sew-out” sample—this is worth paying for if you’re ordering in bulk, as it shows the true texture and color.
Q: What file format should I send?
A: Vector files (AI, EPS, PDF, or CDR) are ideal for sharp lines and scaling. If you only have a JPEG or PNG, make sure it’s high-resolution (300 DPI or more) and clearly separated from the background. Avoid low-res web images—they will look blurry when enlarged.
Q: Are there any copyright issues with custom patches?
A: Yes. Do not reproduce logos, characters, or designs you don’t own or have a license for. Factories will often ask for a confirmation that you own the rights. If you’re creating a patch for a fan community or parody, tread carefully—commercial use can lead to legal trouble.
Q: How do I attach patches to garments?
A: Iron-on backings are the most common for consumer use—just apply heat and pressure. Velcro is great for tactical or outdoor gear where you want to swap patches. Sew-on is the most durable for heavy-use items like jackets or bags. Adhesive backings are best for temporary applications like event badges.
Glossary of Key Terms
| Term | Meaning |
|---|---|
| MOQ | Minimum Order Quantity—the smallest number of units a supplier will produce. |
| DDP | Delivered Duty Paid—seller covers shipping, duties, and taxes to your door. |
| Landed cost | Total cost per unit including production, shipping, duties, and fees. |
| Sew-out | A physical sample of an embroidered patch to check texture and colors. |
| Merrow border | A stitched edge that finishes the patch, giving it a clean, professional look. |
| Backing | The material on the back of a patch (iron-on, Velcro, adhesive, etc.). |
| Pantone | A color matching system used for precise color reproduction. |
Final Checklist Before You Order
- [ ] Patch type confirmed (embroidered, woven, PVC, or dye-sub)
- [ ] Backing selected (iron-on, Velcro, adhesive, or sew-on)
- [ ] Vector file prepared and high-resolution
- [ ] Colors specified (Pantone codes if possible)
- [ ] Size and shape finalized
- [ ] MOQ and per-unit cost within budget
- [ ] Shipping method and duty terms agreed upon
- [ ] Sample or digital proof approved
- [ ] Production timeline matches your deadline
With this guide in hand, you’re ready to approach any supplier with confidence. Whether you’re ordering a hundred patches for a local event or ten thousand for a retail line, the principles remain the same: plan carefully, communicate clearly, and always sample before you scale.
Common Pitfalls to Avoid
Even experienced buyers make mistakes. Here are the most frequent ones and how to sidestep them:
- Sending low-resolution images. A blurry logo will produce a blurry patch. Always send vector files (AI, EPS, PDF) or 300+ DPI PNGs.
- Skipping the sample. A digital proof is not the same as a physical sew-out. Colors shift, threads differ, and edges can feel different in person.
- Ignoring the merrow border width. A standard border is 3–4 mm. If you want a thinner or thicker edge, specify it—otherwise, you’ll get the default.
- Assuming all Velcro is the same. Hook-and-loop comes in different strengths and textures. If the patch will be worn on a uniform, test the Velcro against the actual fabric.
- Forgetting about minimums for each design. If you order five designs, the MOQ applies per design, not in total. A 100-piece MOQ means 500 patches if you have five designs.
- Not accounting for shrinkage. Some materials, especially woven patches, can shrink slightly during production. Add 1–2 mm tolerance to critical dimensions.
How to Communicate with Suppliers Effectively
Clear communication prevents costly errors. Use this structure when requesting a quote:
- Patch type (e.g., embroidered, 100% polyester thread)
- Dimensions (width × height in mm or inches)
- Forma (round, rectangular, custom die-cut)
- Backing (iron-on, Velcro, adhesive, sew-on)
- Quantity (exact number, not a range)
- Color reference (Pantone codes or a high-res image)
- Deadline (production time plus shipping time)
- Budget per unit (optional, but helps narrow options)
Attach your artwork file and a mockup if possible. Suppliers respond faster and more accurately when they can see exactly what you want.
When to Order from Overseas vs. Domestically
| Fattore | Overseas (e.g., China, Vietnam) | Domestic (e.g., US, UK, EU) |
|---|---|---|
| Cost per unit | Lower (often 30–50% less) | Più alto |
| MOQ | Higher (often 100–500 per design) | Lower (sometimes 10–25) |
| Tempo di consegna | 2–4 weeks production + shipping | 1–2 weeks |
| Shipping cost | Higher, especially for small orders | Lower or included |
| Communication | Time zone differences, possible language barriers | Easier, same time zone |
| Quality control | Requires trust or third-party inspection | Easier to visit or request rework |
Rule of thumb: For orders under 50 patches, go domestic. For orders over 500, overseas usually wins on price—provided you have time for shipping and can manage quality remotely.
How to Estimate Your Total Budget
Use this simple formula:
Total Cost = (Per-unit cost × Quantity) + Tooling/Setup Fee + Shipping + Duties/TaxesExample for 500 embroidered patches:
| Articolo | Costo |
|---|---|
| Per-unit cost | $1.20 × 500 = $600 |
| Setup/digitizing fee | $50 |
| Shipping (DDP) | $40 |
| Total landed cost | $690 |
| Cost per patch | $1.38 |
Always ask for a full breakdown—some suppliers hide setup fees or charge extra for backing changes.
Considerazioni finali
Ordering custom patches is a straightforward process once you understand the variables. The key is to treat it like any other manufacturing project: define your specs, request samples, and build a relationship with a supplier who communicates clearly. The extra time spent upfront on planning and sampling will save you from expensive mistakes and ensure your patches look sharp, last long, and fit your purpose perfectly.
Now you’re equipped to get started. Choose your type, pick your backing, and send that first inquiry—your patches are closer than you think.







