

Your arch just collapsed at mile 2. The first runners are bearing down on it, and your entire finish line—the thing sponsors paid real money to brand—is a sagging, deflated heap of PVC. I’ve watched this exact scene play out more times than I care to count. One organizer I know in Chicago told me their whole setup toppled shortly before the first runner crossed, and they ended up dragging tables and chairs across the road as a makeshift finish. Let’s be real: nothing screams “organized event” like a deflated pile of vinyl.
That’s why I’m writing this guide. Not because arches are complicated—they’re basically giant balloons with fans. But because the difference between a flawless event and a public embarrassment comes down to a handful of decisions you make weeks before race day. This is decision-ready, no fluff, no sales pitch. Just the stuff I wish someone had told me when I started booking these things.
Quick Answer
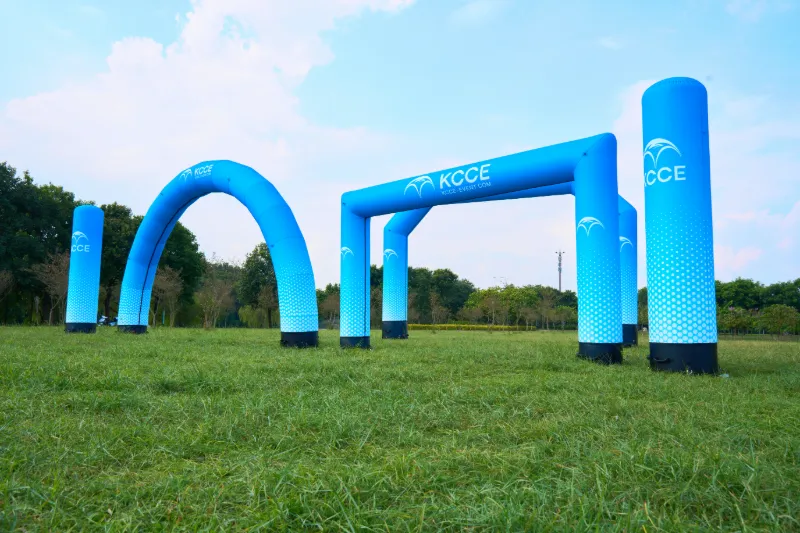
An inflatable arch is a fabric structure inflated by a continuous blower, used to mark start/finish lines, entrances, and brand moments at events. The key to success? Matching size to your venue, anchoring properly for wind, and choosing between renting or buying based on how often you’ll use it.
What Is an Inflatable Arch? Types & Shapes
Let’s start with the basics, because honestly, a lot of organizers don’t realize how many different configurations exist. When people say “inflatable arch,” they usually mean one of three things.
First, the start/finish arch—the classic race gateway. These are typically wide enough to span a road or path, with a flat top that carries sponsor logos and event branding. They’re the workhorses of marathons, triathlons, and cycling events. Morning Tents, a supplier I’ve tracked for years, notes that these arches mark start and finish lines with style and professionalism, serving as both a practical structure and a visual branding tool. That’s not marketing speak—it’s just true. A good arch transforms a nondescript stretch of asphalt into a destination.
Second, there’s the gateway arch—think grand openings, school graduations, trade show entrances. These tend to be smaller, more portable, and often shaped differently. Instead of spanning a road, they frame a doorway or a booth. They’re less about timing and more about drawing the eye.
Third, and this is where it gets fun, are custom shapes. You can get arches with mascot integration, arches shaped like product replicas, arches with integrated lighting. Promo Bears USA, a custom inflatable specialist with over 16 years in the design game, offers original designs in your desired colors and shapes, with optional lights and mascot integration. If you can dream it, someone can probably inflate it.
The shape question matters more than you’d think. A standard arch is symmetrical—two legs, one top. But some events call for offset designs, or arches with side wings, or arches that taper. Your choice here affects everything downstream: how it packs, how it anchors, how it looks in photos. My advice? Don’t get cute with shapes unless you have a specific branding need. The classic arch reads instantly as “finish line” to any athlete. A weird shape just reads as “what is that?”
Sizing: What You Actually Need
Here’s where organizers screw up most. They order an arch that’s too small for the venue, or too big for the space they’re working with. Both are embarrassing in different ways.
The rule of thumb I’ve developed over years of doing this: the arch should be noticeably taller and wider than the flow of traffic passing through it. If runners are funneling through a 10-foot opening, a 12-foot arch feels cramped. If the arch is 20 feet wide and the road is 15 feet, you’ve got a problem with clearance on the sides.
Height is the bigger variable. A start/finish arch for a 5K needs to clear the tallest participant—which, unless you’re hosting the NBA Finals, is rarely an issue. But you also need to think about what’s above the arch: power lines, tree branches, entrance canopies. I once saw an organizer order a 20-foot arch for a venue with a 14-foot awning. The setup crew spent an hour trying to angle the thing sideways just to get it inflated. Don’t be that person.
Width matters too, but in a different way. Wider arches need more anchoring surface area, which means more weights, more stakes, more time. A 30-foot arch might look impressive, but it’s also a sail. Wind load increases exponentially with surface area, not linearly. That’s basic physics, and it’s why you’ll see suppliers ask about your venue’s wind exposure before quoting a price.
Here’s a practical tip: measure your venue before you even contact a vendor. Know the width of the road or path, the height of any overhead obstructions, and the ground type (grass, concrete, asphalt). You’ll save yourself a lot of back-and-forth, and you’ll sound like you know what you’re doing—which, after reading this, you will.
Materials & Build Quality Explained
Now we’re getting into the weeds, but this is where the real value lies. The difference between a $500 arch and a $3,000 arch isn’t markup—it’s materials.
Most inflatable arches are made from either PVC vinile o tessuto in nylon (often called Oxford fabric). PVC is the heavy-duty option. It’s thicker, more puncture-resistant, and handles repeated use better. The downside? It’s heavier, which means more transport weight and longer inflation times. Nylon, on the other hand, is lighter and packs smaller, but it’s more susceptible to abrasion and can develop pinhole leaks over time.
Morning Tents points out that lightweight PVC or Oxford fabric constructions can be inflated within minutes, drastically reducing setup time while improving portability. That’s the trade-off in a nutshell: durability versus convenience.
Beyond the base fabric, look at the seams. Seams are the weak point of any inflatable. A good seam is double-stitched and then heat-sealed or RF-welded. A cheap seam is just stitched, which means it’ll leak air and eventually split under stress. I’ve seen arches fail at mile 2 (remember the intro?) because the seam gave way under wind load.
Reinforcement matters too. The corners where the legs meet the top take the most stress. Quality manufacturers add extra layers of fabric and webbing at these stress points. Promo Bears USA advertises their custom inflatable arches as “made to last,” and while that’s marketing, the underlying spec—reinforced stress points, quality zippers, properly sealed seams—is real.
Print quality is the final tier. Cheap arches use screen printing, which fades and cracks. Better arches use dye sublimation, where the ink is embedded in the fabric itself. For a branded event arch that’ll be photographed thousands of times, dye sublimation is non-negotiable. You want your sponsor’s logo to look sharp in every photo, not washed out and cracked after three uses.
My honest take? If you’re buying an arch you plan to use more than five times a year, spend the extra money on PVC with reinforced seams and dye-sublimated printing. It’ll last years longer and cost less per use than replacing a cheap arch every season.
Blowers & Inflation Basics
The blower is the heart of the operation. No blower, no arch. It’s that simple.
Blowers are rated by CFM (cubic feet per minute)—the volume of air they move. Bigger arches need higher CFM ratings to maintain internal pressure, especially in windy conditions. A small gateway arch might run fine on a 1 HP blower, but a 30-foot start/finish arch needs something in the 2–3 HP range, minimum.
Power requirements are the thing organizers forget. Blowers draw serious current. A 2 HP blower can draw a high amount of current., which means you need a dedicated circuit. I’ve seen events where the arch blower tripped a breaker and the whole arch deflated mid-ceremony. The fix is simple: know your power source in advance, bring extension cords rated for the load, and never daisy-chain blowers off the same circuit as the sound system.
Inflation time is usually faster than people expect. A typical arch goes from flat to fully inflated in 2–5 minutes with a properly sized blower. That’s one of the big advantages over metal or wooden frames, which take an hour or more to assemble. Morning Tents highlights this exact benefit—inflatable arches drastically reduce setup time while improving portability.
Noise is the hidden gotcha. Blowers are loud. Not deafening, but noticeable. A 2 HP blower running at full tilt sounds like a large vacuum cleaner. If your arch is near a podium, a ceremony stage, or a quiet zone, you’ll want to position the blower away from the action or plan for a quieter model. Some manufacturers offer sound-dampened blowers, but they cost more.
One more thing on inflation: the blower needs to run continuously. Inflatable arches aren’t like pool floats—you don’t blow them up and seal them. They’re constantly pressurized by the blower, which is why they’re technically “air-supported” structures. If the blower stops, the arch starts deflating. That’s why backup blowers are a thing, and why you should always have a spare on hand for critical events.
Anchoring & Safety (Non-Negotiable)
This is the section I wish every organizer would tattoo on their forearm. Anchoring is not optional, and it’s not something you can improvise on site. It’s the difference between a successful event and a liability nightmare.
Wind speed limits are the first thing to know. Most manufacturers rate their arches for winds up to 20–25 mph, and some for higher with proper anchoring. But here’s the thing: those ratings assume you’ve anchored correctly. A poorly anchored arch will fail at low wind speeds. A well-anchored arch can sometimes handle higher gusts. The variables are your ground type, your weight configuration, and the arch’s surface area.
Ground type determines your anchoring method:
- Erba: Use stakes (usually provided with the arch) driven at an angle through the anchor loops. For extra security, add sandbags or water weights on top of the stakes. Grass is actually the easiest surface to anchor on, but stakes can pull out of soft, wet soil.
- Concrete: Stakes won’t work. You need sandbags, water weights, or concrete blocks placed on the anchor points. The heavier, the better. For a large arch, we’re talking about a significant amount of weight per leg minimum.
- Asphalt: Same as concrete, but with a caveat—some venues won’t allow weights directly on asphalt because they can leave marks. Use a protective layer (like a tarp) under the weights.
Common failure modes are predictable, which means they’re preventable:
- Insufficient weight: The arch lifts off the ground and tumbles. This is the most common failure, and it’s always the organizer’s fault.
- Blower failure: Power outage or tripped breaker. The arch deflates slowly, then collapses. Prevention: backup blower, dedicated circuit, and a plan for power loss.
- Seam failure: The fabric gives way under stress. Prevention: buy quality, inspect before every use.
- Torn anchor loops: The fabric loops that hold your stakes or weights rip out. Prevention: inspect before use, don’t exceed the arch’s rated wind speed.
Here’s the anchoring formula I use: one stake or weight per anchor point, plus one spare. If the arch has four anchor points, that’s four stakes plus four backup weights. If you’re in a windy area, double it. It takes an extra ten minutes and costs almost nothing, but it’s the difference between confidence and anxiety.
The Chicago organizer I mentioned earlier? Their arch toppled because they used two sandbags on a 20-foot arch in 15 mph winds. They should have had eight. Don’t learn this lesson the hard way.
Cost Breakdown: Rent vs. Buy
Money time. This is usually the first question organizers ask, and it’s the right one. But the answer depends entirely on your use case.
| Fattore | Rental | Purchase |
|---|---|---|
| Upfront cost | $200–$600 per event | $1,500–$5,000+ |
| Per-use cost (1–2 events/year) | $200–$600 | $750–$2,500 |
| Per-use cost (5+ events/year) | $1,000–$3,000 | $300–$1,000 |
| Custom branding | Limited to stock designs | Fully custom, yours forever |
| Tempo di consegna | 1–2 weeks | 4–8 weeks |
| Manutenzione | None (vendor handles it) | Your responsibility |
| Conservazione | Nessuna | Requires space |
| Risk | Rental unit may be worn | You control quality |
The numbers above are realistic ranges based on what I’ve seen in the industry. A standard 12-foot arch typically rents for a few hundred dollars per event. A custom-branded 20-foot arch can cost significantly more if you’re buying.
Boulder Blimp, a supplier I’ve tracked, makes a compelling case for buying in their 2026 investment analysis. They argue that as brands, nonprofits, and event organizers plan for tighter budgets, reusable assets matter more than ever. An inflatable arch isn’t just something you set up and take down—it becomes a focal point that reinforces your brand across different events, seasons, and audiences. That’s the strategic argument for buying.
But let me give you the pragmatic counterpoint. If you’re organizing one event per year, renting is almost always smarter. You don’t deal with storage, maintenance, or the risk of the arch sitting in a warehouse for 11 months. If you’re organizing five or more events per year—or if the arch is a permanent part of your brand presence—buying wins.
There’s also a middle path: rent first, buy later. Rent an arch for your first event to test the logistics. If it works, and you have more events coming, buy one for the next season. This is what I recommend to most organizers who are on the fence.
One more cost factor: shipping. Inflatable arches are bulky even when deflated. Shipping a large arch can add a significant amount to your cost., whether you’re renting or buying. Factor that into your budget, and ask vendors about freight costs upfront.
Logistics, Transport & Storage
Nobody thinks about logistics until they’re standing in a parking lot with a 200-pound duffel bag and no idea how to fit it in their car. Let’s fix that.
Deflated dimensions are the first thing to know. A 20-foot arch, when deflated and folded, typically packs into a bag that’s about 3 feet by 2 feet by 2 feet and weighs roughly 80–150 pounds. That’s manageable in a van or SUV with the seats down, but it’s not fitting in a sedan trunk. Check your vehicle’s cargo space before you commit to transporting an arch yourself.
For larger arches—30 feet and up—you’re looking at multiple bags and a serious amount of weight. Some suppliers offer crating for shipping, which protects the arch but adds bulk. If you’re renting, ask whether delivery and setup are included. Many rental companies will deliver, set up, and tear down for an additional fee, which is often worth it just for the peace of mind.
Storage conditions matter more than most people realize. Inflatable arches are fabric structures, and fabric degrades. The enemy is heat, moisture, and UV light. Store your arch in a cool, dry place, away from direct sunlight. If you’re storing it in a garage or shed, make sure it’s not in a spot where it’ll get baked by the sun through a window.
Durata varies widely based on material quality and care. A cheap nylon arch might last a few seasons with regular use. A quality PVC arch can last several years if maintained properly. The key is consistent care: clean it after each use, dry it completely before storing, and inspect it for damage regularly.
Here’s a packing checklist I use for every event:
- Arch (deflated, folded)
- Blower(s) + spare
- Extension cords (rated for blower load)
- Anchoring stakes or weights
- Sandbags or water weights
- Repair kit (patches, adhesive)
- Duct tape (always)
- Gloves (for handling stakes and weights)
- Tarp (to protect the arch from dirty ground)
Handling tips: Never drag an inflatable arch across rough ground—you’ll abrade the fabric and create leaks. Always lift and carry it, or use a cart. When folding, follow the manufacturer’s fold lines (if marked) to avoid creasing the fabric. And never store a wet arch—mold and mildew will destroy it faster than anything else.
Maintenance & Troubleshooting
Even with the best care, things break. The key is knowing what breaks and how to fix it fast.
Punctures are the most common issue. A stray nail, a sharp rock, a dropped weight—anything can poke a hole in the fabric. For small punctures (less than an inch), a standard inflatable repair kit works fine. Clean the area, apply adhesive, press on a patch, and let it cure. Most repairs take 15–30 minutes.
Seam splits are more serious. If a seam starts to separate, you need a professional repair. Some manufacturers offer repair services, and there are specialty shops that handle inflatable repairs. The cost is usually a fraction of replacing the arch, so it’s worth doing if the arch is otherwise in good shape.
Blower issues are the second most common problem. Blowers are electric motors, and they fail. The most common failure is overheating, usually from running too long without a break or from restricted airflow. Check the air intake regularly and keep it clear of debris. If a blower dies mid-event, your backup is your best friend.
Pulizia is straightforward: use mild soap and water, rinse thoroughly, and dry completely. Avoid harsh chemicals—they can degrade the fabric and the print. For stubborn stains, a soft brush works better than pressure washing, which can damage seams.
Ispezione should happen before every use. Check for:
- Punctures or abrasions
- Seam integrity
- Anchor loops (torn or stretched)
- Zipper function
- Print quality (cracking or fading)
- Blower condition (cord, intake, output)
Spare parts strategy: Always have a spare blower, a repair kit, and a roll of quality duct tape. That’s the minimum. If you’re running a large event, consider having a spare arch on standby—or at least a backup plan for what to do if the arch fails completely.
The essential tips for taking care of your inflatable arch come down to consistency. Clean it after every use. Dry it before storing. Inspect it before every event. Fix small problems before they become big ones. That’s it. There’s no magic to it, but there’s discipline.
Supplier Types: Promo Shops vs. Specialty Manufacturers
Who you buy from matters as much as what you buy. There are two main types of suppliers, and they’re very different animals.
Promo shops are the generalists. They sell branded merchandise—t-shirts, pens, tote bags—and inflatable arches are just one item in their catalog. They typically work with overseas manufacturers and act as middlemen. The pros: they’re easy to work with, they handle the design process, and they often offer competitive pricing. The cons: they may not have deep technical knowledge about inflatables, and their quality control can be inconsistent depending on the manufacturer they’re using.
Specialty manufacturers live and breathe inflatables. They design, fabricate, and sometimes print in-house. KCCE, for example, has been in the inflatable solutions game for years, offering everything from tende gonfiabili to mobili gonfiabili to custom shapes. Promo Bears USA is another example—they’ve got over 16 years of experience in inflatable design and creation. The pros: deep expertise, better quality control, and the ability to customize in ways promo shops can’t. The cons: often higher prices and longer lead times.
My recommendation? For a one-off event, a promo shop is fine. For anything you plan to use repeatedly, or for a custom design, go with a specialty manufacturer. You’ll pay more upfront, but you’ll get an arch that lasts and a partner who actually understands the product.
Here’s a trick for vetting suppliers: ask about their wind ratings and anchoring requirements. If they can’t answer clearly, they don’t know their product. A good supplier will have this information documented and will proactively share it with you.
How to Set Up and Take Down an Inflatable Arch
The setup process is simpler than most people expect, but there’s a right way and a wrong way. Here’s the step-by-step.
Setup:
- Lay out the arch on a clean, flat surface. Position it so the print faces the direction you want (usually toward the start line or entrance).
- Attach the blower to the inflation port. Make sure the connection is secure—a loose connection means air leaks.
- Power on the blower. The arch will start inflating immediately. Guide it as it rises, making sure it doesn’t snag on anything.
- Anchor as it inflates. Don’t wait until it’s fully inflated to start anchoring—the arch is most vulnerable to wind during inflation. Attach stakes or weights as soon as there’s enough fabric to work with.
- Check all anchor points. Give each one a firm tug. If anything moves, add more weight.
- Inspect the final setup. Walk around the arch, check for wrinkles, misalignment, or areas where the fabric is straining.
Total time: about 10–20 minutes for a standard arch with two people.
Take down:
- Power off the blower. The arch will start deflating immediately.
- Remove anchors as the arch deflates. Don’t leave weights on a deflating arch—they can damage the fabric.
- Fold the arch according to the manufacturer’s fold lines. If there are no marked lines, fold in a zigzag pattern, working from one end to the other.
- Pack the arch into its storage bag. Make sure it’s completely dry before sealing the bag.
- Coil and pack the blower and all cords. Check that you have all stakes and weights.
Total time: about 15–25 minutes.
The “from strike” part—meaning from the end of your event to packed and ready to go—should be under 30 minutes for a standard arch. If it’s taking longer, you’re either understaffed or overcomplicating it.
Inflatable Arch Setup: Common Mistakes to Avoid
I’ve seen a lot of setups go wrong over the years. Here are the most common mistakes, in no particular order.
Skipping the wind check. You checked the forecast, but weather changes. Always have a wind contingency plan. What’s your threshold for calling off the arch? What’s your backup if the arch can’t go up? These are questions to answer before you’re standing in a gusty field.
Under-anchoring on hard surfaces. Concrete and asphalt are tricky because stakes don’t work. Organizers often under-weight their arches on hard surfaces, thinking the ground itself provides stability. It doesn’t. You need explicit weight—sandbags, water weights, or blocks.
Ignoring power requirements. The blower needs a dedicated circuit. If you’re sharing a circuit with the sound system, you’re asking for a breaker trip. Know your power source in advance.
Forgetting the spare blower. Blowers fail. It’s not a matter of if, but when. Always have a spare.
Storing a wet arch. This is the silent killer. A damp arch stored in a bag will develop mold and mildew within days. The smell is almost impossible to remove, and the fabric degrades rapidly.
Not inspecting before use. A pre-use inspection takes five minutes and catches most problems. Skipping it is how you end up with a seam failure at mile 2.
Inflatable Arch for Sale: What to Look For
If you’ve decided to buy, here’s a framework for evaluating options. This applies whether you’re looking at a custom inflatable arch or a stock model.
Material quality: PVC is heavier but more durable. Nylon is lighter but less robust. For a purchase, I’d lean PVC unless portability is your top priority.
Seam construction: Double-stitched and heat-sealed is the gold standard. Ask the manufacturer about their seam process.
Print quality: Dye sublimation is the best. It’s embedded in the fabric and won’t crack or fade like screen printing.
Blower included?: Some arches come with a blower, some don’t. If not, factor that into your budget.
Garanzia: A good manufacturer will back their product. Look for at least a 1-year warranty on materials and workmanship.
Tempo di consegna: Custom arches typically take several weeks to produce. Plan accordingly.
Riferimenti: Ask for photos or videos of previous work. A reputable manufacturer will have a portfolio.
One more thing to consider: who’s going to repair it if something breaks? Some manufacturers offer repair services, others don’t. If you’re buying from an overseas manufacturer, shipping an arch back for repairs is impractical. In that case, make sure you’re comfortable with DIY repairs or find a local repair shop.
The Best Inflatable Arch Supplier: How to Choose
Choosing a supplier is like choosing any vendor—you’re looking for reliability, quality, and communication. Here’s what I’ve learned about vetting suppliers.
Ask about wind ratings. A good supplier will have documented wind ratings for their arches and will proactively share them. If they can’t answer, that’s a red flag.
Check their portfolio. Look for arches they’ve built for events similar to yours. If they’ve done marathon finish lines before, they know the drill.
Ask about anchoring. A good supplier will provide anchoring guidelines and may even supply stakes and weights. If they leave anchoring up to you without guidance, they’re not a partner—they’re a vendor.
Get references. Talk to other organizers who’ve used their products. Ask about setup experience, durability, and customer service.
Compare pricing, but don’t lead with it. The cheapest option is rarely the best value. A $500 arch that lasts one season costs more than a $1,500 arch that lasts five years.
KCCE, for example, positions itself as a leader in inflatable solutions with a focus on quality and customization. They offer everything from inflatable shapes to display frames, and their founder has a story worth reading if you’re curious about the industry’s evolution. But I’m not here to sell you on any specific supplier—I’m here to help you ask the right questions.
The bottom line: the best inflatable arch supplier is the one who treats your event like their own. They ask about your venue, your weather, your timeline. They provide documentation, not just quotes. They’re reachable when you have questions. That’s the standard.
Riferimenti
- Your Comprehensive Guide to Inflatable Arches for Events – MVP Visuals
- Top Inflatable Arches To Elevate Your Event | Expert Guide – KCCE Event
- The Role of Inflatable Arches in Sports Events: Start/Finish Lines – Morning Tents
- Custom Inflatable Arches – Promo Bears USA
- Why an Inflatable Arch Is a Smart Investment for 2026 – Boulder Blimp
Considerazioni finali
Inflatable arches have evolved from simple marketing gimmicks into versatile, professional-grade event solutions. Whether you’re launching a brand, crossing a finish line, or celebrating a milestone, the right arch can transform an ordinary space into something memorable.
The key takeaways are simple: choose the right size and style for your venue, invest in quality materials and a reliable blower, and follow proper setup and maintenance practices. With care, a good inflatable arch can serve you for years—delivering impact at a fraction of the cost of permanent structures.
As the event industry continues to embrace flexible, reusable branding solutions, inflatable arches are only becoming more popular. They’re lightweight, portable, customizable, and surprisingly affordable. If you’re planning an event and want to make a statement without breaking the budget, an inflatable arch is one of the smartest investments you can make.
Don’t forget to plan ahead: order with enough lead time for custom printing, check your venue’s power supply and anchoring options, and always have a backup plan for weather. A little preparation goes a long way in ensuring your arch stands tall—literally and figuratively—throughout your event.
Whether you’re a first-time buyer or a seasoned event planner, we hope this guide has answered your questions and given you the confidence to choose, use, and maintain the perfect inflatable arch. Happy event planning!
Domande Frequenti
Q: How to make an inflatable arch?
R: Most organizers don’t make arches themselves—they buy from manufacturers who design, cut, and weld the fabric. If you’re asking about DIY, you’d need PVC-coated fabric, a heat sealer, and a blower. In practice, custom inflatable arch guide resources from manufacturers cover the process, but it’s rarely worth doing yourself unless you have industrial equipment and experience.
Q: How to get an inflatable arch to stay up?
R: Anchoring is everything. Use stakes for grass, sandbags or water weights for concrete and asphalt. Always use one anchor per anchor point, plus backups. Check the wind forecast—most arches are rated for 20–25 mph winds with proper anchoring. If conditions exceed that, take the arch down.
Q: What to do with old inflatables?
R: If the arch is beyond repair, check if your manufacturer offers recycling or disposal services. Some suppliers will take back old inflatables for a discount on new purchases. Otherwise, deflate completely, dispose of the fabric responsibly, and keep the blower—it might work with your next arch.
Q: What is the best way to store inflatables?
R: Clean and dry the arch completely before storing. Fold along manufacturer fold lines, pack in the storage bag, and keep in a cool, dry place away from direct sunlight and heat sources. Check periodically for moisture or pests. Proper storage extends the life of your arch significantly.







