

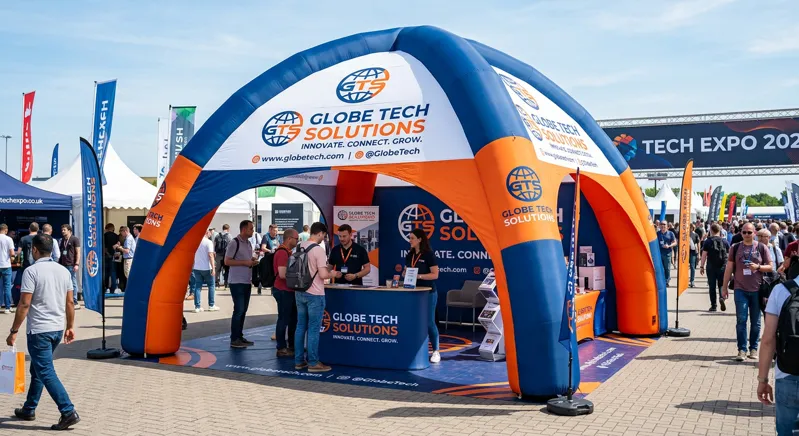
Your logo looks terrible on a sagging tent. I’ve seen it a hundred times at trade shows—a brand that spent real money on a booth, only to have their name printed across a flimsy pop-up that’s bowing in the wind like a tired beach umbrella. The colors are washed out, the fabric is wrinkled, and the whole thing screams “budget cut.” It doesn’t have to be that way.
If you’re here wondering how to customize inflatable advertising tents with your brand name the right way, you’ve come to the right place. I’ve spent years in the inflatable and event marketing industry, and I’ve watched buyers—smart, experienced marketing directors—get burned by cheap imports and overpriced middlemen. This guide walks you through the entire process, from preparing your artwork files to anchoring the finished structure at your next big event. We’ll cover file prep, printing methods, logo placement, costs, and the pitfalls that trip up first-time buyers.
Quick Answer
Customizing an inflatable advertising tent with your brand name involves seven steps: choosing the right shape and size, preparing vector artwork files (AI, PDF, or EPS at 150+ DPI), selecting a printing method like dye-sublimation, mapping logo placement to avoid seams and zippers, reviewing a digital proof, approving production (typically 2–4 weeks), and finally setting up and maintaining the structure properly.
What Are Inflatable Advertising Tents? (Quick Primer)
Let’s get the basics straight before we dive into the customization weeds. Inflatable advertising tents are air-supported structures made from PVC-coated polyester or similar heavy-duty fabric. They come in three primary configurations: arches (those big curved gateways you see at marathon finish lines), domes (the igloo-style shelters popular at expos), and canopies (larger covered spaces for product demos or registration areas). If you’re exploring options, our inflatable tent collection covers all these configurations with a focus on durability and brand visibility.
The difference between these and the standard pop-up tent you can grab at a big-box retailer is night and day. Pop-up tents use a scissor-frame mechanism with a fabric canopy stretched over the top. They’re fine for a Saturday farmer’s market, but they have real limitations. For starters, they catch wind like a sail. A gust hits the flat roof and suddenly you’re chasing your booth down the street.
Inflatable tents and domes, on the other hand, are continuously pressurized by a blower. The air pressure creates a rigid, stable structure that actually handles wind better than most frame tents—the air gives slightly and absorbs the force rather than resisting it outright. That’s not just my opinion; it’s physics, and it’s why you see inflatable structures at motorsport activations and outdoor festivals where the weather doesn’t always cooperate. A flagship example of this engineering is the Air Tight X Tent, which has been field-tested since 2008 for airtight, waterproof, and bug-proof performance.
Here’s the thing though: not every situation justifies the higher investment. If you’re doing a one-off garage sale or a single indoor networking event, a standard pop-up will do the job. But if you’re building brand visibility at multiple events throughout the year, or you need something that stands out from the sea of identical aluminum-frame canopies, custom inflatable units earn their keep. They’re portable marketing structures that capture attention from a distance—something a flat-sided canopy tent simply cannot do.
One more distinction worth making: inflatables in this category are different from custom inflatable advertising balloons or the giant product replicas you see floating above car dealerships. Those are purely decorative attention-grabbers. An inflatable tent is functional—it provides shelter or defines a space while simultaneously doing its advertising job.
Step 1: Choose Your Tent Shape and Size
Before you even think about logos and color palettes, you need to decide what physical form your inflatable will take. This decision drives everything else—printing costs, blower requirements, shipping logistics, and how much floor space you’ll need at your venue.
Arches are the workhorses of the inflatable world. You’ve seen them at race finish lines, concert entrances, and storefront grand openings. They create a literal gateway that every attendee must pass through, which makes them exceptional for event sponsorship signage. If your goal is high-traffic visibility rather than shelter, an arch is usually your best bet.
Domes are what most people picture when they hear “inflatable tent.” They’re self-contained structures with interior space for tables, product displays, or sampling stations. Brands love them for trade shows and outdoor festivals because they offer both shelter and a distinctive silhouette that breaks up the monotony of square frame tents. TentCraft’s customers keep telling them that the style and silhouette of inflatable tents make them especially good at matching the vibe of high-energy athletic events, motorsport activations, and music festivals—domes are where that really shines.
Canopies are the big brothers—larger covered areas that can accommodate more staff, more product, and more foot traffic. They’re common at corporate events where you need a branded lounge area or a registration desk with room to spare.
Size matters more than you might think. A 10×10 footprint is the standard minimum for a functional event space, but inflatable arches can be configured to span driveways and roadways. I’ve seen custom inflatable advertising columns as tall as 280(H)*60CM used for vertical brand presence at street-level activations. The key is matching your structure to your venue. A massive dome might be perfect for an open-air festival but impossible to fit through the loading dock doors of a convention center.
You also need to account for your blower. Every inflatable tent requires a continuous-duty blower to maintain air pressure. Larger structures need bigger blowers, which means more power draw at your venue. Check with your event organizer about power availability before you commit to a structure that needs a 220V outlet when only standard 110V is available.
Step 2: Prepare Your Logo and Artwork Files
Now we get to the part where most customization projects go off the rails. I can’t overstate this: the quality of your final inflatable tent printing depends almost entirely on the quality of the artwork you provide to the manufacturer. Garbage in, garbage out—and with large-format fabric printing, the garbage is visible from fifty feet away.
Accepted file formats. The industry standard is vector artwork. That means Adobe Illustrator (AI), PDF, or EPS files. Vector files use mathematical curves rather than pixels, which means they can be scaled to any size without losing sharpness. If your logo was designed in the last decade, your branding agency should have provided you with vector versions. If you only have a JPEG from your website, you’re going to have problems.
Resolution requirements. For raster images (like high-res PNGs), you need a minimum of 150 DPI at the final printed size. Many manufacturers prefer 300 DPI for the sharpest results. Here’s the math problem most people don’t anticipate: a logo that looks crisp on your website at 500 pixels wide will be a pixelated disaster when stretched across a 10-foot inflatable arch. The printed surface area is enormous compared to a computer screen, so you need files with substantial resolution.
Vector vs. raster. If you have a choice, always go vector. Vector files can be scaled infinitely without quality loss, and they’re easier for the manufacturer’s design team to manipulate if they need to adjust colors or reposition elements for the structure’s curved surfaces. Raster files have a fixed pixel count, so enlarging them always introduces softness.
Here’s a practical tip I give every client: before you even contact a manufacturer, do a logo customization audit. Gather every version of your logo you have—full color, reversed (white), black and white, horizontal and vertical layouts. Check the file formats and note the DPI. This one hour of preparation will save you a week of back-and-forth emails during the proofing stage.
Step 3: Understand Printing Methods and Materials
The printing method determines how your logo looks, how long it lasts, and how much it costs. There are three main approaches in the industry, and they’re not created equal.
Stampaggio a sublimazione is the gold standard for inflatable tent printing. The process uses heat to transfer dye directly into the fabric’s fibers, rather than laying ink on top of the surface. The result is vibrant, full-color branding that won’t crack, peel, or fade prematurely. Because the dye becomes part of the fabric itself, the print flexes with the material as it inflates and deflates—critical for a structure that undergoes constant stress. For any design with gradients, photographs, or multiple colors, dye-sublimation is the way to go.
Vinyl appliqué involves cutting shapes from colored vinyl sheets and welding or sewing them onto the base fabric. This method is excellent for simple, bold designs—think solid-color logos or large text. The colors are opaque and durable, and the method is often more cost-effective for designs with limited colors. The downside is that it can’t reproduce the subtle color transitions or photographic detail that dye-sublimation handles effortlessly.
Screen printing is the traditional method, pushing ink through a mesh stencil onto the fabric. It’s still used for some applications, particularly when you need heavy ink deposits for opacity on dark fabrics. But for large inflatable structures, screen printing has largely been superseded by dye-sublimation because of the latter’s superior durability and color range.
As for materials, the industry standard is PVC-coated polyester. This fabric is engineered for the demands of inflatable structures—it’s airtight, resistant to UV damage, and strong enough to handle the constant pressure from the blower. Fire-retardant options are available and often required by venue regulations, particularly for indoor events. Always ask your manufacturer about fire-retardant certifications if you’re planning indoor use; convention centers typically require compliance with local fire codes.
One thing I’ve learned the hard way: don’t skimp on material quality. Cheap PVC from unknown suppliers can become brittle in cold weather or degrade rapidly under intense sun. A quality PVC-coated polyester fabric will last for years with proper care, while a bargain material might start showing print fade or seam failure within months.
Step 4: Map Artwork Placement on the Structure
This is where the geometry of inflatable structures creates challenges that flat-surface printing never encounters. Your logo isn’t going on a rectangular banner; it’s going on a curved, inflated, three-dimensional surface with seams, zippers, and air valves that all constrain where artwork can go.
Flat panels vs. curved surfaces. The simplest inflatable designs have relatively flat panels—think of the sides of a dome or the face of an arch. These panels accept artwork with minimal distortion. But many inflatable structures have compound curves, where the fabric curves in multiple directions simultaneously. Printing across these areas causes visual distortion: circles become ovals, straight text appears to bend. A good manufacturer will flag these issues during the design process and suggest adjustments—perhaps repositioning the logo to sit entirely on a flatter section of the structure.
Seams and zippers. Inflatable structures are assembled from multiple panels of fabric, joined by welded or sewn seams. Printing across a seam is problematic—the artwork gets interrupted by the seam line, and the print can suffer during the welding process if it’s not handled correctly. Similarly, zippers (used for access doors on larger structures) and air valve locations create physical interruptions in the printable surface. Your artwork needs to be mapped around these elements, not across them.
Full-wrap vs. front-only. This is a significant cost decision. A front-only print covers just the main display panel—the face of the structure that faces your target audience. A full-wrap design extends branding across all visible surfaces, which obviously costs more because there’s more print area. The question is whether the additional coverage justifies the cost. For a dome at a trade show where attendees can approach from multiple angles, full coverage makes sense. For an arch at a race where runners pass through from two directions, front-and-back printing on the main faces might be sufficient.
The manufacturer’s proof should show you exactly how your artwork maps onto the structure, including how it will look when the tent is fully inflated. Pay close attention to how text and logos behave at the edges of panels and near seams. This is where the expertise of the manufacturer’s design team becomes invaluable—they’ve done this dozens of times and know what works structurally.
Step 5: Review the Digital Proof and Approve
Before any fabric gets cut or any ink gets applied, the manufacturer will send you a digital proof. This is your opportunity to catch problems while they’re still cheap to fix. Once production starts, changes become expensive or impossible.
The layout check. First, verify that your brand name on the inflatable tent is spelled correctly and your logo looks right. Sounds obvious, but you’d be surprised how often typos slip through when files are resized or re-created. Check that all contact information, website URLs, and taglines are accurate and legible at the structure’s actual size.
The color match. Colors on a computer screen never perfectly match colors on fabric—that’s a fundamental limitation of the medium. Screen colors are created with light; fabric colors are created with dye. What you should look for is whether the proof’s colors are reasonably close to your brand standards. If you have specific color requirements, provide Pantone color codes to the manufacturer. Pantone matching allows the production team to mix dyes to hit your exact brand colors, rather than approximating from a digital image.
Understanding color shift. Here’s something many first-time buyers don’t realize: colors look different on inflatable fabric than they do on paper or screen. The texture of the PVC-coated polyester scatters light differently than smooth paper. White areas may appear slightly cream-colored. Dark colors may appear richer or deeper. Red tends to shift toward orange in some lighting conditions. A good manufacturer will point this out during the proof stage and help you adjust expectations.
The scale check. How will your logo look at actual size? A logo that’s prominent on a 24-inch monitor might be underwhelming on a 10-foot inflatable. Conversely, text that fills the screen might overwhelm the structure’s design. The proof should give you a sense of proportion, but you may need to ask the manufacturer for dimensions—how large will the logo actually be in feet and inches?
When you receive your proof, take your time. Share it with your team. Look at it on a properly calibrated monitor if possible. If something looks off, ask questions. The proof stage exists precisely to prevent expensive mistakes in production.
Step 6: Production, QC, and Shipping Timelines
Once you’ve approved the proof, production begins. Understanding the timeline and what happens during manufacturing helps you plan your events and avoid last-minute panic.
Typical lead times. Most custom inflatable tent manufacturers quote 2–4 weeks for standard production. This includes fabric cutting, printing, assembly, and quality control. If you need a structure faster, rush production is often available—but expect to pay a premium, and understand that rushing quality control is never a good idea. The manufacturer might be able to compress the timeline to 7–10 days for an additional fee, but this depends on their current production schedule and the complexity of your design.
The production process. Your approved artwork goes to the printing department, where it’s output onto the fabric using the method we discussed earlier—typically dye-sublimation for full-color designs. The printed panels then move to the assembly area, where they’re cut to shape and welded or sewn together. This is where the structure takes physical form, and it’s also where the most common quality control issues arise.
Quality checks. A reputable manufacturer runs multiple quality control checks before shipping. Seam strength is tested—the seams are the structural weak points of any inflatable, and they must withstand the constant pressure from the blower. Air retention is verified by inflating the structure and monitoring for leaks. Print adhesion is inspected to ensure the dye or vinyl has properly bonded to the fabric. Some manufacturers also test zippers and valves to confirm they operate correctly.
Ask about their QC process. When you’re choosing a custom inflatable tent manufacturer, don’t be shy about asking what quality checks they perform. A manufacturer that can’t articulate its quality control process is a red flag. You want someone who tests every unit, not just a random sample. The cost of a defective inflatable at your event—both in terms of money and brand reputation—far exceeds any savings from choosing a manufacturer with lax standards.
Shipping considerations. Inflatable tents are bulky but relatively lightweight. They’re typically shipped deflated and folded into shipping cases or bags. The shipping footprint depends on the structure’s size when packed, not its inflated dimensions. Ground shipping is standard for domestic orders; international orders may require freight forwarding. Factor shipping time into your planning—you want the structure to arrive at least a week before your event so you can do a test inflation and address any issues.
Step 7: Setup, Maintenance, and Print Longevity
Your inflatable tent has arrived, and it’s time to put it to work. Proper setup and maintenance will extend the life of your structure and keep your branding looking sharp event after event.
Blower setup and inflation. Every inflatable tent requires a blower to maintain air pressure. The blower connects to the structure via a duct, and once powered on, it inflates the tent in a matter of minutes—most structures go from flat to fully inflated in under five minutes. This is one of the key advantages over frame tents, which require assembly of poles and fittings. A quick-setup inflatable structure means less time setting up and more time engaging with attendees.
Anchoring is non-negotiable. Even though inflatable structures handle wind better than frame tents, they still need proper anchoring. Most structures have anchor points or loops around the base where you can secure stakes (for grass or soft ground) or sandbags/weights (for hard surfaces like concrete). Don’t skip this step. I’ve seen inflatables tumble across parking lots because someone thought a few sandbags were optional. The blower keeps the structure rigid, but anchoring keeps it in place.
Cleaning and storage. After each event, clean your inflatable with mild soap and water to remove dirt, dust, and environmental residue. Allow it to dry completely before packing—storing a damp inflatable invites mold and mildew, which can permanently damage both the fabric and the print. When dry, fold or roll the structure according to the manufacturer’s instructions and store it in its shipping bag in a cool, dry location.
Print fade prevention. The UV-resistant properties of your fabric will slow print fading, but they can’t stop it entirely. Prolonged exposure to intense sunlight will eventually cause colors to fade, particularly bright reds and oranges. To extend the life of your branding, avoid leaving the structure inflated for extended periods when it’s not in use, and store it out of direct sunlight when possible. Some brands purchase protective covers for long-term outdoor installations, though these add cost and complexity.
Repair considerations. Even with excellent care, inflatables can develop leaks over time—a puncture from a stray object, a seam that weakens after years of use. Small repairs are often possible with patch kits, but significant damage may require professional repair. This is another reason to choose a reputable manufacturer: they can often repair their own products, and they have the replacement fabric to match your original colors.
The longevity of your inflatable tent customization depends on the quality of the materials, the printing method, and how well you maintain the structure. A well-made, well-maintained inflatable can serve your brand for years of events, delivering impressions that far exceed its cost. If you’re also looking to complement your tent with branded inflatable shapes o display frames for a cohesive booth setup, those can be customized to match your campaign’s visual identity.
Domande Frequenti
Q: How much does it cost to make a custom inflatable?
R: Pricing varies widely based on size, shape, print coverage, and complexity. Small custom inflatable advertising columns might cost a few hundred dollars, while large domes for trade shows can run into the thousands. Most manufacturers require a minimum order of 1–5 units, and full-wrap printing costs more than front-only. Request quotes from multiple manufacturers with your specifications to get accurate pricing.
Q: How to make a custom inflatable?
R: The process starts with choosing your structure type and size, then preparing vector artwork files (AI, PDF, or EPS) at 150+ DPI. The manufacturer prints your design onto PVC-coated polyester using dye-sublimation or vinyl appliqué, then welds or sews the panels into shape. After quality checks for seam strength and air retention, the structure ships deflated with a blower for inflation.
Q: What’s the difference between an inflatable tent and a pop-up tent for marketing?
R: Pop-up tents use a scissor frame with fabric stretched over the top, while inflatable tents are air-supported by a continuous blower. Inflatables generally handle wind better because the air pressure absorbs gusts, and they offer more distinctive silhouettes for brand visibility. Pop-ups are cheaper and don’t require power, making them better for casual or low-budget uses.
Q: How long does a custom inflatable tent last?
R: With proper care, a quality inflatable tent made from PVC-coated polyester can last 5–10 years or more. Print longevity depends on the method used—dye-sublimation prints are embedded in the fabric and resist fading better than surface-applied inks. UV exposure, cleaning practices, and storage conditions all affect lifespan. Regular maintenance and proper storage are the biggest factors.
Q: Can I use my inflatable tent in windy conditions?
R: Inflatable tents handle wind better than frame pop-ups because the air pressure creates a stable, slightly flexible structure. However, all inflatables have wind ratings, typically expressed as a maximum safe wind speed. Always anchor your structure properly with stakes or weights, and deflate it if wind speeds approach the manufacturer’s limit. Never operate an inflatable in severe weather.
Q: What file format should I send to the manufacturer?
R: Vector formats like AI, PDF, or EPS are preferred because they scale to any size without losing quality. If you only have raster files, send high-resolution PNGs at 300 DPI at the final printed size. Also provide your Pantone color codes for accurate color matching. If you’re unsure about your files, ask the manufacturer—most have design teams that can help prepare artwork.
Q: Do I need a blower, and does it come with the tent?
R: Yes, every inflatable tent requires a continuous-duty blower to maintain air pressure. Most manufacturers include the blower with the tent purchase, but confirm this when getting your quote. Check the blower’s power requirements against your venue’s available outlets, and consider carrying a spare blower for multi-day events in case of equipment failure.
Q: Can I wash my inflatable tent with the logo on it?
R: Yes, but use mild soap and water with a soft cloth or sponge. Avoid harsh chemicals, abrasive cleaners, and pressure washers, which can damage the fabric and print. Rinse thoroughly and let the tent dry completely before packing. Proper cleaning removes dirt and environmental residue that can degrade both the fabric and the print over time.
Riferimenti
1. Custom Inflatable Advertising Tent Buying Guide 2026 – kcce-event.com
2. The Ultimate Guide to Custom Canopy Tents – lushbanners.com
3. 9 Branded Inflatable Tent Designs That Will Inspire Your Next Outdoor Event Activation – tentcraft.com
4. How to Use Branded Inflatables to Increase Brand Awareness – boulderblimp.com
5. Custom Tent Sizing and Layout Guide – signs.com







