

Risposta rapida / Punti chiave
What Are Custom Event Tents?
Custom event tents are portable, branded structures used for trade shows, markets, weddings, and outdoor events. Unlike stock tents, they feature printed logos, custom colors, and optional accessories like sidewalls and weight bags. The three main types are pop-up tents (quick setup, portable), frame tents (no center pole, open interior), and pole tents (large, classic, require staking).
How Much Do Custom Event Tents Cost?
A quality 10×10 custom pop-up tent costs $300-$800. Budget tents under $200 exist but use thin fabric that fades and frames that bend. Commercial-grade tents with dye-sublimation printing and reinforced frames run $500+. Wholesale orders of 5+ units typically reduce per-unit cost by 15-30%. Renting a 20×20 frame tent costs $400-$1,200 per event, plus delivery and setup fees.
How to Choose the Right Structure
- Pop-up tents: Best for vendors who set up weekly. Fold into a wheeled bag, set up in minutes, available in 10×10 and 10×20 sizes. Not ideal for high wind.
- Frame tents: No center pole, unobstructed interior. Better stability than pop-ups. Choose 12×12 or larger for registration areas or demo spaces.
- Pole tents: Classic look for weddings and festivals. Require stakes, so they don’t work on concrete or asphalt.
How to Customize Your Tent
- Choose your structure type and size.
- Select fabric color and weight (600D polyester is standard for commercial use).
- Upload your logo or artwork — use vector files (AI, EPS, PDF) for crisper prints.
- Confirm printing method: dye-sublimation prints edge-to-edge with no fading for 5+ years.
- Add accessories: sidewalls, weight bags, LED lighting, or custom table covers.
Are Custom Printed Tents Worth It?
Yes. A custom canopy tent functions as a reusable billboard. At $500-$800 for a commercial-grade unit, you recoup the cost through brand visibility and perceived professionalism. Cheap tents with peeling prints actively hurt your image — attendees equate tent quality with product quality. Invest in a durable, full-color printed tent and maintain it properly (dry before storing, use weight bags in wind) and it will serve you for years.
Your logo on a cheap tent says cheap. That’s the first thing I tell anyone who calls me up asking about event branding on a budget. You can spend thousands on a beautiful booth design, hire the best staff, and print flawless brochures—but if your canopy is sagging, wrinkled, and the print is peeling, that’s the image people walk away with. I have been in the event and inflatable products industry for many years., and I’ve seen it happen more times than I can count. So before you click “buy” on the first cheap pop-up you find, let’s talk about custom event tents. This isn’t a catalog listing. This is the stuff I wish every buyer knew before they spent a dime.
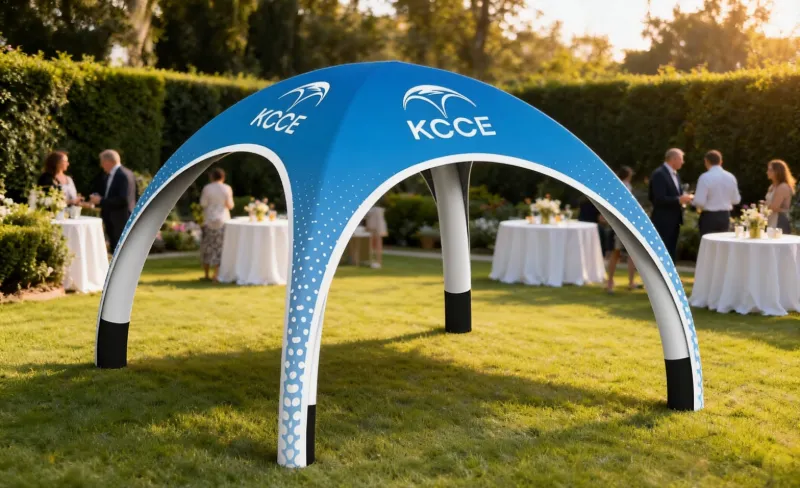
What Are Custom Event Tents? (Core Types & Uses)
Let’s get the basics down. A custom event tent isn’t just a tent with your logo slapped on it. It’s a structure designed around your brand, your event space, and your practical needs. Stock tents come in one color with no branding. Custom ones are printed, sized, and accessorized to fit your specific use case.
There are three main categories you’ll run into:
- Pop-up tents: These are the workhorses of trade shows and farmers markets. They fold down into a wheeled bag, one person can set them up in minutes, and they come in standard sizes like 10×10. If you’re a vendor who packs up every weekend, this is your tent.
- Frame tents: No center pole means you get unobstructed interior space. That’s a game-changer if you’re putting tables in the middle or want a clear sightline across your booth. They’re heavier and take longer to set up, but for a custom canopy tent 12×12 or larger, the stability is worth it.
- Pole tents: The big tops you see at weddings and festivals. They’re classic, elegant, and require stakes in the ground. Not great for concrete, but for a backyard party or a grassy field, they’re hard to beat.
When you start shopping, you’ll see a lot of custom canopy tents out there. The trick is matching the structure to the event scale. A 10×10 works for a vendor booth. A 20×20 frame tent works for a registration area. And if you’re doing a full outdoor wedding, you’re looking at pole tents or large frame structures with sidewalls.
Frame vs. Pop-Up: Which Structure Fits Your Event?
This is the question I get asked the most, and honestly, the answer depends on how much you hate setting things up. Pop-up tents are the definition of convenience. You pull them out of the bag, extend the legs, and you’re done. Most of them can be set up quickly with two people. That’s why custom pop up tents dominate the trade show circuit—nobody wants to spend an hour assembling a booth when they could be networking.
But here’s the trade-off: pop-ups aren’t built for wind. They’re fine for a sunny day, but if a gust rolls through, you’re chasing your tent across the parking lot. I’ve seen it happen. It’s not pretty.
Frame tents, on the other hand, are the heavyweights. They use a network of aluminum or steel frames that distribute weight more evenly. They handle wind better, they look more professional, and they give you that full interior space I mentioned. The downside? Setup is a two-person job that takes a while, often around half an hour or more. And they weigh a lot more. If you’re flying to an event, that’s a real consideration.
For most businesses, I recommend starting with a pop-up. It covers 80% of use cases. But if you’re doing multi-day events, outdoor festivals, or anything where weather is a gamble, invest in a frame tent. The stability is worth the extra setup time.
Material Science: Polyester, Vinyl, or Canvas?
Now we’re getting into the weeds, and this is where most buyers make their first mistake. The tent material determines everything—how long it lasts, how it looks, and how much it costs.
Polyester is the budget option. It’s lightweight, which makes it great for pop-ups, and it prints well with dye sublimation. But it’s not the most durable. In direct sun, it fades faster than other materials. For a tent you use a few times a year, it’s fine. For weekly use, you’ll be replacing it sooner than you’d like.
Vinyl is the workhorse. It’s heavier, waterproof, and much more resistant to tearing and fading. If you’re buying a custom canopy tent 10×10 price is a concern, vinyl might cost more upfront, but it lasts years longer. The print quality is also excellent—crisp, full-color logos that hold up in the elements. The trade-off is weight. A vinyl tent is noticeably heavier to carry and set up.
Canvas is the premium option. It’s breathable, which means less condensation inside, and it has a classic, upscale look. But it’s expensive, heavy, and requires more maintenance. I’d only recommend canvas if you’re doing high-end events or weddings where aesthetics matter more than portability.
Whatever you choose, make sure it’s fire-retardant and waterproof. These aren’t just nice-to-haves—they’re often required by event venues. A tent that fails a fire safety check is a tent you can’t use.
Printing Methods: Dye Sublimation vs. Vinyl Application
This is where your brand comes to life, and the difference between the two main methods is night and day.
Dye sublimation is the gold standard for custom printed tents. The ink is infused into the fabric itself, not printed on top. That means the colors are vibrant, the detail is sharp, and the print won’t crack, peel, or fade. Even after dozens of setups and takedowns, a dye-sublimated tent looks as good as the day you got it. The downside? It requires a minimum order quantity. Many manufacturers may require a minimum order quantity for custom dye-sub tents, often a small batch to make the setup worthwhile.
Applicazione del vinile is the cheaper, faster alternative. Your logo is cut out of vinyl and heat-pressed onto the tent. It’s fine for simple designs—a one-color logo, text, basic shapes. But for full-color graphics or photographs, it just doesn’t cut it. The vinyl can also peel over time, especially if the tent gets folded up while the adhesive is cold.
My rule of thumb: if your logo is simple and you need one tent fast, vinyl is fine. If you want a tent that looks like a professional billboard, go dye sublimation. You might be wondering if the extra cost is worth it. Yes, it is. Your tent is your storefront. It’s the first thing people see. Don’t cheap out on the printing.
Sizing Guide: From 10×10 to 40×60
Let’s talk numbers, because this is where people get confused. The standard vendor booth size in the industry is 10×10. That’s the space you’re allotted at most trade shows and markets. A custom canopy tent 10×10 fits that perfectly, with no overhang or wasted space.
But what if you need more room? Here’s a quick ratio I use: One person typically needs a modest amount of space inside a tent, and more space if they are moving around or waiting in line. For a 10×10 tent (100 square feet), that’s comfortable for 5–8 people standing, or one vendor with a table and some inventory.
A 10×20 tent (200 square feet) works for two vendors or one vendor with a bigger display. A 20×20 (400 square feet) is good for a registration area, a small stage, or a lounge setup. And if you’re planning a wedding or a large festival structure, you’re looking at 20×40 or 40×60 tents—those are the big tops that need professional installation.
One thing people often forget: clearance height. Standard pop-ups have about 7–8 feet of headroom at the center. That’s fine for most people, but if you’re hanging signage or have tall displays, check the peak height before you buy. A 10×10 with a higher peak can make a small space feel much bigger.
Cost Drivers: Why Prices Range from $300 to $3,000
You might be wondering why custom tent costs vary so wildly. I’ve seen prices from under $300 to over $3,000 for what looks like the same tent. Here’s what drives the price:
- Fabric grade: Polyester is cheaper. Vinyl is more expensive. Canvas is the premium.
- Printing method: Dye sublimation costs more than vinyl application, but it looks better and lasts longer.
- Frame type: A basic pop-up frame is cheap. A heavy-duty frame with reinforced corners costs more.
- Sidewalls: These are the panels that close off the sides of your tent. They’re essential for weather protection and privacy, and they add a significant chunk to the price.
- Accessori: Weight bags, carry cases, lighting, and custom table covers all add up.
Here’s my honest take: the $300 tent is not a bargain. It’s a temporary solution that you’ll replace in a year. A $1,000–$1,500 tent with a heavy-duty frame, dye-sublimated print, and vinyl sidewalls will last five years or more. Do the math on cost per use, and the expensive tent is actually the better deal.
Lead Times & Ordering: What to Know Before You Buy
Custom event tents are not off-the-shelf items. They take time to manufacture, print, and ship. Standard lead times are often a few weeks., depending on the size of the order and the printing method. Dye sublimation takes longer than vinyl because the printing process is more involved.
If you need a tent fast, rush orders are available from most manufacturers, but they cost extra. And if you’re ordering during peak season—spring and summer, when weddings and festivals dominate—lead times stretch even longer. My advice: order early. If you know you have an event in June, order in March. The off-season (fall and winter) is also a great time to buy, as many manufacturers offer discounts to keep their production lines busy.
One more thing: shipping. Large frame tents and 20×20-plus structures don’t ship cheap. Freight costs can add a few hundred dollars to your total, so factor that into your budget. And always confirm the shipping method—some tents come via standard parcel, others require freight delivery with a lift gate.
Sidewalls, Accessories & Add-Ons Worth Buying
You’ve bought the tent. Now what? The accessories are where you can really level up your setup. Here are the add-ons I recommend to every client:
- Sidewalls: These are non-negotiable in my book. They block wind, rain, and sun, and they give you a clean, professional look. You can get them with windows, zippered doors, or printed with your branding. A custom canopy tent 10×10 with sidewalls is a complete booth solution.
- Weight bags: If you’re setting up on concrete or asphalt, you can’t stake into the ground. Weight bags fill with sand or water and anchor your tent. They’re cheap insurance against wind damage.
- Carry bags: Most tents come with a bag, but the cheap ones are flimsy. Invest in a heavy-duty wheeled bag. Your back will thank you.
- Custom table covers: A branded tent with a plain table underneath looks incomplete. Matching table covers tie the whole booth together.
- Illuminazione: If your event runs into the evening, LED lighting kits are a must. They’re easy to install and make a huge difference in visibility.
And if you’re really looking to make a splash, consider adding some inflatable shapes o display frames to your booth. They draw attention from across the venue and complement your tent setup perfectly.
Domande Frequenti
Q: How much does a custom pop-up tent cost?
R: Prices vary widely based on size, material, and printing method. A basic 10×10 custom pop-up tent with vinyl lettering can start around a few hundred dollars, while a heavier-duty frame with full-color dye sublimation printing will cost more. The custom canopy tent 10×10 price also depends on whether you add sidewalls, weight bags, and other accessories. Remember, the cheapest option often costs more in the long run because you’ll replace it sooner.
Q: Can I get a custom tent made?
R: Absolutely. Custom event tents are made to order by manufacturers who specialize in branded structures. You can customize the size, color, fabric, printing method, and accessories. Most manufacturers have in-house design teams that can work with your logo and brand colors. Just be prepared for a lead time of 2–4 weeks, and expect a minimum order quantity for dye-sublimated prints.
Q: How much does it cost to rent a 20×20 event tent?
R: Rental prices vary by region and vendor, but A 20×20 frame or pole tent typically rents for a few hundred dollars per event., not including installation and delivery. If you’re using tents regularly, buying your own is often more cost-effective. A custom canopy tent 12×12 or larger can pay for itself after just a few events.
Q: Are custom printed tents worth it?
R: Yes, if you use them more than a few times a year. A custom printed tent is a mobile billboard that works for you every time you set it up. It builds brand recognition and looks far more professional than a plain tent. The upfront cost is higher, but the return on investment is real. For businesses that attend multiple events annually, custom pop up tents are one of the best marketing investments you can make.
At the end of the day, your tent is more than a shelter—it’s a statement. It tells people whether you’re a serious professional or a weekend hobbyist. I’ve worked with companies that saved money on their first tent and regretted it, and I’ve worked with companies that invested upfront and reaped the benefits for years. The choice is yours. But if you want to see what a truly professional setup looks like, I’d suggest checking out some of the inflatable tent options from KCCE. They’re quick to set up, durable, and they turn heads. Whatever you decide, order early, invest in quality, and make sure your brand looks as good on the outside as it does on paper.
Final Checklist Before You Order
Before you hit that “checkout” button, run through this quick list to make sure you’re getting exactly what you need:
- Size: Will it fit your table, booth, or crowd? Measure your space twice.
- Material: Polyester for budget, vinyl for durability, or canvas for premium feel.
- Print Quality: Dye-sublimation for full-color, edge-to-edge graphics; screen printing for simple logos.
- Frame Type: Pop-up for speed, frame for stability, pole for classic look.
- Accessori: Sidewalls, weights, lighting, and carrying bags—don’t forget them.
- Tempi di Consegna: Custom printing takes 2–4 weeks. Order early, especially before peak event season.
Maintenance Tips to Extend Tent Life
A quality tent is an investment, and a little care goes a long way. Here’s how to keep yours looking sharp:
- Clean after each use: Wipe down with mild soap and water. Avoid harsh chemicals that can fade prints.
- Dry completely before storing: Moisture leads to mold and mildew, which can ruin fabric and frames.
- Store properly: Use the included bag, and keep it in a cool, dry place. Avoid leaving it in a hot car for extended periods.
- Check hardware: Inspect zippers, poles, and connectors regularly. Tighten loose screws and replace worn parts promptly.
- Use proper weights: Wind is the #1 killer of tents. Always secure your tent with sandbags or stakes, and take it down in high winds.
When to Buy vs. Rent (Again, With Numbers)
| Scenario | Rent | Buy |
|---|---|---|
| One-time event | ✅ Cheaper | ❌ Overkill |
| 3–5 events/year | ❌ Adds up | ✅ Breaks even |
| Weekly markets | ❌ Wasteful | ✅ Essential |
| Branding aziendale | ❌ No customization | ✅ Full branding |
If you’re on the fence, do the math: a $400 custom tent used 10 times costs $40 per event. A $150 rental used 10 times costs $1,500. The choice becomes obvious.
Il punto fondamentale
Your tent is your handshake, your storefront, and your billboard all in one. Whether you’re a first-time vendor or a seasoned exhibitor, the right tent makes all the difference. Don’t settle for a flimsy, generic canopy that collapses in the wind or fades after one season. Invest in quality, customize it to reflect your brand, and take care of it—it’ll take care of you.
And if you’re ready to upgrade your setup, take a look at what’s out there. From inflatable options that pop up in minutes to heavy-duty frame tents that last for decades, there’s a perfect match for every business. Order early, plan ahead, and get ready to stand out at your next event.
Domande frequenti (FAQ)
Q: Can I use a pop-up canopy in the rain?
A: Yes, but only if it’s waterproof (look for a PU coating or taped seams). Even then, avoid pooling water on the roof—use a slight pitch or a center pole to shed rain.
Q: What’s the best tent for a food vendor?
A: A 10×10 or 10×20 with sidewalls, a flame-retardant fabric, and a vented roof. Add a counter-height table at the front for service.
Q: How long does a quality tent last?
A: With proper care, a mid-range tent lasts 3–5 years of regular weekend use. High-end commercial frames can last 10+ years if you replace the canopy fabric when it wears out.
Q: Do I need a permit for a tent at a market or fair?
A: Often yes. Check with the event organizer or local municipality. Many require fire-rated fabric and secured stakes, especially for larger tents.
Q: Can I print my logo on any tent?
A: Most manufacturers offer custom printing, but the quality varies. Heat-transfer or dye-sublimation printing lasts longer than screen printing. Ask for UV-resistant inks if you’ll be in direct sun.
Final Checklist Before You Order
- Measure your space (don’t forget clearance for sidewalls)
- Choose the right size (10×10 for solo, 10×20 for a team)
- Pick a frame material (steel for strength, aluminum for portability)
- Select fabric (polyester for budget, vinyl for durability, flame-retardant for safety)
- Decide on accessories (sidewalls, weights, lighting, counters)
- Confirm customization options and lead time
- Read reviews and warranty terms
Ready to Make the Move?
The best time to buy a tent is before you need it—not the day before your first event. Ordering early gives you time to customize, test the setup, and fix any issues. And if you’re still unsure, start with a rental for one event to see what you actually use, then invest in a model that fits your real needs.
Your next event is your chance to make a lasting impression. With the right tent, you’ll not only protect your products and staff—you’ll draw in customers and build a brand that people remember. Go ahead, set up your success.
Quick Reference: Popular Tent Sizes & Uses
| Dimensione Tenda | Ideale per | Tempo di montaggio | Approx. Weight |
|---|---|---|---|
| 10×10 | Solo vendors, farmers markets | 5–10 min | 40–60 lbs |
| 10×20 | Two vendors, larger displays | 10–15 min | 80–110 lbs |
| 10×30 | Multi-booth setups, demo areas | 15–20 min | 120–160 lbs |
| 20×20 | Event hubs, food courts | 20–30 min | 150–200+ lbs |
Common Mistakes to Avoid
- Skipping the weights – Even a light breeze can lift an unsecured tent. Always use sandbags or stakes.
- Ignoring wind ratings – Check the manufacturer’s wind resistance; cheap tents may only handle 15–20 mph.
- Forgetting to test the setup – Do a trial run in your backyard before the event. You don’t want to learn on-site.
- Overloading the frame – Hanging heavy lights or signage not rated for the frame can cause collapse.
- Not checking the warranty – Some warranties don’t cover weather damage. Read the fine print.
Maintenance Tips to Extend Tent Life
- Clean the fabric with mild soap and water after each use; avoid harsh chemicals.
- Dry fully before storing to prevent mildew.
- Store in a cool, dry place—heat can degrade fabric and seams.
- Inspect poles and connectors for bends or cracks before each event.
- Replace worn stakes and ropes; they’re cheap and easy to swap.
Considerazioni finali
Choosing the right tent is a balance of budget, durability, and your specific event needs. Don’t be swayed by the cheapest option or the flashiest print—focus on what will hold up over time and serve your customers well. A quality tent is an investment in your brand’s visibility and professionalism.
Take your time, do your research, and when you’re ready, place that order with confidence. Your future self—and your customers—will thank you.







