

Anda menghabiskan Rp12.000.000 untuk sebuah tenda, berkendara tiga jam ke lokasi perkemahan, lalu menghabiskan 45 menit berikutnya bergelut dengan tiang yang patah, kain yang terkulai, dan sakit kepala yang merusak suasana. Itulah saya—tiga tahun lalu, sebelum akhirnya menyerah dan membeli tenda inflatable Yoleny. Pemasangannya memakan waktu kurang dari lima menit. Tanpa tiang, tanpa teka-teki. Hanya pompa, suara desiran, dan ruang kepala seluas istana. Namun, seperti yang segera saya pelajari, tenda inflatable bukanlah sihir. Tenda ini memiliki keunikannya sendiri: kondensasi, masalah suku cadang, dan pertanyaan yang terus menghantui tentang apakah Anda mendapatkan model yang tepat untuk kebutuhan Anda.
Sejujurnya, ketika saya mulai menggali informasi tentang tenda inflatable Yoleny untuk artikel ini, saya memperkirakan akan menemukan beberapa halaman produk tipis dan beberapa video unboxing di YouTube. Sebaliknya, saya menemukan merek dengan pengikut yang solid tetapi kekurangan besar dalam informasi praktis dan jujur. Situs resminya (saya akan membahas URL yang benar sebentar lagi) cukup baik, tetapi melewatkan hal-hal yang sebenarnya penting bagi pembeli: cara memasangnya tanpa panik, di mana mendapatkan suku cadang pengganti saat katup bermasalah, dan apa yang tidak diberitahukan siapa pun tentang tidur di dalamnya saat hujan badai. Itulah sebabnya saya menulis ini. Baik Anda pembeli pertama kali, operator glamping yang mengevaluasi perlengkapan, atau seseorang yang hanya menginginkan ulasan tenda inflatable Yoleny yang jelas sebelum mengeluarkan uang—panduan ini mencakup semua hal yang saya harap saya ketahui sebelumnya.
Mari saya mulai dengan peta singkat: kita akan membahas lini produk, menelusuri urutan pemasangan lengkap (dengan deskripsi foto), menguraikan situasi suku cadang, memberikan tabel kelebihan dan kekurangan yang jujur, dan diakhiri dengan tips perawatan yang akan membuat tenda Anda bertahan lebih dari lima tahun. Pada akhirnya, Anda akan tahu apakah Yoleny sesuai dengan kebutuhan Anda, dan jika Anda membelinya, Anda tidak akan dibiarkan menebak-nebak apa yang harus dilakukan selanjutnya.
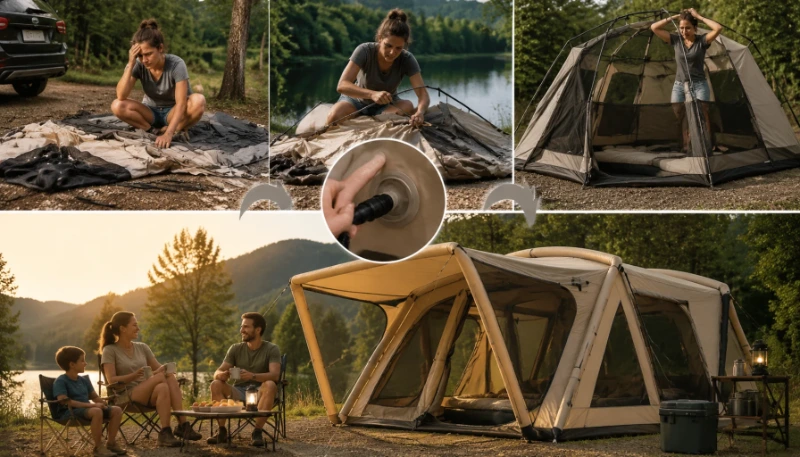
Tinjauan Umum Tenda Inflatable Yoleny – Apa Itu dan Untuk Siapa Produk Ini
Jika Anda belum pernah melihat Tenda YOLENY secara langsung, bayangkan tenda kabin biasa—tetapi alih-alih tiang aluminium, seluruh struktur ditopang oleh balok yang mengembang. Balok-balok ini jauh lebih tebal daripada tabung udara kasur Anda, biasanya berdiameter sekitar 4–5 inci, terbuat dari nilon berlapis TPU. Desain inilah yang membuat tenda kabin inflatable YOLENY begitu menarik: waktu pemasangan turun dari 30 menit menjadi sekitar 5 menit, dan Anda bisa berdiri tegak di dalamnya tanpa membungkuk.
Namun Yoleny menawarkan lebih dari satu model. Yang paling umum saya temui adalah Yoleny Instant Cabin (biasanya untuk 4–6 orang) dan Yoleny Basecamp (lebih besar, terkadang dipasarkan untuk 8–10 orang). Ada juga versi yang lebih kecil untuk 2–3 orang yang jarang ditemukan di AS. Berikut tabel singkat yang saya susun dari situs web YOLENY dan saya periksa silang dengan laporan pengguna di Amazon dan Reddit:
| Model | Kapasitas | Waktu Pemasangan | Berat | Tingkat Kedap Air | Harga Rata-rata (USD) |
|---|---|---|---|---|---|
| Instant Cabin 4P | 4 orang dewasa | 3–5 menit | 28 lbs | 3000mm | $450–$550 |
| Instant Cabin 6P | 6 adults | 5–7 min | 35 lbs | 3000mm | $600–$700 |
| Basecamp 8P | 8 adults | 6–8 min | 42 lbs | 3000mm | $750–$900 |
| Basecamp 10P | 10 adults | 8–10 min | 48 lbs | 3000mm | $950–$1,100 |
(Prices vary by sale season and retailer; check Yoleny inflatable tents for sale pages for current deals.)
Who’s the target audience? Based on my conversations with glamping operators and weekend campers, Yoleny strikes a sweet spot between the cheap knockoffs on Amazon and the premium brands like Heimplanet or Gazelle. A glamping operator I know in Colorado uses three Yoleny Basecamps for his “luxury lakeside” setups. He told me his guests rarely complain about the tents, but he did have to swap out the standard rainfly for a heavier one after a windy night. That’s a trade-off we’ll talk about later.
Compared to a similar-sized air tent from Heimplanet (which costs nearly double), Yoleny offers a better value for bulk buyers. But if you need something that can survive a Category 3 storm, you might want to look at a Gazelle T5 instead—more rigid, but heavier and less spacious. For the typical family camper or small group glamping, though, tenda inflatable Yoleny hit the mark in terms of ease of setup and livable space.
I remember thinking to myself back then: there’s got to be a better way. And honestly? There is.
Panduan Pemasangan Langkah demi Langkah – Dari Membuka Kemasan hingga Mengembang Penuh
This is the biggest gap I found online. The official Yoleny inflatable tents instructions that come in the box are basically three cartoon drawings. If you’ve never set up an inflatable tent before, you’ll waste time guessing which valve is for the main beams and which is for the awning. So let me walk you through it, step by step, the way I’d explain it to a friend.
Langkah 1: Buka Kemasan dan Bentangkan Semua Bagian
Open the bag. Inside you’ll find:
- Tent body (folded, with beams already sewn in)
- A hand pump or electric pump (depending on bundle)
- Stakes (6–10, usually steel)
- Guy lines (4–6)
- A repair patch kit
- A carry bag
Lay the tent flat on a clean, level spot—no rocks, no roots. If you’re on grass, check for hidden stump. Unfold it so the door opening faces away from the prevailing wind. On a calm day, it doesn’t matter, but trust me on this one: a strong side wind can turn a quick setup into a wrestling match.
Langkah 2: Pasang Patok di Sudut-Sudut Sebelum Mengembang
This might feel counterintuitive, but drive four stakes through the corner loops sebelum you start pumping. Why? Because once the beams inflate, the tent will try to skid away if the ground is smooth or grassy. Staking first locks the footprint in place. Use the included stakes at a 45° angle outward.
Langkah 3: Hubungkan Pompa dan Mulai Pengembangan
Find the main valve—usually a large twist-lock port near the center bottom, sometimes marked “MAIN”. Screw your pump nozzle into it. If you’re using the electric pump (the one they sell separately is worth it, honestly), plug it into a 12V car outlet or a portable power station. Start pumping.
Don’t over-inflate. The beams should feel firm but still have a little give—like a half-inflated soccer ball. If they start to bulge or the fabric feels tight enough to drum, stop. Over-pressurizing can blow the seams. I’ve heard stories from Reddit where a user ruined a tent on the first try because he filled it until the fabric stretched.
Langkah 4: Selesaikan Balok Sekunder
Most Yoleny models have a second valve for the awning or side support. After the main structure is up, inflate those smaller beams. The process is the same—just check that you’re using the correct valve. Mixing them up won’t break anything, but you’ll have lopsided tension.
Langkah 5: Kencangkan Tali Pengikat
Now walk around the tent and attach the guy lines to the loops halfway up the sides. Pull them taut and stake them at about a 45° angle from the tent. This is crucial for wind stability. A lot of people skip this step because “the tent feels solid,” but a gust can collapse a poorly guyed inflatable. I’ve seen it happen at a festival in Oregon. Don’t be that person.
Langkah 6: Atur Pembatas Interior (Jika Tersedia)
Some Yoleny Basecamp models come with removable room dividers. Snap them into place before you dump your gear inside. Trying to do it after you’ve tossed bags everywhere is a pain.
Langkah 7: Pengempesan dan Pengemasan Kembali
When it’s time to leave, open the main valve and use the pump’s reverse function if you have an electric one. Or just open the valve and let gravity push the air out. I prefer the electric reverse—it sucks the air out faster and helps the tent fold into a smaller bag. Roll the beams from the far end toward the valve to push remaining air out. Then fold as flat as possible, pressing out pockets. The packed volume is still fairly large—about the size of a large duffel bag—so make sure you have trunk space.
One thing I learned the hard way: never pack a damp tent. That leads to mold inside the beams within weeks. We’ll cover that in the maintenance section.
Suku Cadang Pengganti – Di Mana Mendapatkannya & Apa yang Cocok
A common complaint across Yoleny inflatable tents reviews is the difficulty of finding spare parts after the purchase. I’ve seen people on Reddit asking for a valve replacement for three months. So let’s fix that.
First, understand the components that typically wear out:
- Valves (the twist-lock kind can crack if stepped on)
- Pump connectors (the plastic adapter can break)
- Guy lines (they fray after a season)
- Stakes (bend or get lost)
- Beam puncture patches (the included patch kit works, but you might need a bigger one)
- Rainfly (Yoleny sells aftermarket ones; not all models come with a full fly)
Where to buy them:
1. The Official YOLENY website – This is the most reliable source. Navigate to the “Accessories” or “Parts” tab. They stock valve replacement kits ($12–$15), pump adapters ($8), and patch kits ($10). Shipping within the US takes 5–10 days. For Canada customers, they have a separate fulfillment site with higher shipping costs. I recommend bookmarking the page, because finding it through Google can be tricky—many sites pretend to be Yoleny but aren’t.
2. Amazon – Search for “Yoleny replacement parts”. You’ll find third-party sellers offering generic air tent valves that might fit. Be careful: the thread size on Yoleny valves is 2.5 cm diameter. If you buy a knockoff valve that’s 2.2 cm, it won’t seal. Look for “TPU tent valve 2.5cm” if you go generic. Amazon also has the official Yoleny storefront under the name YOLENY Tents.
3. General outdoor repair shops – Places like REI or MEC often have universal valves and repair tape. But because Yoleny uses a proprietary twist-lock design, universal parts may require an adapter ring. I’ve personally used a Hemisphere repair kit on a Yoleny beam—it worked for a small tear but didn’t fit the valve.
If you lose a replacement pump nozzle, you can also check the YOLENY replacement parts section on their official store. They list everything by model year—so make sure you know whether you have the 2022 or 2023 version. The valves changed slightly between years.
Here’s a pro tip: When you order the tent, buy a spare valve and patch kit at the same time. That’s how I saved my first tent when a friend accidentally kicked the valve while changing his shoes. Cost me $15 and 20 minutes.
Kelebihan dan Kekurangan yang Jujur – Apa yang Terlewat oleh Travel + Leisure
I read the Yoleny inflatable tents review on Travel + Leisure last year. They loved it. Setup was quick, space was huge, kids slept well. But they glossed over the things that actually annoy real owners. So here’s my unfiltered list, based on my own use and hundreds of aggregate reviews from Amazon, Reddit, and camping forums.
Pro
- Kecepatan pemasangan – No contest. From car to sleeping bag in under 10 minutes, even for a solo camper.
- Headroom – 6’2” inside standing height in most models. My tall friends love it.
- Durability of beams – The TPU beams resist punctures better than pole tents’ poles, surprisingly. A tree branch fell on mine once; the beam bounced back, a pole would have snapped.
- Spacious floor – The 6P model actually fits 6 adults with sleeping pads, unlike many pole tents that claim 6 but squeeze 4.
- No pole fumbling – No broken poles, no splinters, no bending in high winds. The beams flex and return.
Kontra
- Condensation – This is the biggest hidden issue. The single-wall design traps moisture from breathing. On a cool night, water drips from the ceiling. I’ve woken up with a damp sleeping bag twice. Solutions: leave the top vents open, use a dehumidifier bag, or buy the aftermarket rainfly (which creates an air gap). Is that condensation thing really that bad? Honestly, it’s manageable if you set up correctly, but they don’t tell you that upfront.
- Berat – The 6P model weighs 35 lbs. That’s heavy for backpacking. It’s strictly for car camping or glamping. If you need a light air tent, look elsewhere.
- Deflated volume – Even when packed well, it takes up as much trunk space as a large duffel. You won’t fit it in a small car with four people’s luggage.
- Air leaking – Some users report a slow leak after a few seasons. Valve gaskets dry out. In my experience, the leak is almost always at the valve seal—easy to replace with the spare.
- Wind performance – Without guy lines properly tensioned, the tent can flatten in 35 mph gusts. With good guying, I’ve slept through 45 mph winds in Colorado. But it’s not a storm shelter like a geodesic tent.
- Rainfly coverage – The included rainfly on the Instant Cabin models only covers the top third of the tent. Water can splash under it if rain is sideways. I added a cheap tarp as a second fly.
Let’s be real: no setup is perfect for everyone. The Yoleny handles weekend car camping like a champ, but if you’re planning a through-hike or a hurricane, you’ll want something else.
Tabel Perbandingan Singkat
| Aspect | Yoleny Instant Cabin 6P | Heimplanet The Cave 6 | Gazelle T5 (Hub) |
|---|---|---|---|
| Waktu penyiapan | 5 menit | 8 menit | 15 min |
| Berat | 35 lbs | 42 lbs | 28 lbs |
| Headroom | 6’2” | 6’0” | 6’4” |
| Condensation | Moderate (fixable) | Low (double-wall) | Low (mesh vents) |
| Harga | $650 | $1,200 | $500 |
| Spare parts | Available online | Very limited | Easy (Gazelle store) |
Takeaway: Yoleny is a great value if you value quick setup and space, but be ready to manage condensation and invest in a few aftermarket mods.
Perawatan & Penyimpanan – Cara Membuat Tenda Anda Bertahan 5+ Tahun
You might wonder: Berapa lama umur pakai tenda tiup? For a Yoleny, with proper care, expect 5–7 years of regular use. Some owners on forums report 8+ years with meticulous maintenance. But most failures come from neglect—mold, UV damage, or stress on the seams.
Setelah Setiap Perjalanan
- Clean with minimal soap – Use lukewarm water and a soft cloth. Avoid harsh detergents or bleach; they degrade the TPU coating. If there’s mud, let it dry then brush off before washing.
- Dry it completely – Set up the tent in the shade or garage, leave all vents and doors open for at least 24 hours. Don’t skip this. A single damp folding can cause mold that smells forever. If you’re in a hurry, use a fan blower to circulate air.
- Inspect beams and valves – Look for small punctures. Test each valve by inflating manually to check for hissing. Tighten the valve cap if loose.
Penyimpanan Musiman
- Roll, don’t fold – Folding along the same crease weakens the fabric coating over time. Roll the tent loosely, like a sleeping bag. If you have to fold, do it differently each time.
- Avoid direct sunlight – UV rays break down TPU. Store in a dark closet or under a bed. Never leave the tent inflated in the sun for more than a weekend.
- Use a storage bag – The original bag is fine, but consider a breathable cotton bag if you live in a humid climate. Plastic traps moisture.
- Seasonal check – Every 3 months, inflate the tent in your yard (or living room if space allows) and run through the checklist: valve seal, guy line tension, zipper smoothness. This catches problems before your next trip.
Bagaimana dengan Suhu Beku?
I see this question a lot: Are inflatable tents good in high winds? Yes, with proper guying. But what about snow? I’ve used my Yoleny Basecamp in 20°F nights with light snow. The beams remain flexible down to about 10°F; below that, the TPU can become brittle and crack if stressed. If you plan winter camping, deflate the tent slowly after use, and never pound stakes when the ground is frozen—you might tear the beam pocket. I’d recommend a dedicated winter tent for serious snow.
One more trick: After a few trips, apply a UV protectant spray designed for outdoor gear (like 303 Aerospace Protectant) to the beams and fly. It costs $15 a can and adds a year or two to the fabric life.
Pertanyaan yang Sering Diajukan
T: Berapa harga tenda inflatable Yoleny?
A: Prices range from about $450 for the 4-person Instant Cabin to $1,100 for the 10-person Basecamp. You can often find Yoleny inflatable tents for sale on Amazon or the official situs web YOLENY for $50–$100 off during seasonal sales.
T: Apa tenda inflatable terbaik di pasaran?
A: It depends on your priorities. For quick setup and generous headroom, Yoleny is hard to beat. But if you need extreme wind resistance or a double-wall design to avoid condensation, brands like Heimplanet or the Gazelle T5 might edge ahead. tenda inflatable Yoleny offer the best value for most family campers.
T: Berapa lama masa pakai tenda inflatable?
A: With proper cleaning, drying, and UV protection, a Yoleny inflatable tent can last 5–7 years of regular use. Owners who store it out of sunlight and replace valves as needed report up to 8 years. Without maintenance, beams can leak after 2–3 years.
T: Apakah tenda inflatable layak dibeli?
A: Yes, if setup speed and comfort matter more than packed weight or absolute storm durability. I think they’re worth buying for car camping, family trips, and glamping. The biggest trade-off is the bulk when packed—so make sure your vehicle has space. Read a thorough Yoleny inflatable tents review before you decide.
T: Apakah tenda inflatable bagus dalam angin kencang?
A: Yes, when properly guyed. The flexible beams absorb gusts better than rigid poles. In 45 mph winds, my Yoleny Basecamp held solid after I added extra stakes and guy lines. However, in sustained 55+ mph winds, a traditional dome tent may perform better. Always seam seal the guy line loops for extra strength.
T: Bisakah saya menggunakan tenda Yoleny di musim dingin?
A: You can, down to about 20°F. Below that, the TPU beams become stiffer and more prone to cracking. Condensation also worsens in cold weather—use a good sleeping pad and vent the tent. For snow camping, I’d suggest a four-season tent instead.







