

Your race starts in two hours. The sky looks fine, but the forecast called for gusts. You walk over to the start line, coffee in hand, and there it is—your inflatable arch, sagging sideways like a tired balloon animal. The blower is running, but the thing is twisting in the wind, and your volunteers are scrambling for sandbags that nobody thought to bring.
I’ve seen this exact scene play out more times than I care to count. Inflatable arches for events look like the simplest piece of gear you’ll ever buy—until a 15-mph breeze turns your $2,000 branding investment into a floppy liability. The truth is, these things are deceptively simple. There’s a lot more to choosing the right one than picking a color and clicking “add to cart.”
This guide covers sizing, anchoring, and vendor vetting—so you buy once and use it for years without the mid-event panic.
Quick Answer
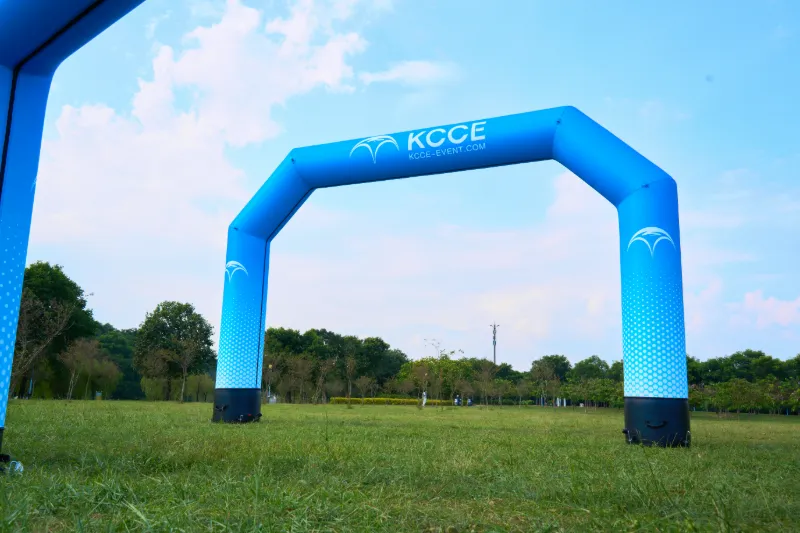
Inflatable arches for events are portable, air-powered branding structures that mark entrances, finish lines, and focal points. They beat metal frames on setup speed, storage footprint, and visual impact. But that’s only if you size them right and anchor them properly for your specific surface and wind conditions.
Why Inflatable Arches for Events Beat Metal Frames
Let’s start with the obvious question: why would anyone choose an inflatable arch over a traditional metal frame structure? I’ve worked with both, and honestly, it’s not even close for most applications.
The first thing you’ll notice is setup time. A metal frame arch—the kind with truss sections and crossbars—takes a crew of several people and a considerable amount of time to assemble. You’re dealing with bolts, wrenches, and the inevitable moment when someone drops a connector piece into the grass. An inflatable arch, by comparison, rolls out of a bag the size of a large suitcase, you attach a blower, and you’re done in a relatively short time with two people. That’s not a marketing exaggeration—that’s the real-world difference I’ve clocked at actual events.
Portability is the second big win. A large metal arch frame doesn’t fold up nicely. You need a trailer or a large van just to transport it. The inflatable version of the same size packs down into something you can throw in the back of an SUV. For event planners juggling multiple venues in a single week, that storage and transport difference alone justifies the switch.
Cost is where things get interesting. While the upfront prices are comparable—we’ll dig into the actual numbers later—the total cost of ownership favors inflatables. Metal frames need painting, repairs, and replacement parts. Inflatables, when you buy commercial-grade with the right fabric, hold up for years with minimal maintenance. According to Boulder Blimp’s analysis of the inflatable arch market, brands, nonprofits, and event organizers are increasingly seeing these as reusable assets that work across multiple events and seasons rather than one-time purchases.
And then there’s the safety angle, which doesn’t get enough attention. Metal frames have hard edges. At crowded events, especially with kids running around, that’s a genuine hazard. An inflatable arch is, well, inflatable. If someone bumps into it, they bounce off. If it does come down, it’s not going to injure anyone the way a falling truss might.
Visual impact is the final piece, and it’s the one that sells most people. Inflatables are three-dimensional, bold, and can be shaped into nearly anything. A metal frame is a rectangle. An inflatable arch can be an archway tunnel, a custom shape that matches your brand, or something with integrated lighting. The height and scale create a focal point that flat signage simply can’t match.
Speaking of which, if you’re exploring inflatable structures beyond arches for your events, you might want to look at a quick-setup inflatable arch for events options from manufacturers like KCCE, who specialize in this category.
Sizing Your Arch: Width, Height, and Tunnel Options
Here’s where most buyers get it wrong. They see “10-foot arch” and assume that’s the size they need, without thinking about what’s actually passing through it.
The first question you need to ask yourself is: what’s going through the arch? This isn’t a rhetorical question—it changes everything.
For runners and walkers: A 10-foot wide arch is usually sufficient for a 5K or 10K finish line. Runners come through in a steady stream, not all at once. You’re giving them clearance to pass through comfortably without bottlenecking. The height matters too—You want enough clearance so taller participants and those with signs or flags don’t clip the top.
For vehicles: This is where people really mess up. If you’re planning a parade, a car dealership grand opening, or any event where vehicles will pass under the arch, you need to think about vehicle height and width. A standard sedan needs a modest amount of clearance, but a delivery truck or a fire truck—common at community events—needs significantly more. I’ve seen planners buy a beautiful 12-foot arch and then realize the fire truck they invited can’t fit under it. Check your vehicle specs before you order.
For walk-through events: Trade shows, graduation ceremonies, and festivals often use inflatable archway tunnels that participants walk through. These are typically wider and taller because people flow through in groups. A 15-foot arch gives you comfortable clearance for two or three people walking side by side.
Now, let’s talk about standard sizes. In the industry, you’ll commonly see a range of widths, including 10-foot, 12-foot, and 15-foot. Some manufacturers offer custom dimensions, but those three are your baseline. Here’s my take on when to use what:
- 10 feet: Perfect for 5K races, smaller events, and single-lane walkthroughs. It’s also the most budget-friendly option.
- 12 feet: The sweet spot for most events. It handles runners, small vehicles, and group walkthroughs. If you’re unsure, this is the size I’d default to.
- 15 feet and up: For parades, large festivals, and events with vehicle traffic. The bigger footprint also means more branding surface area, which is worth considering if visibility is your priority.
One thing to keep in mind: the arch size guide isn’t just about clearance. A larger arch needs a more powerful blower to maintain inflation pressure. If you’re buying a 15-foot arch, make sure the blower that comes with it is rated for that size. Undersized blowers are a common cause of arches that look deflated and sad.
For specific use cases, consider an inflatable arch for marathon finish line events—these typically need the 12 to 15-foot range with extra anchoring because of the crowd flow and the excitement (read: potential chaos) at the finish.
Fabric and Build Quality: What Actually Lasts
You might be wondering why one inflatable arch costs $300 and another costs $2,500 for what looks like the same product. The answer is in the fabric and the construction, and this is where you absolutely should not cut corners.
The two main materials you’ll encounter are PVC vinyl and polyester. Here’s the breakdown:
Vinil PVC is the heavier, more durable option. It’s what most commercial inflatable arches are made from because it holds air pressure better and stands up to repeated use. The downside is weight and cost. A PVC arch is heavier to transport and more expensive to manufacture.
Polyester is lighter and cheaper, but it’s also less durable. For a one-time event, polyester might be fine. For anything you plan to use more than twice, spring for PVC.
Within PVC, you’ll see denier ratings—this is the thickness of the fabric threads. A 420D fabric is lighter and more flexible, while 840D is heavier and more puncture-resistant. For a commercial inflatable arch that’s going to see regular use, I’d strongly recommend 840D. It’s the difference between an arch that survives a season and one that survives five seasons.
Seam construction is the next thing to check. Double-stitched seams are the industry standard for quality. They’re stronger and less likely to blow out under pressure. If you look at a product listing and it doesn’t mention seam construction, ask the vendor directly. This is a detail they’ll usually share if you ask.
UV resistance is another factor that gets overlooked. An arch that sits in direct sunlight for eight hours at an outdoor festival is taking a beating. UV rays break down fabric over time, causing fading and weakening. A UV-resistant coating will extend the life of your arch significantly. Most reputable manufacturers apply this as standard, but it’s worth confirming.
Here’s a real-world example of why build quality matters. I’ve seen cheap inflatable arches fail at outdoor events because the seams gave way after a few hours in the sun. The arch didn’t pop dramatically—it just slowly sagged until it was a pile of fabric on the ground. By contrast, a well-made arch from a manufacturer like Promo Bears USA, which has over 16 years of experience in inflatable design and creation, will hold its shape all day, event after event.
If you’re planning to use your arch for a trade show booth or other indoor events where it’ll be set up and taken down frequently, the fabric quality becomes even more critical. Repeated folding and unfolding is hard on any material, and cheaper fabrics will show wear much faster.
Anchoring Systems: Stakes, Sandbags, and Water Ballasts
This is the section that separates the pros from the amateurs. And honestly, it’s the topic that gets the least attention in most buying guides, which is a shame because it’s where most events go wrong.
The first thing to understand is that an inflatable arch is essentially a big sail. It catches wind, and if it’s not anchored properly, it will move. The question is not whether you need anchoring—it’s which type works for your surface.
Grass and soft ground: This is the easiest scenario. Steel stakes driven into the ground at a 45-degree angle, positioned at the base of each leg and along the back edge, will hold most arches in moderate wind. You’ll typically need four to eight stakes depending on the arch size. Make sure the stakes are long enough—at least 12 inches—and that they’re driven in all the way. A stake that’s only half-buried is a stake that’s going to pull out.
Concrete and asphalt: This is where things get tricky, and it’s the scenario that most guides skip. You can’t stake into concrete. Your options are sandbags or water ballasts. Sandbags are the traditional choice—heavy, cheap, and effective. But they’re also a pain to transport. A 50-pound sandbag doesn’t fit neatly in your car, and you’ll need several of them.
Water ballasts are the modern solution. They’re essentially heavy-duty vinyl bags that you fill with water on site. They’re flat and light when empty, which makes them easy to transport, and they provide serious weight when filled. The tradeoff is that you need a water source at your event location, which isn’t always available.
Here’s my honest take: for concrete surfaces, plan on using both sandbags and water ballasts. The combination gives you redundancy, and redundancy is what saves you when an unexpected gust hits.
Wind ratings and when NOT to use an inflatable: Every quality inflatable arch comes with a wind rating—the maximum wind speed at which it can safely operate. This is usually in the 20 to 25 mph range for properly anchored arches. But here’s the thing: that rating assumes proper anchoring. If you’re on concrete with insufficient ballast, your effective wind rating drops dramatically.
I’ll be blunt: if the forecast calls for sustained winds over 25 mph or gusts over 30 mph, don’t use an inflatable arch. It’s not worth the risk. The arch could tear, the blower could fail, or worse, the whole structure could become a projectile. Have a backup plan for extreme weather days.
Blower requirements and backup power: The blower is the heart of your inflatable arch. It needs to provide enough airflow (measured in CFM—cubic feet per minute) to maintain constant inflation. A typical arch blower runs at a rate that varies based on the arch’s volume. Most commercial arches come with a blower sized for the product, but you should always verify.
Here’s a social media insight that comes up constantly: people asking what size generator they need to power an inflatable arch. The math isn’t complicated, but it’s important. Check the wattage of your blower motor—Most are in a moderate wattage range. Add a 20% safety margin, and that’s your minimum generator output. But here’s the catch: generators have both running wattage and starting wattage. A blower motor draws more power when it starts up than when it’s running. If your generator can’t handle the starting surge, the blower won’t spin up.
My advice: always bring a backup blower. Blowers fail. It’s not a matter of if, but when. A backup blower is cheap insurance compared to a failed event. And if you’re using a generator, bring a second one or at least a long extension cord so you can tap into building power as a fallback.
Custom Printing and Branding: Logos, Colors, and Lead Times
Let’s be real: the whole point of buying a custom inflatable arch is the branding. You’re not buying a piece of equipment—you’re buying a billboard that happens to be inflatable. So the printing quality and customization process matter a lot.
There are two main printing methods for inflatable arches:
Sublimasi pewarna is the gold standard for full-color printing. The dye is infused into the fabric itself, which means the colors are vibrant, they don’t crack or peel, and they’re resistant to fading from UV exposure. This is what you want for complex logos, gradients, and photographic images.
Vinyl applique involves cutting shapes from colored vinyl and heat-sealing them onto the arch. This is a good option for simple designs—solid color logos, text, basic shapes. It’s generally less expensive than dye-sublimation, and it can look great, but it’s not suited for intricate artwork.
For most events, I’d recommend dye-sublimation. The difference in visual impact is noticeable, and the durability is better.
The proofing process is where you’ll interact most with your vendor. You’ll submit your artwork, and they’ll send you a digital proof showing how the arch will look. This is your chance to catch mistakes—misspelled words, wrong colors, logo placement issues. Review it carefully. Once production starts, changes are expensive or impossible.
Production lead times for custom inflatable arches can vary, depending on the complexity of the design and the manufacturer’s workload. If you need something faster, some vendors offer rush production for an additional fee. My advice: don’t count on rush production. Order at least three weeks before your event to give yourself a comfortable buffer.
The design service is worth mentioning. Some manufacturers, like Promo Bears USA, offer free design assistance where their team helps you create concept artwork. This is valuable if you have a rough idea but not a polished design file. Take advantage of it if it’s offered.
One thing to consider: your custom inflatable arches with logo are reusable assets. A well-designed arch isn’t a one-event purchase. You’ll use it at multiple races, festivals, and promotions throughout the year. So invest in the design. A generic-looking arch is a wasted opportunity.
Setup, Takedown, and On-Site Maintenance
The moment of truth: event day. You’ve bought the right arch, it’s properly sized, and the branding looks fantastic. Now you need to get it up without drama.
Setup is genuinely simple, but there’s a sequence that works better than others. Start by laying the arch flat in the position where it will stand. Unfold it completely, making sure there are no twists or folds in the fabric. Attach the blower to the inflation tube, secure it with the strap or clamp, and then power it up.
Here’s a tip I’ve learned the hard way: let the arch fully inflate before you start anchoring. Trying to stake or sandbag a half-inflated arch is frustrating and can damage the fabric. Give it two to three minutes to reach full pressure, then anchor it.
A two-person crew can handle setup in 15 to 20 minutes. One person to manage the blower and inflation, another to position and anchor. Three people make it easier but aren’t necessary.
Takedown is the reverse. Remove the anchors, disconnect the blower, and let the air out. Most arches have a large opening that allows rapid deflation. Then fold or roll the arch for storage. The folding pattern matters—if you fold it the same way every time, the creases will eventually weaken the fabric. Vary your folding pattern to distribute wear.
On-site maintenance is about having the right supplies on hand. Here’s what I’d pack in every event kit:
- Patch tape: For emergency repairs to small tears or punctures. Most manufacturers sell patch kits designed for their fabric.
- Spare blower: As I mentioned earlier, this is non-negotiable in my book.
- Extension cords: You never know where the power source will be. Bring at least 50 feet of heavy-duty extension cord.
- Duct tape: The universal fixer. Not for repairing the arch itself, but for securing cords, marking anchor points, and a hundred other uses.
- Spare stakes: You’ll lose some. It’s inevitable.
If you do get a tear, don’t panic. Small punctures (under an inch) can be patched with the repair kit. Larger tears need professional repair. And here’s the thing about inflatable arch repair: it’s often cheaper to fix a quality arch than to replace it. That’s another reason to buy good fabric in the first place.
For event planners using inflatable arches frequently, consider investing in additional inflatable products from the same manufacturer. Many vendors, including KCCE, offer a range of inflatable products that work well together at events—like our inflatable furniture for lounge areas or bentuk tiup for decorative accents.
Cost Breakdown: Rental vs. Purchase
Money talk. This is where I see event planners make the biggest mistakes, and it’s usually because they’re only thinking about this weekend’s event instead of the full year.
Rental: Renting an inflatable arch typically costs a variable amount per event, depending on size and customization. The rental company handles delivery, setup, and takedown. That’s convenient, but it adds up fast. If you run monthly events, you’re looking at $1,800 to $6,000 per year on rentals alone.
Purchase: Buying an inflatable arch costs a variable amount, depending on size, fabric quality, and customization. That’s a significant upfront investment, but here’s the math that matters: If you use the arch even 10 times, the per-event cost drops to a more affordable range. And you own it. No rental coordination, no dependency on a vendor’s schedule, no risk of the rental being double-booked.
Boulder Blimp’s analysis of inflatable arches as an investment for 2026 makes this exact point. Budgets are tighter, and reusable assets matter more than ever. An inflatable arch isn’t just something you set up and take down—it becomes a focal point that reinforces your brand across different events, seasons, and audiences.
Hidden costs to watch for:
- Pengiriman: Inflatable arches are heavy. Shipping can add a variable amount depending on your location. Some vendors offer free shipping above a certain order value—ask.
- Storage bag: Some arches come with a storage bag; others don’t. A proper bag is a worthwhile investment for protecting your investment.
- Blower replacement: Blowers don’t last forever. Plan for replacement every few years with regular use. Budget accordingly.
- Perbaikan: Minor repairs are cheap if you do them yourself. Major repairs or professional servicing will cost more.
If you’re running a single event, renting makes sense. If you’re running multiple events, or if you plan to use the arch year after year, buying is the smarter financial move.
For those looking to buy, there are several top-rated manufacturers worth considering, and we’ll get to those next.
Top-Rated Manufacturers for Inflatable Arches for Events
The vendor you choose matters as much as the product. I’ve seen great designs ruined by poor manufacturing, and I’ve seen mediocre designs elevated by quality construction. Here are some manufacturers that consistently show up in the SERP results and have solid reputations:
Extreme Canopy: Known for a wide range of event products, including inflatable arches. They’re a solid choice if you’re looking for a one-stop shop for multiple event needs. Their prices are competitive, and their quality is reliable for mid-range events.
LookOurWay: This company specializes in marketing and advertising inflatables. Their strength is customization and attention to detail on branding. If your priority is a striking visual for brand promotion, they’re worth a look.
Banner Buzz: As the name suggests, they’re primarily a banner company, but they’ve expanded into inflatable arches. Their advantage is the integration of banner-quality printing with inflatable structures. If your arch is primarily a branding vehicle, their printing quality is a plus.
West Shade: Known for shade structures and event canopies, they’ve also entered the inflatable arch market. Their strength is durability—they build for outdoor, long-term use.
Promo Bears USA: With over 16 years of experience in inflatable design and creation, they offer custom-made arches with free design service. Their portfolio includes a wide range of arch styles and they’re a strong choice for fully custom designs.
MVP Visuals: This company has been in the custom display business for 20 years. They offer inflatable arches, tunnels, and custom inflatables. Their longevity in the industry is a good sign of reliability.
Boulder Blimp: They’ve published detailed analysis on why inflatable arches are a smart investment, and they manufacture custom inflatables including arches. Their perspective is that these structures are reusable assets that work hard across multiple events.
Deluxe Canopy: They’ve published reviews of inflatable arches for branded events, and they offer both standard and custom options. Their blog content is genuinely useful for buyers trying to understand the product category.
Here’s my honest advice: don’t just pick the cheapest option. Look at the fabric specifications, check the seam construction, and read reviews from other event planners. The best inflatable arches for outdoor events balance price, quality, and lead time. A slightly higher upfront cost is worth it if the arch lasts twice as long.
If you’re looking for a manufacturer that understands the full range of inflatable event products, KCCE’s inflatable solutions are worth exploring. They’ve been in the business long enough to know what works in the field.
Pertanyaan yang Sering Diajukan
Q: Where can I find inflatable arches for races?
A: Most major inflatable manufacturers sell arches designed specifically for race events. Look for vendors like Extreme Canopy, LookOurWay, or MVP Visuals, and search for “inflatable arch for marathon finish line” specifically. Race arches typically need to be 10 to 15 feet wide with bright, high-visibility branding. Order at least three weeks before your race date to allow for production and shipping.
Q: How to make an inflatable arch?
A: Making a DIY inflatable arch isn’t practical for most people—it requires industrial sewing equipment, specialized fabric, and blower systems. Professional manufacturers use heat-sealed seams and commercial-grade PVC vinyl. If you’re on a tight budget, consider renting instead of building. If you need a custom design, work with a manufacturer that offers design services rather than attempting a DIY approach.
Q: How to get an inflatable arch to stay up?
A: Proper anchoring is the answer. On grass, use steel stakes driven at a 45-degree angle. On concrete, use sandbags or water ballasts—ideally both. Always anchor before fully inflating, and check your anchors periodically throughout the event. If wind speeds exceed your arch’s rated limit, take it down. A properly anchored arch with a correctly sized blower will stay up in moderate conditions.
Q: How long does an inflatable arch last?
A: With proper care, According to brand claims, a commercial-grade inflatable arch with 840D PVC fabric and double-stitched seams can last several years of regular use. UV exposure is the main enemy—look for UV-resistant coating. Proper storage in a bag, avoiding sharp objects, and repairing small tears promptly will extend the life significantly. Cheaper polyester arches may only last a season or two.
Q: What size inflatable arch do I need?
A: For runners and walkers, 10 feet is sufficient. For vehicles, measure your tallest vehicle and add at least 2 feet of clearance. For group walkthroughs at festivals or trade shows, 12 to 15 feet is comfortable. When in doubt, size up—a larger arch provides more branding space and is more forgiving for unexpected clearance needs.
Q: Are inflatable arches weather resistant?
A: Most commercial inflatable arches are water-resistant and have UV-resistant coatings, but they’re not designed for extreme weather. Light rain is generally fine, but heavy rain can pool on top and stress the fabric. Wind is the bigger concern—According to brand claims, most arches are rated for moderate wind speeds when properly anchored. Don’t use an inflatable arch in severe weather.
Q: How much does a custom inflatable arch cost?
A: Custom inflatable arches vary in price, depending on size, fabric quality, and printing complexity. A basic 10-foot arch with simple printing starts at a lower price point. According to brand claims, a 15-foot arch with full-color dye-sublimation printing and premium fabric can reach a higher price point. Factor in shipping, storage bag, and blower costs when budgeting.
Q: What blower do I need for an inflatable arch?
A: Your blower should match the arch’s volume. Most commercial arches come with a properly sized blower, typically in the 500 to 1,500 watt range. Check the CFM rating—you need enough airflow to maintain constant pressure. Always have a backup blower on hand, and if using a generator, make sure it handles the blower’s starting wattage, not just running wattage.
Referensi
1. Custom Inflatable Arches for Events & Entrances – MVP Visuals
2. Inflatable Arch Review for Branded Events – Deluxe Canopy
3. Custom Inflatable Arches – Promo Bears USA
4. Why an Inflatable Arch Is a Smart Investment for 2026 – Boulder Blimp
5. The Complete Guide to Inflatable Arches for Event Marketers – Event Marketing Insider
6. Blower Selection Guide for Inflatable Arches – Inflatable Event Supply







