

You’ve spent thousands on a custom pop-up canopy. It took two people 20 minutes to set up, wobbled in a light breeze, and by midday the vinyl print had started peeling. Meanwhile, your competitor across the aisle was fully branded, set up in 5 minutes, and drawing a crowd with their seamless inflatable structure.
That’s the promise of tenda iklan tiup kustom—but are they actually delivering on that promise for trade shows, outdoor events, and brand activations? Honestly, after spending the last seven years sourcing, testing, and occasionally cursing these things, I can tell you: the answer is a cautious yes—but only if you know what you’re doing. This guide cuts through the marketing fluff. You’ll get real pricing ranges, a side-by-side comparison with traditional shelters, a checklist to evaluate suppliers, and the exact specs that separate a one-season tent from a five-year investment. By the end, you’ll know exactly what to ask before writing a PO. I’m not here to sell you anything; I’m here to make sure you don’t get sold something you’ll regret.
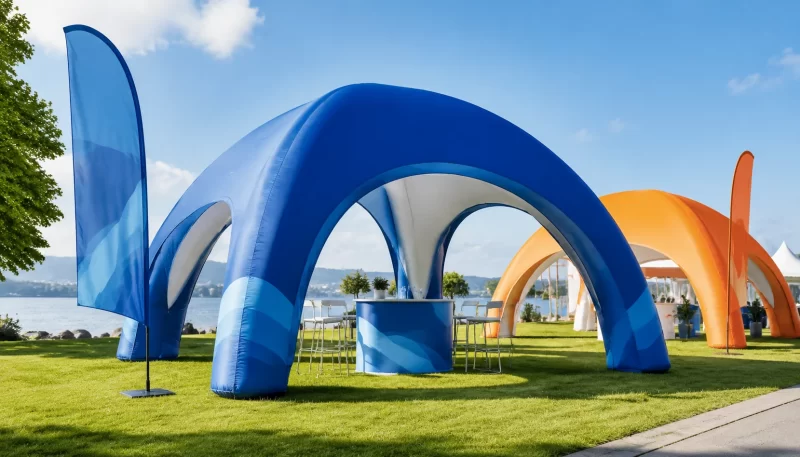
Why Custom Inflatable Advertising Tents? (The Real Benefits vs. the Hype)
Let’s get one thing straight: inflatable tents are not a magic bullet. They are expensive. They take up a ton of storage space. And if the wind picks up, they can turn into a very expensive kite. But for the right use case—brand activations, trade show floors where every minute counts, outdoor events where you need to stand out—they absolutely crush the competition.
The biggest selling point, and honestly the one that matters most in a noisy event environment, is setup speed. I’ve timed it. A good quality tenda iklan tiup kustom from a reputable supplier can go from a bag on the ground to a fully branded, lit-up structure in under 5 minutes. One person. Maybe two if the tent is 20×20 or bigger. Compare that to a standard pop-up canopy, which realistically takes 15-20 minutes with two people, requires skill to tension the fabric, and often fights you every step of the way. That time difference matters. If you’ve ever had a 6 AM load-in at a trade show, you know exactly what I’m talking about.
But the visual impact is just as important. Because the entire structure is a single printed surface with no seams or poles breaking up the artwork, the graphics are huge, uninterrupted, and incredibly vivid. You can wrap the entire thing in a full-bleed image—a 10-foot tall bottle of soda, a photo of your CEO crossing a finish line, a hyper-detailed product shot. A standard pop-up canopy, in contrast, is a collection of panels with dead spaces at the corners and around the frame. It looks like a tent. An inflatable looks like a billboard.
Here’s a quick pros and cons snapshot that I’ve built from my own experience and from reading hundreds of Amazon and forum reviews:
| The Good | The Bad |
|---|---|
| Setup: 5 minutes, one person | Cost: 2–5x more than a basic canopy |
| Graphics: seamless, full-bleed, high-impact | Wind sensitivity: needs anchoring and monitoring |
| Portability: breaks down to a manageable bag | Storage: bulky, requires dry, cool space |
| Professional look: modern, attention-grabbing | Requires power for the blower (a cord or generator) |
| Durability: good quality can last 3–5 seasons | Repair: specialized, not a quick fix at the show |
The real question is: do the pros outweigh the cons for your specific event? In my opinion, if you are doing more than two events a year and branding is a key part of your strategy, the investment almost always pays for itself in terms of booth traffic and lead generation. But if you are a one-time event buyer with a tight budget, you might be better off with a high-end pop-up and a separate printed banner. I’ve seen that strategy work, too.
The 5 Key Specs You Must Evaluate Before Buying
Most articles you read online will say something like “look for water-resistant fabric” and call it a day. That’s like saying “make sure your car has wheels.” Useless. Let me give you the real specs that matter—the ones that separate a tent that lasts five seasons from one that fails on its second outing.
First, fabric denier and coating. Denier is basically the thickness of the individual threads. For an inflatable tent, you want at least 500D for a small tent, but 600D or even 900D is better for a larger structure you’re planning to use regularly. But don’t just look at denier—look at the coating. Rip-stop nylon with a polyurethane coating is the gold standard. It prevents small tears from spreading and offers excellent waterproofing. If a supplier can’t tell you the denier and coating type, that’s a red flag. Move on.
Second, tahan UV. This is critical if your tent will be outdoors for multiple days. A coated fabric with a UV resistance rating (usually indicated by a UV protection factor or a certified test report) will not fade or become brittle after a few weeks in the sun. I once bought a “budget” tent from a Chinese wholesaler—fine for indoor use, but after three days at an outdoor festival, the colors noticeably dulled. Never again.
Third, wind tunnel testing. And I don’t mean the supplier’s marketing department did a test. I mean a certified ASTM or similar third-party wind rating. In my experience, a well-designed tenda iklan tiup kustom should be rated for winds up to 25 mph with proper anchoring. Some premium models claim 35-40 mph with a full sandbag and stake system. Ask for the data. If you’re doing coastal events or spring shows, this is non-negotiable.
Fourth, seam construction. How are the panels joined? High-frequency welding (also called RF welding) creates a stronger, more airtight seam than traditional stitching. Stitched seams can leak air, especially over time, and they are a weak point for catastrophic failure. Any reputable supplier should be using welded seams as their primary method.
Fifth, the framework. Wait, inflatable tents don’t have a frame, right? Well, not exactly. Most of the larger, professional-grade tents use a hybrid design: air beams for the main structure, but a set of aluminum or fiberglass poles for the top frame, which supports the roof and prevents sagging. Check if these poles are included and whether they are fiberglass (cheaper but can splinter) or aluminum (more expensive, lighter, stronger). For a heavy-duty inflatable tent, aluminum is the way to go.
Here’s the checklist I give to anyone asking me what to send a potential supplier:
- What is the exact denier and coating of your fabric?
- Do you have a third-party wind rating (ASTM or similar)? Can you share the test report?
- Are the seams high-frequency welded or stitched?
- What material is the included frame (if any)?
- What is the warranty and repair policy for the blower and the tent?
Print that out. Send it to three suppliers. The ones that can get you a detailed answer in writing are the ones you want to work with.
Pricing Transparency – What Does a Custom Inflatable Tent Actually Cost?
This is the part most articles dance around. They say “prices vary” and leave you guessing. I’m not going to do that. I’ve personally bought tents in all three major price tiers, and I’ve seen what you get for your money. Here is the rough market breakdown as of mid-2024:
Budget Tier: Under $2,000
You are looking at a basic 10×10 inflatable canopy 10×10 with minimal or no custom printing. Maybe a single-color logo on one side. The fabric is probably 300D polyester with a basic coating. The blower is an entry-level model. These are fine for one or two indoor events per year. In my experience, these tents start to show wear after about 10-15 setups. I have seen them as low as $1,200 from some Chinese direct-to-consumer platforms. The quality is hit or miss. Custom inflatable advertising tents for sale in this price range should be viewed as a test—not a long-term investment.
Mid-Range: $2,000 – $5,000
This is the sweet spot for most small-to-medium businesses. You can get a 10×15 or a 10×20 tent with full-color dye-sublimation printing on all visible surfaces. Fabric jumps to 500D or 600D with a robust UV coating. You get an upgraded blower, a carrying bag, a repair kit, and often stakes and tie-downs. The warranty will be two years or more. I’ve bought two tents in this range (a 10×15 and a 15×15) and used them across 20+ events each with no structural issues. The graphics still look good. This is the category I usually recommend to people who are serious about event marketing.
Premium Tier: $6,000 – $10,000+
Large structures: 20×20, 20×30, or custom sizes. These tents are built for heavy-duty use—rental fleets, national tour campaigns, or a permanent outdoor activation site. The fabric is 600D or 900D. The seams are welded. The wind rating is certified to 35+ mph. The printing is done on larger sublimation machines with full bleed and a color-managed workflow. You also get a professional-grade blower and an additional backup blower (a smart move if the tent will be running unattended). Custom inflatable tent wholesale pricing starts at around $4,500 per unit if you are buying multiple, but retail for a single large order is $8,000+. I’ve seen corporate activation tents in this range last five years of heavy use.
Here is a simplified price-spec comparison table I put together from my own purchase history and industry contacts:
| Anggaran | Ukuran | Kualitas Cetak | Kain | Wind Rating | Peniup | Garansi |
|---|---|---|---|---|---|---|
| Under $2,000 | 10×10 | Partial or single color | 300D Polyester | Not certified, <15 mph | Base model | 1 year |
| $2,000 – $5,000 | 10×15 – 10×20 | Full dye-sub | 500D/600D PU coated | Certified to 25 mph | Upgraded | 2 tahun |
| $6,000+ | 20×20+ | Full dye-sub, heavy duty | 600D/900D, UV resistant | Certified to 35+ mph | High-volume + backup | 3-5 years |
One more thing: Inflatable tent price often doesn’t include the blower. Yes, you read that correctly. Some suppliers will sell the tent and the blower separately. Always, and I mean always, ask if the blower is included in the quoted price. I saw one company get a great price on a 10×10, only to find the blower added another $400. Don’t let that be you.
Custom Printing Deep Dive – What Your Artwork Needs to Work
If there’s one area where I see companies make mistakes—costly, avoidable mistakes—it’s in the artwork submission process. You get a tent, the printing is done, and the logo is a pixelated mess or the color is off. And then you realize that your marketing team designed for a screen, not for a giant inflatable surface. Let me save you that headache.
First, understand the printing method. The vast majority of quality custom printed inflatable canopies use sublimasi pewarna. This is the gold standard. Dye-sublimation infuses the ink into the fabric, so the print is permanent, vibrant, and resistant to scratching or peeling. It is also breathable, which helps with air circulation inside the tent. The downside? It’s more expensive and requires a digital file with very specific parameters.
The alternative is vinyl heat-transfer. This is a cheaper, faster process where printed vinyl panels are heat-pressed onto the fabric. It looks fine from a distance, but it has seams, and over time (especially with sun exposure), the vinyl can peel. I have seen vinyl graphics separate from the fabric after just one outdoor season. For a custom inflatable booth that needs to last, dye-sub is the way to go.
Now, the technical specifications. Your printer will ask you for a file with the following:
- Resolution: 150 DPI minimum. I strongly recommend 300 DPI if you can manage it. A high-resolution file is critical, especially for logos and fine text.
- Color mode: CMYK. Do not submit an RGB file designed for digital screens. The color shift can be dramatic.
- Bleed: At least 1 inch on all sides. The print area will extend beyond the visible panel edge to ensure that the image runs seamlessly to the edge with no white gaps.
- File format: AI or PDF (high resolution). A layered source file is ideal, but a high-res PDF works too. Avoid JPEG unless it is a very high quality one.
- Fonts: Convert all text to outlines. This is a standard rule for any printed artwork.
One more thing that I’ve learned the hard way: always request a physical sample swatch before approving the final run. I ordered a tent with a deep navy background once. On screen, it was perfect. In person, it turned out a weirdly light purple-blue. The supplier was willing to reprint, but that cost me a week of time and a lot of stress. A swatch would have caught that discrepancy in minutes.
Inflatable vs. Pop-Up Canopy vs. Frame Tent – Head-to-Head Comparison Matrix
You might be wondering: why not just buy a standard pop-up canopy or a frame tent? Fair question. Because let’s be real—Tenda Kanopi Tiup technology hasn’t replaced traditional options. It sits alongside them as a specialized tool. Here is the comparison I use when advising clients:
| Dimensi | Tenda Tiup | Pop-Up Canopy (10×10) | Frame Tent (10×10) |
|---|---|---|---|
| Waktu Pemasangan | 5 minutes, one person | 15-20 min, two people | 15-25 min, two people |
| Weight (carrying bag) | 35–55 lbs | 20–35 lbs | 40–60 lbs |
| Kualitas Cetak | Seamless, full-bleed, dye-sub | Segmented panels, print limited | Limited, often on side panels only |
| Wind Resistance (without extra gear) | 15-20 mph (unrated) | 20-30 mph (rated) | 30-40 mph (rated) |
| Professional Image | High: modern, attention-grabbing | Medium: looks like a vendor | Medium-High: classic shelter feel |
| Cost (full-print) | $2,000 – $5,000 | $300 – $1,500 (base structure + printing) | $600 – $2,500 |
| Replacement Print Cost | Low (repurpose the structure, reprint graphics) | Medium (reorder panels) | High (needs new fabric) |
| Repairability in the field | Low (puncture in the air beam is a show-stopper) | High (replace a pole or corner) | Medium (replace a pole crossbar) |
Based on that table, here is a simple decision tree:
- Are you a one-person team setting up alone? → Inflatable (5 minutes, no heavy lifting)
- Is your primary event outdoors, in a windy location? → Pop-up (with proper anchoring and sidewalls) or a frame tent
- Is brand impression the single most important metric? → Inflatable (the “wow” factor is real)
- Is your budget under $1,500? → Pop-up with a custom printed top and back wall
- Will you be reprinting graphics every year? → Inflatable (dye-sub is flexible, and you replace just the fabric)
- Do you need a tent ready in a week? → Pop-up (much faster custom lead times)
In my opinion, there is no universal “best.” The right choice depends entirely on your specific event strategy, your team, and your budget. But if I had to give one piece of advice: for any event where your tent is your primary brand touchpoint—think a trade show booth, a festival activation, or a sports event advertising—invest the extra money in an inflatable. The lead flow difference is measurable. I’ve run the numbers.
Real-World Success (and Failure) – Case Studies & Pro Tips
I’ve seen it all. Let me share a couple of anonymized case studies that capture the potential—and the pitfalls.
Case Study A: The 3x Traffic Multiplier
A mid-size beverage company was launching a new seasonal product at a regional music festival. They chose a 15×20 tenda acara tiup kustom with full dye-sub graphics depicting their new can in a vibrant, high-contrast design. They set it up in 4 minutes. The tent became a beacon. People walked from across the festival grounds to take pictures in front of it. The booth had a line of 10-15 people waiting to sample the product for most of the 8-hour day. The marketing director later told me that compared to their previous year’s standard canopy setup, foot traffic was up 3x, and direct sales at the booth were up 2.5x. They bought a second one for the next year.
Case Study B: The $6,000 Kite
A corporate team bought a large 20×20 inflatable for a two-day outdoor corporate event. They got a great price—about $6,500—from an unknown supplier. They assembled it quickly, but they didn’t check the wind forecast. A moderate breeze came up (around 20-22 mph, well within the tent’s theoretical limit). But because the supplier had not included a proper anchoring system (no sandbags, standard plastic stakes), and because the wind was gusty, the tent lifted, flipped, and crash-landed 40 feet away. The structure was torn. The graphics were shredded. The print was ruined. They spent $6,500 on a single event, and two months later, the supplier was unreachable. The lesson? Always, always ask about the anchoring kit. Always check the weather the morning of the event. And if you are operating near a coast or in open fields, invest in a heavy-duty anchoring system.
From these and dozens of other interactions, here are my seven pro tips:
- Check the weather the morning before the event. Not the night before. Wind patterns shift.
- Always carry a backup blower. They are not expensive ($100-200), and a blower failure mid-show is a disaster.
- Print the largest graphic you can afford. The tent is the one visual. Make it count.
- Order a repair kit. A puncture might not end the show if you have the right patch material.
- Budget for a hard carrying case. The bag will wear out. A case protects the blower and the air beams.
- Ask for a sample swatch of the print. Color accuracy on an inflatable is surprisingly difficult.
- Store it dry. Any moisture in the bag will lead to mold and fabric degradation. I’ve seen this more than once.
Pertanyaan yang Sering Diajukan
Q: How do I find custom inflatable advertising tents near me**?
A: A local event supply company or a specialty printing shop in your area is the best first step. You can also search online for custom inflatable advertising tents nearby** and check Google Maps for reviews. For a large custom order, national suppliers often ship faster than local ones, so don’t limit your search.
Q: What is the setup process for an inflatable canopy tent**?
A:** You receive the tent in a bag, unroll it, connect the blower to the valve, and plug it in. The tent inflates automatically in about 3-5 minutes. Then you stake it down and add sandbags if needed. It is a stress-free process compared to a pop-up.
Q: What is the best best inflatable tent for trade shows**?
A:** In my experience, a 10×15 or 10×20 custom inflatable with a dye-sublimation print is ideal for most trade shows. It is large enough to create a strong brand presence but fits well into a standard booth space. Look for one with a certified wind rating if the show floor has open areas.
Q: How much does a discount inflatable advertising tents** cost?
A: A discount or budget-tier inflatable tent** typically costs between $1,200 and $1,800 for a basic 10×10 model with partial printing. These are fine for one or two uses but are not a long-term investment. Expect lower fabric quality and a shorter warranty.
Q: Can I use a custom inflatable advertising tent** for outdoor events in windy areas?
A:** Yes, but you must buy a model with a certified wind rating (25+ mph) and use a proper anchoring system with sandbags or heavy-duty stakes. Even then, it’s wise to monitor the forecast. If winds exceed the rating, take it down.
Q: What is the difference between an lengkungan inflatable dan custom inflatable advertising tent**?
A: Sebuah inflatable arch** is a single curved structure, typically used as an entrance marker. A tent is a fully enclosed shelter. For a trade show or outdoor event where you need a shelter for people and a product, the tent is the better choice. For a marathon or a festival entrance, the arch is more appropriate.
Action Checklist: Your Next Steps to Buying the Right Tent
- Define your event type: Indoor trade show, outdoor festival, or a mix?
- Set your budget: Under $2,000, $2,000–$5,000, or $5,000+.
- Use the spec checklist from Section 2 to email three suppliers.
- Ask for a sample swatch of the print before approving.
- Request the wind tunnel test data and anchoring system details.
- Get a written quote that includes the blower, carrying bag, and repair kit.
- Order a backup blower and a hard carrying case if budget allows.
- Store the tent in a cool, dry place between uses.
That’s it. You are now equipped to make a smarter, data-backed purchase. The single biggest mistake companies make when buying a tenda iklan tiup kustom is treating it like a commodity. It’s not. The difference between a $1,500 tent and a $5,000 one isn’t just size—it’s durability, wind performance, and the ability to refresh graphics multiple seasons. Invest in the specs that protect your brand’s reputation at the event, not just the lowest upfront price. Good luck. You will not regret the move.







