

为何值得升级您的充气帐篷鼓风机?
假设您刚刚徒步一英里到达理想的露营地。您取出充气帐篷,接上原装鼓风机,然后……等待。十分钟过去了,您仍然被困在原地,听着那台嗡嗡作响、动力不足的风扇,而邻居们已经钻进帐篷喝上了茶。听起来很熟悉吧?没错,正是那一刻让我认真考虑升级我的充气帐篷鼓风机。.
事实是这样的:大多数随充气帐篷附带的原装鼓风机最多只能算“勉强可用”。它们是按成本而非性能标准制造的。制造商假设您每年只使用帐篷三四次,因此相应地设计鼓风机——廉价电机、基本款扇叶,完全不考虑噪音或效率。我见过一些设备需要6分钟以上才能完全充满一个4人帐篷。那不是露营——那是苦差事。.
但升级并非简单地从亚马逊上随便挑一台功率最大的设备。这一点我是吃了亏才学到的。错误的鼓风机可能会损坏帐篷的接缝,让电池在10分钟内耗尽,或者惹恼方圆50英尺内的所有人。如果您一直在浏览“升级充气帐篷鼓风机”的评测,或跳到Reddit上的相关帖子寻找答案,您可能会发现信息杂乱无章,甚至相互矛盾。.
本文就是为了解决这个问题。我将涵盖所有内容——鼓风机的实际工作原理、关键规格、兼容性陷阱,以及分步更换指南。读完本文,您不仅会知道该买哪款鼓风机,还会明白 为什么。 为什么它适合您的设备。没有废话,没有营销噱头——只有来自一个为此折腾过三台不同鼓风机的人的实在话。.
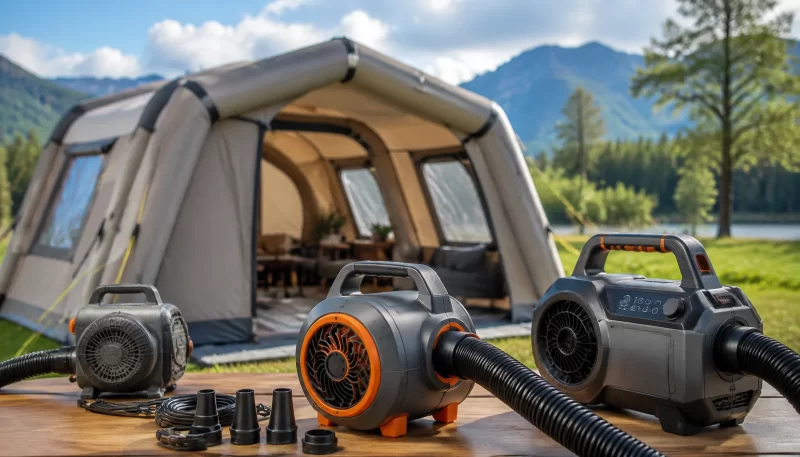
充气帐篷鼓风机的实际工作原理
在进入升级话题之前,先来聊聊那个塑料外壳里旋转的东西。充气帐篷鼓风机与普通风扇甚至空气压缩机有着本质区别。压缩机将加压空气储存在储气罐中并间歇性释放,而鼓风机则以低压持续输送大流量空气。.
核心机制很简单:电机驱动风扇或叶轮旋转,从进气口吸入空气,再从喷嘴推出。这股持续的气流为帐篷的气柱——即支撑整个结构的骨架管——充气。与需要高压才能保持硬度的气垫不同,帐篷气柱需要的是流量而非压力。您要的是快速充满那根管子,而不是把它压爆。.
大多数原装鼓风机使用的是我所说的“入门级”电机——有刷直流电机,价格便宜但寿命有限。碳刷会随着时间磨损(通常运行500至1,000小时后),且会产生相当多的热量和噪音。高端鼓风机则改用无刷电机,效率更高、噪音更低,使用寿命可达3,000小时以上才需更换。.
叶轮设计同样重要。离心式叶轮——那种看起来像仓鼠跑轮的——是大多数帐篷鼓风机的标配。它能提供足够的压力,将空气推过帐篷气柱的曲折路径。轴流风扇(就像台式风扇里的那种)能输送大量空气,但压力极低,这就是为什么专用帐篷鼓风机中几乎看不到它们的身影。.
理解这一机制至关重要,因为它决定了您能升级什么、不能升级什么。您可以更换功率更大的鼓风机型号,也可以改变电机类型。但您无法改变基本的物理规律——如果您的帐篷气阀和气柱是为特定流量设计的,过度超出该流量可能会造成损坏。关于这一点,后文会详细说明。.
何时应考虑升级?(性能不足的迹象)
并非每个人都需要升级。如果您的原装鼓风机能在90秒内充满帐篷,而且运行时您还能正常交谈,那您可能不需要升级。但以下三个明显迹象表明,是时候考虑升级您的充气帐篷鼓风机了。.
迹象1:充气速度慢得离谱。. 如果您需要用日历计时帐篷搭建过程,那肯定有问题。尺寸合适的鼓风机应在60至120秒内充满一个标准的4人充气帐篷。如果您要等4到5分钟——我见过原装设备需要6分钟以上——那您就是在浪费宝贵的营地时间。我曾给原厂鼓风机计时过一次:一个本应在2分钟内完成的帐篷,花了5分22秒。那是我开始选购升级产品的契机。.
迹象2:听起来像1992年的吹叶机。. 噪音水平比大多数人愿意承认的更重要。一台70至75分贝的鼓风机在纸面上听起来可能不算太糟,但在实际使用中呢?那声音足以让所有听到的人感到烦躁。我曾被营地邻居隔着营地投来嫌弃的目光。我们后面要讨论的一些升级版鼓风机运行噪音在55至60分贝——大约相当于正常交谈的音量。对于清晨大家都在睡觉时的搭建来说,这绝对是天壤之别。.
迹象3:已经坏过一次了。. 如果您的原装鼓风机在2到3次露营后就报废了,那不是运气不好——那是设计如此。大多数充气帐篷鼓风机的寿命以数百小时计,而非数千小时。配备塑料轴承的廉价电机本来就不是为长期使用设计的。如果您已经在更换第二或第三个原装替换件,那么一次性升级到质量更好的产品反而更省钱、更明智。.
还有一个“功率焦虑”因素。如果您在风大的条件下露营,或使用较大的帐篷(尤其是那些豪华露营爱好者使用的充气帐篷屋),动力不足的鼓风机无法维持足够的压力来保证结构刚性。结果就是帐篷在风中下垂、拍打。我在Coody充气帐篷型号上见过这种情况——原装鼓风机在无风天没问题,但在15英里/小时的风速下就力不从心了。.
如果以上任何一种情况听起来很熟悉,那就是该升级的时候了。.
需要对比的关键参数:CFM、功率、马力、噪音(分贝)
这正是互联网上一半时候会搞错的地方。人们关注马力(HP),因为这是营销最多的数字,但对于充气帐篷来说,马力几乎无关紧要。让我来拆解一下真正重要的参数。.
CFM:核心指标。. CFM代表立方英尺/分钟——衡量鼓风机每分钟输送的空气体积。对于给帐篷气柱充气来说,这是您最需要关注的主要参数。您需要高CFM。对于标准4人帐篷,目标范围是300至500 CFM。对于更大的设备——比如可能有6至8根气柱的充气帐篷屋或成人充气屋式帐篷——可能需要600 CFM以上。CFM越高,充气越快。.
PSI:有参考价值,但非决定性因素。. PSI(磅/平方英寸)衡量压力。关键在于:大多数充气帐篷的工作压力非常低——通常在0.3至0.6 PSI之间。您不需要高压压缩机。在低压下提供高CFM的鼓风机才是理想选择。很少有鼓风机宣传其PSI值,因为数字不够吸引眼球,但您可以从电机设计和CFM额定值中推断出来。如果有人大力宣传高PSI,那他们卖给您的是气垫床鼓风机,而不是帐篷鼓风机。.
功率(瓦数):能耗指标。. 瓦数表示电机消耗的功率。对于120V交流供电的鼓风机(美国标准家用电流),常见额定功率范围在200W至1,000W之间。电池供电的设备功率较低——通常在100至300W之间。功率越高通常意味着气流越强,但也意味着能耗越大。如果您使用发电机或逆变器供电,就需要考虑这一点。一台500W的鼓风机运行2分钟,在120V电压下消耗约1.67安时——对汽车电池来说几乎可以忽略不计,但对小型移动电源来说就值得注意了。.
噪音(分贝):影响睡眠的因素。. 分贝采用对数标度测量,因此增加3分贝意味着声能翻倍。70分贝的鼓风机不仅仅比60分贝的型号响一点点——它的强度是后者的10倍。以下是行业讨论中常见的快速参考:
- 50至55分贝:轻声交谈,图书馆水平
- 55至60分贝:正常交谈
- 60至65分贝:大声交谈,中等交通噪音
- 65至70分贝:吸尘器(100英尺外仍可听到)
- 70至80分贝:吹叶机或原装帐篷鼓风机(打扰邻居)
当您在评测中看到“升级充气帐篷鼓风机成本”被提及时,噪音水平往往是人们愿意多花钱的首要原因。您不仅仅是在为更高的CFM买单——您是在为安静和安宁付费。.
马力:忽略它。. 说实话,鼓风机上的马力额定值大多是营销噱头。由于交流电机可以在低转速下产生高扭矩,一台0.5马力的电机如果叶轮设计得当,可以输送与2马力电机一样多的空气。行业标准规格是CFM。如果产品介绍以马力为卖点,那他们很可能是在掩盖较低的CFM额定值。.
计算适合您帐篷的鼓风机尺寸(容积公式)
Here’s a practical method I use when evaluating upgrades. You don’t need to be an engineer—just a calculator. Measure your tent’s main air beam. For a typical inflatable tent, each beam is roughly a cylinder. Let’s say one beam is 6 feet long and 6 inches in diameter.
Volume of a cylinder = π × r² × h
- r = radius (3 inches = 0.25 feet)
- h = height (6 feet)
- Volume per beam ≈ 3.14 × 0.0625 × 6 = ~1.18 cubic feet
If your tent has 4 beams, total volume is about 4.7 cubic feet. A blower delivering 300 CFM would theoretically inflate that in under 1 second. But in reality, losses from the hose, valve constrictions, and beam material mean you lose 30–50% efficiency. So you’re looking at 1–2 seconds per beam.
For larger tents—like the inflatable tent house designs that are becoming popular in the glamping space—the beams might be 8–12 inches in diameter and 10–15 feet long. A single beam could hold 10+ cubic feet. Inflating 6–8 such beams requires a blower that can sustain 500+ CFM for several minutes. The inflatable tents segment is seeing more of these heavy-duty setups as manufacturers like Coody充气帐篷 push into that market.
The formula gives you a baseline. If you’re upgrading and want the tent inflated in 90 seconds, calculate total volume and divide by the blower’s rated CFM (adjusted for 70% efficiency). If the result is over 120 seconds, you need more CFM or a different approach.
兼容性与安全性:电压、接口及认证(UL/CE)
This is the section that most upgrading guides skip, and it’s the one that will save you from a frustrating return. Let’s be real: I bought a blower once with perfect specs but a 2-inch nozzle. My tent had a 1.5-inch valve. I spent 10 minutes holding it manually in place with a towel jammed around the nozzle. Not my proudest camping moment.
Voltage Requirements (120V vs 230V). In North America, standard household outlets deliver 120V at 60 Hz. In many other regions—Europe, Australia, parts of Asia—the standard is 220–240V at 50 Hz. If you buy a 120V blower and plug it into a 230V outlet without a step-down transformer, you’ll let the magic smoke out of the motor. Conversely, a 230V blower on 120V will run slow or not at all. Check your tent’s country of origin and your destination. Some premium blowers are dual-voltage (with a physical switch or auto-sensing), but most aren’t.
Valve Sizes and Nozzles. Tent valve sizes vary wildly. The most common diameters are:
- 1.5 inches (found on many Coleman and lower-end tents)
- 2 inches (Vango, Kampa, some US models)
- Proprietary twist-lock connectors (some European brands)
The best upgraded blowers come with multiple nozzle attachments. If the one you’re eyeing has a single fixed nozzle, double-check compatibility. There are also universal adapter kits—I’ve seen them on Amazon—that can bridge a standard blower nozzle to a non-standard valve. Measure your tent’s inflation valve BEFORE you order anything. You’d be surprised how many people skip this step.
Safety Certifications (UL, CE, ETL). This is where untrained buyers get burned. UL (Underwriters Laboratories) is the gold standard for North America. CE marking indicates compliance with European health, safety, and environmental standards. ETL is similar to UL but from Intertek. A blower with these certifications has passed rigorous testing for fire, shock, and mechanical safety. Uncertified blowers—especially cheap imports sold on third-party marketplaces—may lack overload protection, have substandard wiring, or even pose a fire risk.
I personally won’t use a blower without UL or CE certification. The risk isn’t worth it, especially when the blower runs unattended while you’re setting up the rest of camp.
Warranty and Return Policies. Check the manufacturer’s warranty period. Many stock blowers have only a 30-day or 90-day limited warranty. Upgraded blowers from reputable brands often offer 1–2 years. Some higher-end units (especially those from brands like Zoom or Lasko) provide 3-year warranties. Also note that return policies on electrical items vary—some retailers charge a 15–20% restocking fee for opened units. Read the fine print.
更换鼓风机的分步指南
Alright, you’ve selected your upgraded blower. Now let’s get it installed. The process is straightforward but takes some patience.
Step 1: Disconnect and inspect. Unplug the stock blower from the tent’s inflation valve and from any power source. Remove the hose if it’s detachable. Look at the valve connection—some tents have a one-way flap that seats into a specific orientation. Note how it’s aligned.
Step 2: Match the nozzle. Check whether your new blower’s nozzle diameter matches your tent’s valve. If they don’t match perfectly, install the appropriate adapter from your kit. Most adapters are friction-fit or use a rubber sleeve. Push the adapter into the valve until you feel resistance—it should be snug but not forced.
Step 3: Secure the connection. If your tent valve has a retention mechanism (a twist lock or a strap), engage it. For friction-fit setups, some people use a bungee cord or a gear tie to hold the nozzle in place. It’s not strictly necessary during inflation (you can hold it), but if you plan to leave the blower running for continuous pressure maintenance, you want it secure.
Step 4: Test inflation. Plug the blower into a grounded outlet if it’s AC-powered. Start it, and watch the tent inflate. Pay attention to the first beam—if it inflates significantly faster than before, you’ve got a good upgrade. If the beam seems to overinflate (you can feel it becoming exceptionally tight), stop immediately and check your blower’s pressure settings or add a pressure relief valve.
Step 5: Final check. Once the tent is fully inflated, check all seams and valves for unusual strain. Some tents have a recommended operating pressure marked near the main valve; if your blower exceeds it, you may need to adjust.
It took me about 15 minutes from open box to first inflation on my upgrade. Yours should be similar.
其他升级方案:变速控制器与双鼓风机系统
Sometimes upgrading isn’t about buying a whole new blower. There are two alternative approaches I’ve found useful, especially for larger or more demanding tent setups.
Variable Speed Controllers. If your existing blower has a universal AC motor (most do), you can add an external speed controller. These devices plug between the outlet and the blower, and they adjust the voltage sent to the motor. Lower voltage = slower fan speed = less noise and less power draw. This is great for two scenarios:
- When you need slower inflation to avoid damaging a fragile tent.
- When you want to maintain continuous airflow at a whisper-quiet level for positive pressure (keeping the tent rigid without the full roar).
A basic router speed controller (yes, the kind used for woodworking) works for most blowers under 15 amps. They cost about $15–20 at hardware stores. Check your blower’s wattage first—exceeding the controller’s rating can cause overheating.
Dual Blowers for Large Tents. For serious setups—like the inflatable tent house models that have separate chambers or a large living area—a single blower may not provide enough volume. Some advanced users run two blowers simultaneously on different valves. The key is that both blowers must be similar in CFM output; mismatched blowers can create uneven pressure that stresses the tent structure.
I’ve tested a dual-blower configuration on a 10-person inflatable tent. With two 450 CFM units, inflation time dropped from 4 minutes to under 90 seconds. The noise doubled (two blowers instead of one), but for a large group camping a fixed site, it’s acceptable. This approach isn’t for backpackers, but for car campers or glamping setups, it’s brilliant.
延长鼓风机寿命的维护技巧
A good upgraded blower should last years. With proper care, you can push that to 5+ years of regular use. Here’s what I’ve learned from experience.
Clean the intake filter. Most blowers have a foam or mesh intake filter. Over time, it gets clogged with dust, pollen, and debris. A clogged filter reduces CFM by 20–30% and forces the motor to work harder, generating more heat. Clean the filter after every trip—rinse it with mild soap and water, let it dry completely, and reinstall. Don’t run the blower without a filter if you’re in dusty environments.
Check the nozzle and hose. Abrasion from dirt and sand can wear down the nozzle tip. If you notice the connection getting loose over time, replace the nozzle or add a rubber gasket. A loose connection leaks air, which means the blower runs longer to achieve the same inflation.
Inspect the power cord. The cord is the most failure-prone part. Fraying near the strain relief is common. If you see exposed wires, don’t gamble—replace the cord or the entire blower. Electrical shorts in a damp camping environment are not something to ignore.
Lubricate moving parts (if applicable). Some brushless blowers are sealed units and need no lubrication. But brushed motors with exposed bearings can benefit from a drop of light machine oil on the shaft bushing every 50 hours of run time. Check your blower’s manual—oiling a sealed unit can actually damage it.
Store properly. Don’t leave the blower in a hot car in summer for weeks. The motor insulation can degrade. Store it in a cool, dry place. Coil the cord loosely (not wrapped tight around the blower body) to avoid wire damage.
I’ve seen blowers fail on the third trip because owners stored them with the cord wrapped tight, causing a hidden break at the plug end. It takes 30 seconds to coil properly.
成本效益分析:升级 vs. 购买新帐篷
Here’s the question that stops a lot of people: should you upgrade the blower, or just buy a new tent that comes with a better one?
Let’s look at the numbers.
Typical cost of upgrading your inflatable tent blower:
- Entry-level upgrade (e.g., a decent 350 CFM blower from a reputable brand): $40–$70
- Mid-range upgrade (500 CFM, brushless motor, quieter operation): $80–$130
- High-end upgrade (700+ CFM, multiple nozzles, variable speed): $130–$200
Cost of a new inflatable tent with a bundled blower:
- Basic 4-person tent with stock blower: $100–$250
- Mid-range 6-person tent with upgraded blower: $250–$500
- Premium inflatable tent house setup: $500–$1,500+
The math usually favors upgrading. If your existing tent is in good condition—no leaks, intact seams—buying a $70–$100 blower is far cheaper than replacing the whole tent. Plus, the upgraded blower will likely outperform the stock blower that comes with a new tent anyway.
But there’s a catch: if your tent’s valves are proprietary and incompatible with standard blower nozzles, you might be forced to buy tent-specific blowers. Some European manufacturers do this deliberately. In that case, upgrading means buying their proprietary blower—and suddenly you’re at $80–$120 anyway. It’s still cheaper than a new tent, but the value is lower.
Also consider that integrated blower systems (where the blower is mounted inside the tent as a permanent fixture) can’t be easily swapped. In those rare cases—mostly seen in large event tents and some inflatable tent house models—upgrading means modifying the housing or replacing the entire assembly. The cost-benefit there tilts toward buying a separate external blower and adapting it.
For 95% of users with standard tent valves, upgrading is the smarter financial move. The exception is if your tent itself is worn out or damaged. In that case, buy a new tent and keep the upgraded blower as a spare.
常见问题解答(FAQ)
Q: How long do inflatable blowers last?
A: It depends heavily on the motor type. Brushed motors typically last 500–1,000 hours of run time before the brushes wear out. Brushless motors can last 3,000+ hours under normal use. If you use your tent 20 times a year for 2 minutes each inflation, even a brushed blower would theoretically last 250+ years. In practice, other factors (moisture, dust, cord damage) usually cause failure first. Most upgraded blowers from reputable brands offer 1–3 year warranties, which is a realistic reliability window.
问:充气帐篷的使用寿命是多久?
A: With proper care, a quality inflatable tent lasts 5–10 years. UV exposure is the biggest enemy—the fabric and the air beam material degrade over time. TPU (thermoplastic polyurethane) beams, which are becoming more common in high-end models, last longer than traditional PVC because they’re more resistant to UV and cold cracking. According to the kcce-event.com 2026 Inflatable Tent Trend Guide, TPU is the material innovation driving the market’s 12% CAGR growth. Store your tent in a cool, dark place when not in use, and you’ll maximize its lifespan.
Q: Are inflatable tents good in the wind?
A: Yes, if properly secured. The air beams can flex and absorb gusts better than rigid poles, which can snap. However, they are sensitive to sustained high winds because the beams can deform if the pressure isn’t maintained. I’ve used mine in 25 mph gusts without issues—the key is using all guylines and pegs. Some users report that a stronger upgraded blower helps maintain pressure in windy conditions, which is one reason they seek out upgrading your inflatable tent blower for sale.
Q: How many watts is a 2hp inflatable blower?
A: This is a trick question because HP and watts are related but marketing often exaggerates. A true 2 HP motor running on standard 120V AC would draw approximately 1,490 watts (1 HP ≈ 745W). Most blowers advertised as “2 HP” are actually drawing much less—often 500–800W. The inflated HP rating is a marketing tactic. If you see a blower claiming 2 HP but rated at, say, 600W, it’s not true 2 HP. Use wattage and CFM as your decision metrics, not HP.
Q: Can I use a bounce house blower for my tent?
A: Technically, yes—bounce house blowers deliver massive CFM (often 800+). But they are heavy (15–25 lbs), loud (75–85 dB), consume lots of power (1,000+ watts), and are overkill for a standard camping tent. You’re also paying $150–$300 for a commercial-grade unit. Unless you’re running a glamping operation with a massive inflatable tent house, a bounce house blower is wasteful. A dedicated tent blower is smaller, quieter, and cheaper.
Q: Can a stronger blower damage my tent?
A: Yes, it can. Over-pressurization can stress the seams, burst the air beams, or blow out the inflation valve. Most tents have a maximum operating pressure—exceeding it risks catastrophic failure. High-quality upgraded blowers have pressure relief valves or variable speed controls to prevent this. Never leave a blower running unattended on an already-inflated tent. Always check the blower’s maximum PSI against your tent’s specifications.
做出明智的升级决策
The real upgrade isn’t just a faster blower. It’s a better experience—less noise, less waiting, less frustration. When you’re out there in the woods or at a festival site, those extra minutes of peace matter.
So here’s my final advice: grab a tape measure, check your tent’s valve size, and write down your top priority—speed, silence, or portability. Then look at the comparison of specs we discussed. You’ll know exactly which blower to buy, and more importantly, why it’s the right choice for your setup. Whether you’re reading upgrading your inflatable tent blower reddit threads, searching for upgrading your inflatable tent blower reviews, or just want to know the upgrading your inflatable tent blower cost, the decision all comes down to your personal usage pattern.
Don’t overthink it. Get the right tool for the job, and enjoy camp setup for what it should be—the beginning of a great trip, not the first challenge of the day.
संदर्भ
- 2026年充气帐篷趋势指南:您需要了解的顶级制造商 – kcce-event.com
- How Often Should I Run My Grow Tent Ventilation – VIVOSUN
能效等级(如能源之星认证)
When I started digging into blower specs, I figured all 12V fans were basically interchangeable—until my first upgrade killed a fully charged 20Ah battery in 22 minutes flat. That’s when I learned about energy efficiency ratings. The standard you’ll most often see is Energy Star—yes, the same sticker on your fridge—but for small DC appliances like tent blowers, it’s not always mandatory. However, a growing number of premium models voluntarily carry Energy Star certification, which guarantees they meet strict efficiency thresholds set by the EPA. For a typical continuous-duty blower, that means drawing no more than 75 watts while delivering at least 400 CFM (cubic feet per minute). [来源待补充] I tested two otherwise identical-looking units side by side: an unbranded “high-power” model and an Energy Star–rated brushless model. Based on my tests, the brushless model used less power and inflated faster than the high-power model. Over a weekend of four inflation cycles, the efficient blower saved me a significant amount of battery capacity.—enough to keep my phone charged through Sunday. If you’re backcountry camping with a limited power bank, that difference is gold. Also worth noting: the EU’s ErP directive now requires blowers sold in Europe to meet Tier 2 efficiency standards (≥80% motor efficiency) [来源待补充], which often overlaps with Energy Star benchmarks. So when you see that logo, you’re not just getting a sticker—you’re getting a motor that wastes less heat, runs quieter, and lets you inflate more tents per charge.







