Imagine planning that perfect outdoor adventure, only to discover your inflatable tent has a leak or a torn seam. Talk about frustrating! This is a common headache for many outdoor enthusiasts. Fortunately, understanding how to maintain and repair inflatable tents can save both your adventure and some cash. Let’s dive into some practical tips and tricks to keep your tent in great shape. Whether you’re dealing with minor wear or something more serious, you’ll gain the confidence to tackle repairs yourself—making sure your tent stays a reliable companion for all your camping escapes.
Inflatable Tent Maintenance and Repair: These are some of the problems we often encounter in our communication with customers. We summarize it and hope to help you in your daily use.
Understanding Inflatable Tent Design and Common Issues
So, what’s the deal with inflatable tents? As you might guess, these tents use air-filled segments for their structure instead of the traditional poles. This unique design is all about lightweight portability and ease of setup, which is why they’ve become such a hit for outdoor events. But, just like anything else, they come with their set of challenges. For example, air leaks or punctures can happen, often caused by sharp objects or even just the wear and tear of regular use.
One common problem you might run into is a malfunctioning air valve, which can slow down deflation. If you’ve ever spent extra time at a campsite trying to pack up a droopy tent, you know how vital this issue can be. Plus, seams and fabric can break down over time, especially when exposed to harsh sunlight or improper storage.
Here’s a quick rundown of potential problems you might face with your inflatable tent:
- Leaks and punctures: Often due to sharp objects or mishandling.
- Valve issues: A faulty valve can cause rapid deflation.
- Fabric wear and mildew: Weather exposure can compromise the fabric’s integrity.
- Seam separation: High-stress areas might lead to seams pulling apart.
If you’ve encountered any of these issues, don’t worry; there are solutions available—and many of them are within your reach with a bit of know-how.
Regular Maintenance for Longevity
Regular maintenance is key to prolonging your inflatable tent’s life. Honestly, I can’t emphasize enough how routine checks can help you avoid major repairs down the road. Experts usually recommend giving your tent a thorough inspection at least once a month during camping season.
Here’s a quick maintenance checklist to keep in mind:
- Air Valve Check: Make sure the air valves are working properly and sealed up tight.
- Visual Fabric Inspection: Look for any signs of wear like frays, holes, or discoloration.
- Seam Inspection: Keep an eye out for any seams that might be coming apart.
- Wildlife Check: Check for any critters cozying up in your tent.
- Storage Conditions: When it’s time to pack it away, store your tent in a dry and dark spot to avoid mildew.
I remember one camping trip where I ignored a small puncture. It seemed minor back then, but it turned into a deflated mess before morning! A little vigilance goes a long way—staying on top of maintenance can help you avoid such headaches.
How to Identify and Fix Common Leaks
Finding leaks in your inflatable tent can feel like a quest for buried treasure. From what I’ve seen, the best way to track down leaks is to combine visual inspections with some simple tests. First off, take a good look at all the seams and fabric for any cracks or holes. If your tent has spent a lot of time in the sun, that’s even more crucial, as UV exposure can create tiny fissures that develop into bigger issues.
To pinpoint leaks, the soapy water method is a tried-and-true technique. Just mix soap with some water and apply it to the suspected leak areas with a sponge. If you see bubbles start to form, bingo—you’ve found the leak!
For fixing minor leaks, you’ll need:
- A patch kit (most sporting goods stores carry these)
- Scissors
- A clean cloth
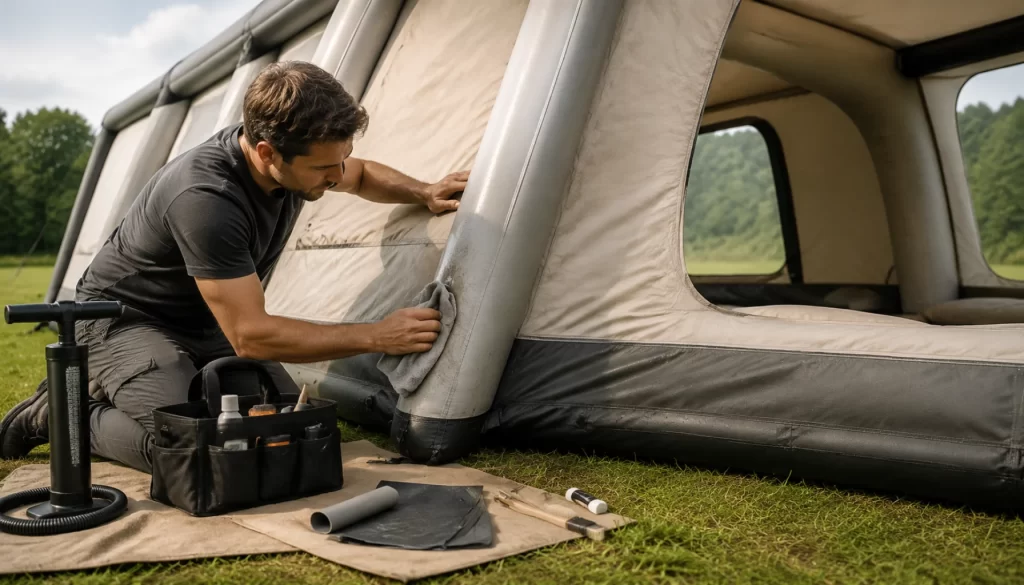
Here’s how the repair process goes:
- Clean the Area: Make sure the area around the leak is free of dirt and moisture.
- Cut a Patch: Use your kit to cut a patch that’s larger than the leak—about an inch all around should do.
- Apply Adhesive: If your patch kit calls for adhesive, follow the instructions on that.
- Press the Patch: Firmly press the patch over the leak to seal it up.
- Let it Cure: Allow the patch to dry completely before reinflating the tent.
This DIY inflatable tent maintenance and repair method is fairly straightforward. With a little elbow grease, you can significantly extend your tent’s lifespan.
Repair Kits and Tools You Need
Having the right tools handy for inflatable tent maintenance and repairs can really make a difference. There are plenty of kits available out there, but honestly, not all of them are great.
Here’s a list of handy inflatable tent maintenance and repair tools I’ve found especially useful:
- ערכות תיקון: Try to find kits with patches made from the same material as your tent. Some even include adhesive to make repairs easier.
- Pliers: Handy for making sure valves are securely tightened.
- Vinyl Sealant: This can help seal up those sneaky tiny leaks that aren’t easy to spot.
- Air Pump: A high-quality pump with pressure regulation will help keep your tent properly inflated.
- Cleaning Supplies: Mild detergent and water for regular cleaning sessions.
When picking out your repair kit, take a moment to read through reviews and consider what fits your specific needs. Personally, I’ve had great luck with one brand that comes with all the essentials neatly packed up—perfect for camping trips.
Professional Repair Services: When to Call for Help
Sometimes, despite our best intentions, a repair can go beyond DIY capabilities. So, when’s the right time to call for professional help?
If you’re dealing with extensive damage—like large seams separating or multiple leaks—it might be time to reach out for specialized repair services. From what I’ve experienced, having a pro take a look can save you time and prevent further damage down the road.
When scouting for a repair service, consider:
- Reputation and Reviews: Check out what others are saying online. Community forums can also be gold mines for personal recommendations.
- Location: You might be wondering, is there an inflatable tent maintenance and repair service nearby? Availability can really matter, especially when you’re in a pinch.
- Cost Estimates: Request quotes upfront to avoid any unwelcome surprises.
Keep in mind, while DIY repairs are cost-effective, sometimes the peace of mind that comes from professional expertise is absolutely worth the investment.
Cost Estimates for Repairs
The cost of repairing your inflatable tent can vary quite a bit depending on the damage and your location. To give you a rough idea, fixing minor repairs like patching small holes can cost around $20 to $50, whereas professional services could run you anywhere from $75 to $150 for bigger problems.
Here’s a quick look at potential repair costs:
- DIY Patch Kits: $10 – $30
- Professional Patch Services: $50 – $100
- Seam Repair: $75 – $150
- Full Tent Restoration: $150 – $300
As you budget for repairs, don’t forget to consider the potential cost of new equipment if you frequently run into issues. Sometimes, putting money into a higher-quality tent at the beginning can save you a lot more in the long run.
As you gear up for your next outdoor adventure, keep in mind that a little regular maintenance can really boost the longevity of your inflatable tent. Have you thought about how often you check for leaks or wear and tear? Taking these proactive steps not only makes for a better camping experience but can also save you a pretty penny. And if you stumble upon repairs that are beyond your skills, don’t hesitate to reach out for professional help. Your adventures deserve top-notch gear—let’s ensure your inflatable tent is up for the challenge!
Frequently Asked Questions
Q: How can I repair a punctured inflatable tent?
A: To repair a punctured tent, first locate the hole using soapy water. Clean the area, cut a patch from a repair kit, apply adhesive if necessary, and press the patch over the puncture. Make sure to let it cure before reinflating.
Q: What are the best inflatable tent maintenance and repair techniques?
A: Regularly inspect your tent for wear, clean it after each use, and store it in a dry, dark place. Use a soapy water mix to check for leaks and attend to any damage promptly to maintain the tent’s integrity.
Q: Where can I find inflatable tent maintenance and repair near me?
A: You can usually find local repair services through online searches or by checking with local outdoor equipment retailers who may offer repair services or recommendations.
Q: How often should I perform maintenance on my inflatable tent?
A: Ideally, conduct maintenance checks monthly during the camping season. Plus, make sure to inspect it after every trip to catch issues before they escalate.
Q: What tools do I need for DIY inflatable tent maintenance and repair?
A: Essential tools include a patch kit, scissors, a clean cloth, pliers, vinyl sealant, and a decent air pump. These tools will help tackle most common repairs.
Q: When should I consider hiring a professional for inflatable tent repairs?
A: If you have extensive damage, such as multiple leaks or significant seam separations, it’s best to consult a professional. Their expertise can save you time and ensure everything is fixed correctly.